
Intro
Amorphic Dataset portal helps you create unstructured, semi-structured and structured Datasets. These Datasets can be used as a single source of truth across the different departments of an organization. Amorphic Datasets helps in providing complete data lake visibility of data.

Datasets with same name can now be created throughout the application i.e., More than one dataset can have the same name throughout the application but should be unique under a specified Domain. DomainName will now be visible along with DatasetName throughout the Amorphic application.
Amorphic dataset provides capability to search with a Google-like search index through the Dataset Metadata.
Amorphic Dataset page consists of options to List or Create a new Dataset. Datasets are available to select in the Amorphic Dataset for listing purpose. You can sort through the Dataset using the Domain filters, Create new Datasets or View Dataset details.
Create New Dataset
You can create new Datasets in Amorphic by using the “Create Dataset” functionality of Amorphic application.

In order to create a new Dataset, you would require information like Domain, Connection type and File Type etc. Following are the main information required to create a new dataset.
The Amorphic dataset has a hierarchical structure such that Files are associated with Datasets which are associated with a domain. Hence to create a Dataset, you need to first create a Domain using Amorphic Administration. Then create a Dataset and upload new structured, semi-structured or unstructured files to the Dataset and upload the respective files.
Dataset Name: Name of the dataset. Dataset name must be 3-70 (64 only if DWH is AuroraMySQL) alphanumeric, _ characters only. Dataset name must be unique under a given Domain.
Description: Description of the dataset. Please describe your dataset in as much detail as possible. The full text of this field is searchable within the application.
Domain Name: Domain groups the related datasets to keep them organized. This will be used as the 'database' in Glue/Athena and schema in Redshift.
Data Classifications: To classify the dataset with different categories to protect the data more efficiently. For ex: PCI, PII etc.
Keywords: Keywords for the dataset. Keywords are indexed and searchable within the application. Please choose keywords which are meaningful to you and others. You can use these to flag related datasets with the same keywords so that you can easily find them later.
Connection Type: Currently amorphic supports below connection types.
- API (default) : Default connection type which can be used for manual upload of files to the dataset. Please check the documentation on Dataset files for manual upload of files to the dataset.
- JDBC : For ingesting the data from a JDBC connection (as source) to the Amorphic dataset. Requires a schedule for data ingestion.
- S3 : For ingesting the data from a S3 connection (as source) to the Amorphic dataset. Requires a schedule for data ingestion.
- External File System : For ingesting the data from an external file system (as source) to the Amorphic dataset.
- External API : For ingesting the data from an external API (as source) to the Amorphic dataset. Requires a schedule for data ingestion.
File Type: The file type should be in sync with the ML Model supported file format option. Apart from the various supported formats, you can also perform metadata extraction from the unstructured dataset using auto ML functionalities which are integrated with AWS Transcribe and Comprehend services in the back end.
Target Location: Currently amorphic supports below target locations.
- S3 : Files uploaded to the dataset (either manual or through ingestion) will be stored in the S3 location.
- Auroramysql : Files uploaded to the dataset (either manual or through ingestion) will be either stored in the auroramysql database. Either Auroramysql or Redshift will be displayed based on the database selection during deployment.
- Redshift : Files uploaded to the dataset (either manual or through ingestion) will be either stored in the redshift datawarehouse. Either Auroramysql or Redshift will be displayed based on the database selection during deployment.
- S3-Athena : We can store structured data i.e csv/tsv/xlsx in Athena with all connection types available in amorphic. Please refer to Athena Datasets for more detail.
- Lakeformation : Lakeformation datasets are an extension to S3-Athena type datasets. It provides a similar functionality as S3-Athena datasets with an additional support to fine grained access control on the dataset columns. Please refer to Lakeformation Datasets for more detail.
NoteIf the target location is Datawarehouse (auroramysql/redshift/S3-Athena) then the user should upload a file for schema inference and publish the schema.
Update Method: Currently amorphic supports below three update methods.
Update : With this update method data will be appended to the existing data.
Latest Record : With this update method one can query the latest data based on the Record Keys and Latest Record Indicator defined during the schema extraction process.
Reload : With this update method data will be reloaded to the dataset. Below are two options which are exclusive for Reload type of dataset.
Target Table Prep Mode
- Recreate : Dataset will be dropped and recreated when this option is selected.
- Truncate : Just the data is deleted in the dataset without deleting the table.
Skip Trash (Optional) : When Skip Trash is True old data is not moved to Trash bucket during the data reload process, default is true when not provided.
Based on the above reload settings, data reload process times can vary.
Skip LZ (Validation) Process: This functionality deals with Dataset file upload. If the Skip LZ is True then it'll skip the whole validation (LZ) process and file gets directly uploaded to DLZ bucket. This will avoid unnecessary s3 copies and validations. It'll auto-disable MalwareDetection and IsDataValidationEnabled (for S3Athena and Lake formation datasets) functionality. It is applicable to only append and update type of datasets. If it is False, it'll follow the LZ process with validations.
NoteAs of Amorphic 1.14, This is applicable to dataset file upload process through Amorphic UI (Manual file upload), ETL (file write) process Streams and Appflow. Not Applicable to other file upload scenarios like Ingestion and Bulkloadv2. This SkipLZ feature will be implemented eventually for other scenarios in the upcoming releases.
Enable Malware Detection: Whether to enable or disable the malware detection on the dataset.
Unscannable Files Action: Action to be performed when found malware in the file uploaded to the dataset whether to quarantine or pass-through the file.
Enable Data Profiling: Whether to enable or disable the data profiling. Only applicable for datasets targeted to S3Athena or DataWarehouse (Redshift or AuroraMySQL).
Enable AI Services: Whether to enable or disable the AI services. Only applicable for datasets targeted to S3.
Enable Data Cleanup: Whether to enable or disable dataset auto clean up. This option enables data deletion to save storage costs based on the clean up duration value inputted by the user. All the files which are past the expiration date i.e the clean up duration will be removed permanently and the action cannot be undone. The expired dataset files are identified based on the upload date instead of the upload time. Example: If a file is uploaded on Aug 21, 4:55 PM and the data clean up duration is set to 2 days. The clean up happens on Aug 23, 12:00 AM instead of Aug 23, 4:55 PM.
Enable AI Results Translation: Whether to enable or disable dataset AI results translation to English. When the user enable AI services for the dataset, Amorphic automatically runs machine learning algorithms to run text analytics on top of any text data (File Type being PDF or TXT) that was uploaded to the dataset. This option allows the user to enable or disable the auto translating of those AI results to english for the user to read or search in various interfaces of Amorphic. Example: If a user uploaded an Arabic PDF document, Amorphic identifies the dominant language, runs automatic ML algorithms to identify key phrases, entities and sentitment analysis etc on top of the data which was uploaded. This flag on selecting No, allows the user to preserve the native language in this case Arabic and stores the AI results in the same language so that the user can query the results in the native language which the document was written. By Default all the AI results would be translated to English unless the user specifies not to.
Enable Life Cycle Policy: Whether to enable or disable the lifecycle policy management. Only applicable for datasets targeted to S3, S3-Athena & LakeFormation.
Enable Data Metrics Collection(API Only): Whether to enable or disable the metrics collection of given dataset. It is currently supported only for datasets with TableUpdate as update/append type irrespective of its TargetLocation. Metrics(FileCount, TotalFileSize, AvgFileSize) of dataset is collected every hour once this flag is enabled. The collected metrics helps to display required data in Insights page. Collected metrics will be expired after one year automatically from the time at which metrics was collected. User can now also manually trigger an api to synchronize metrics of dataset up to past year. Synchronization of metrics happens based on LastModifiedTime of files currently present in dataset. User will be notified via email once the synchronization of metrics is completed(success or failure).
API Request Payload Details
To create a dataset along with enabling/disabling dataset metrics collection
/datasets & POST method
Request payload to create dataset with dataset metrics collection{
(Include all attributes required for creating dataset)
(Include attributes specified below in second point)
}To update dataset metrics collection flag
/datasets/{id}/updatemetadata & PUT method
Request payload to update dataset metrics collection flag{
"DataMetricsCollectionOptions": {
"IsMetricsCollectionEnabled": <Boolean> (true|false)
}
}To synchronize dataset metrics up to past year, i.e., last 8760 hours
/metrics/datasets/{id} & PUT method
Request Body Not RequiredTo fetch dataset metrics up to given duration in hours
/metrics/datasets/{id}?duration={hours} & GET method
Request Body Not Required
Notewhile reading PDF documents, Amorphic currently supports only two languages for character recognition specifically English and Arabic. Support for other languages will be added incrementally.
Notification settings has been moved to Settings page and using that user can choose the type of notification setting for the Datasets. Please check the documentation on Notification settings
For a Multi tenancy deployment, data uploaded to the Dataset is stored in their respective tenant database. Example: If a User creates a dataset under a domain "testorg-finance", all the data uploaded to the tenant database "testorg". User can connect to "testorg" using any third party connector to view their tables.
User can also create the Dataset by using the "Navigator" which would direct the user to Data Creation page from any where in the application. To get the option displayed, the user need to either click the 'App Navigator' icon on the top right side of the page or double tap on "Ctrl" button in the keyboard.
Below is a simple graphic to demonstrate App Navigator.

Schema
Amorphic Dataset registration feature, helps user to extract and register schema of the uploaded file, when user chooses Datawarehouse (auroramysql or redshift) as target location.

Schema Definition
When user registers a dataset with Datawarehouse as target location, user is directed to "Define Schema" where user can upload a same schema file or upload a JSON file with schema definition or manually enter schema fields.

Schema Publishing
When user registers a dataset with Datawarehouse (auroramysql or redshift) as target location and "My data files have headers" as "Yes", user is directed to "Publish Schema" where inferred schema will be displayed.
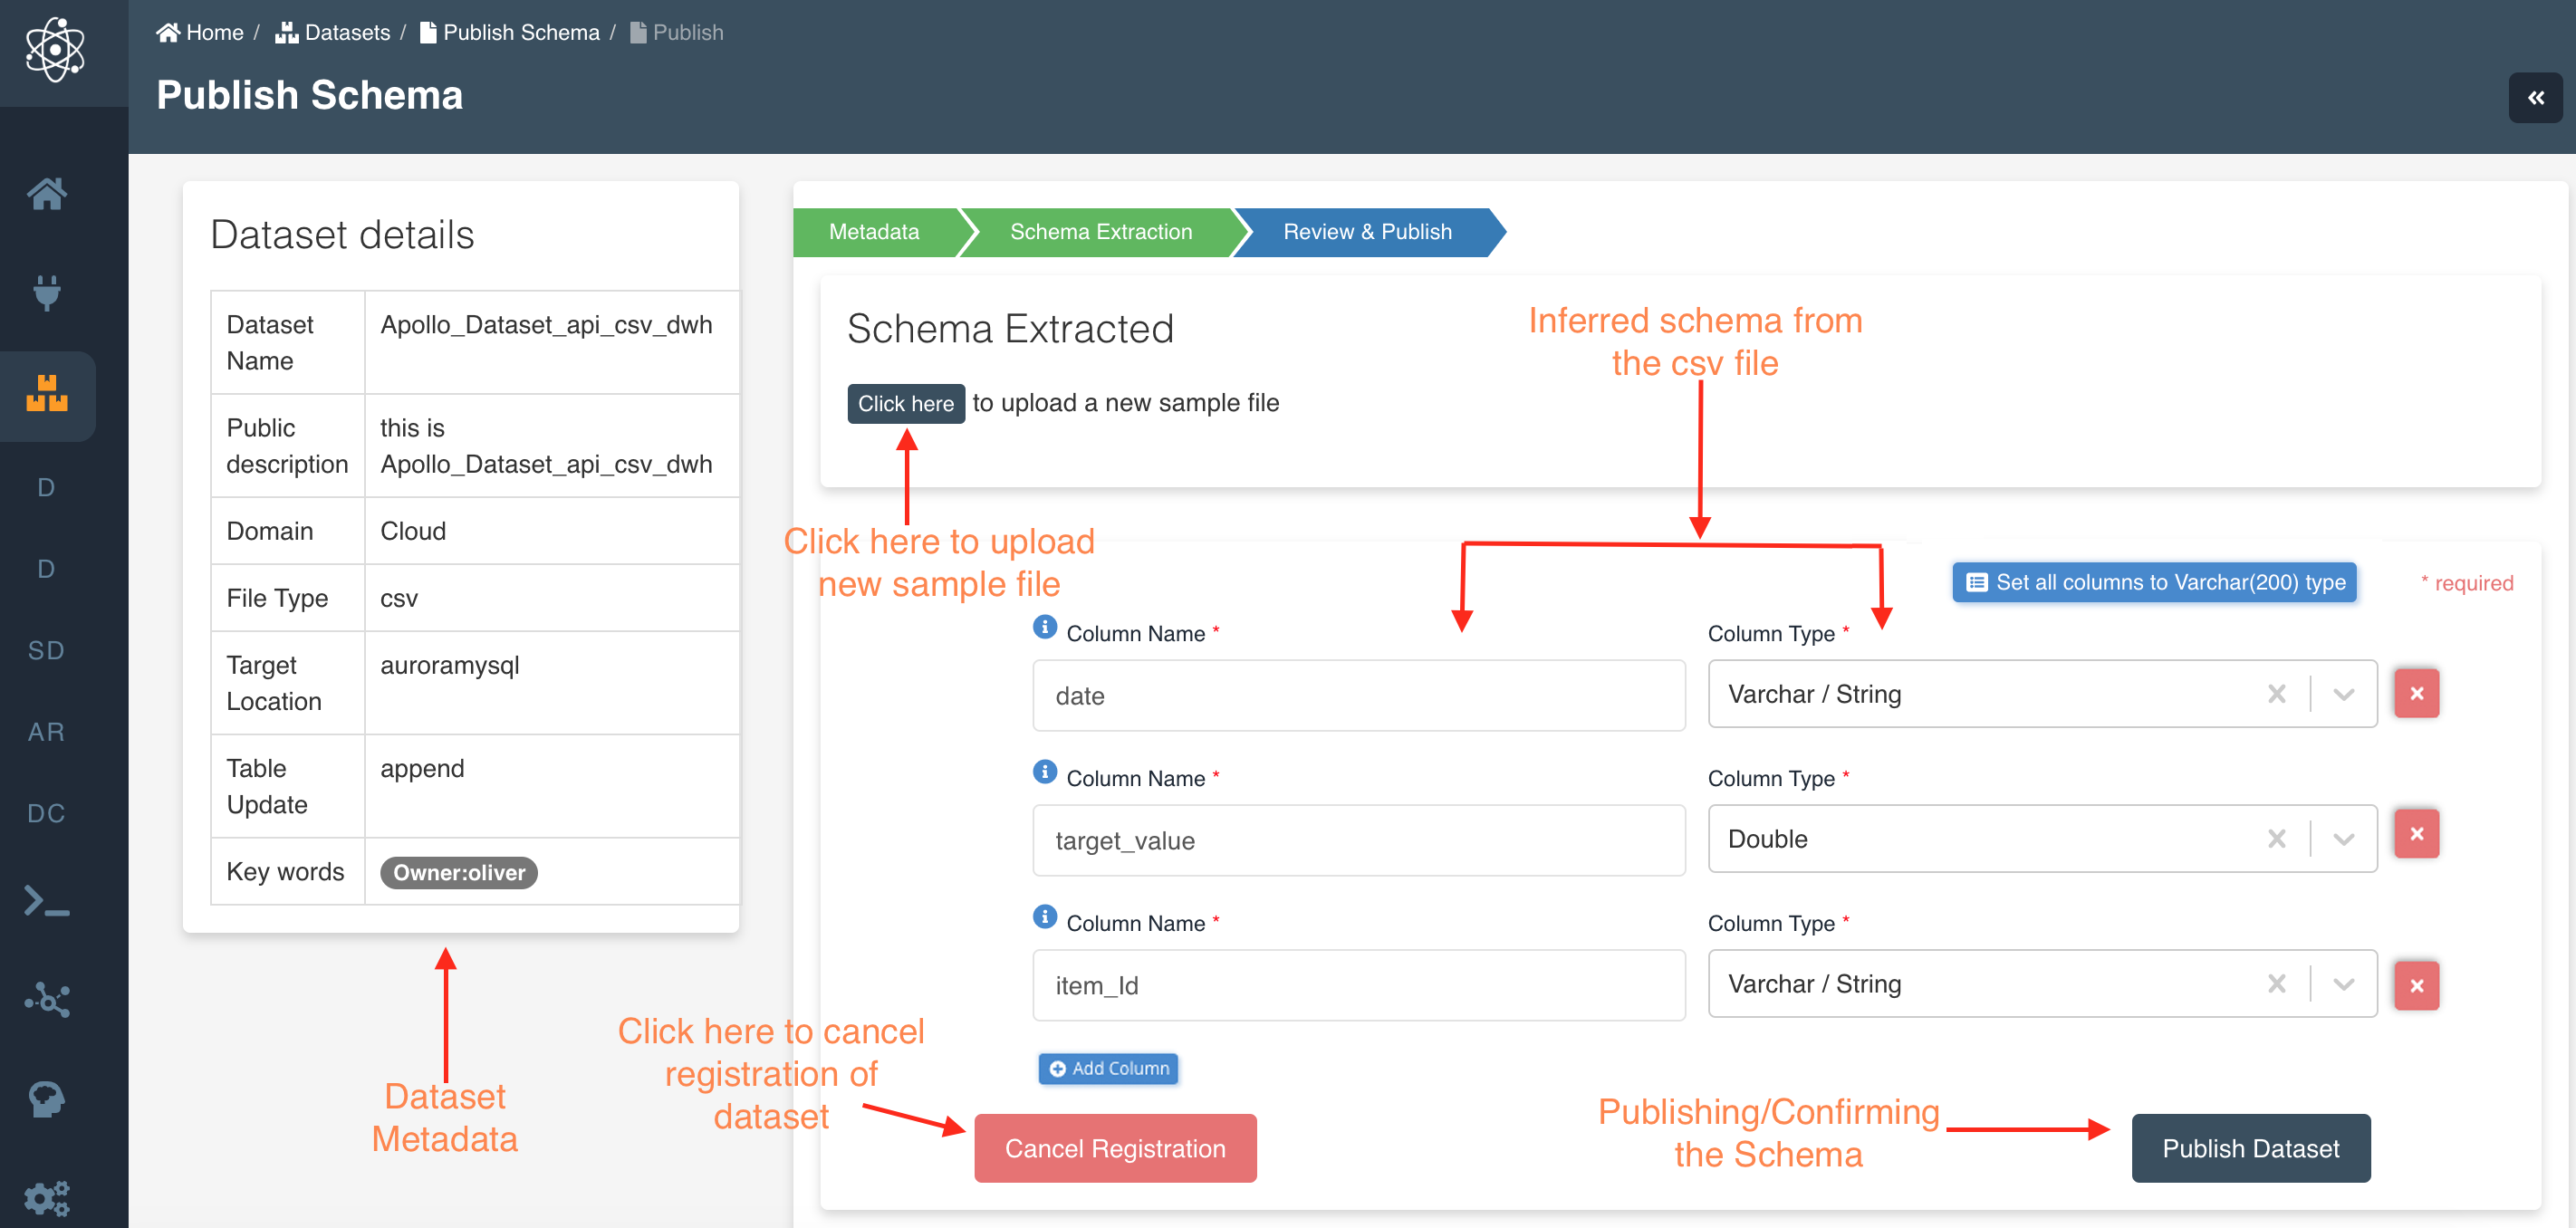
User has an option to add/remove new fields or edit "Column Name" and "Column Type" in the Schema Extraction page
User can also change the data type of all the columns to varchar using the 'Set all columns to varchar type' button.
Below are the data types supported for Redshift targeted dataset:
INTEGER, SMALLINT, BIGINT, REAL, DOUBLE PRECISION, DECIMAL (Precision: 38), VARCHAR (Precision: 65535), CHAR (Precision: 4096), DATE, TIMESTAMP, TIMESTAMPTZ, TIME, TIMETZ, BOOLEAN
Below are the data types supported for AuroraMySQL targeted dataset:
VARCHAR (Precision: 65535), CHAR (Precision: 255), DATE, TIME, DATETIME, TIMESTAMP, TIMESTAMPTZ, YEAR, INT, TINYINT, SMALLINT, MEDIUMINT, BIGINT, DECIMAL (Precision: 65), NUMERIC, FLOAT, REAL, DOUBLE PRECISION, BIT, BOOLEAN, LONGTEXT, TINYTEXT, TEXT, MEDIUMTEXT, BINARY, VARBINARY, BLOB, TINYBLOB, MEDIUMBLOB, LONGBLOB, LONG, NVARCHAR (Precision: 65535), ENUM, POINT, LINESTRING, POLYGON
Column names must be 1-64 (common limit) alphanumeric characters, _ is allowed and must start with an alphabetic character only.
Redshift: The maximum length for the column name is 127 bytes; longer names are truncated to 127 bytes. You can use UTF-8 multibyte characters up to a maximum of four bytes. Maximum of 1600 columns can be defined in a single table.
AuroraMySQL: The maximum length for the column name is 64 characters. Maximum of 1017 columns can be defined in a single table.
Athena: The maximum length for the column name is 255 characters.
User can also custom partition the data. Please check the documentation on Dataset Custom Partitioning.
View Dataset
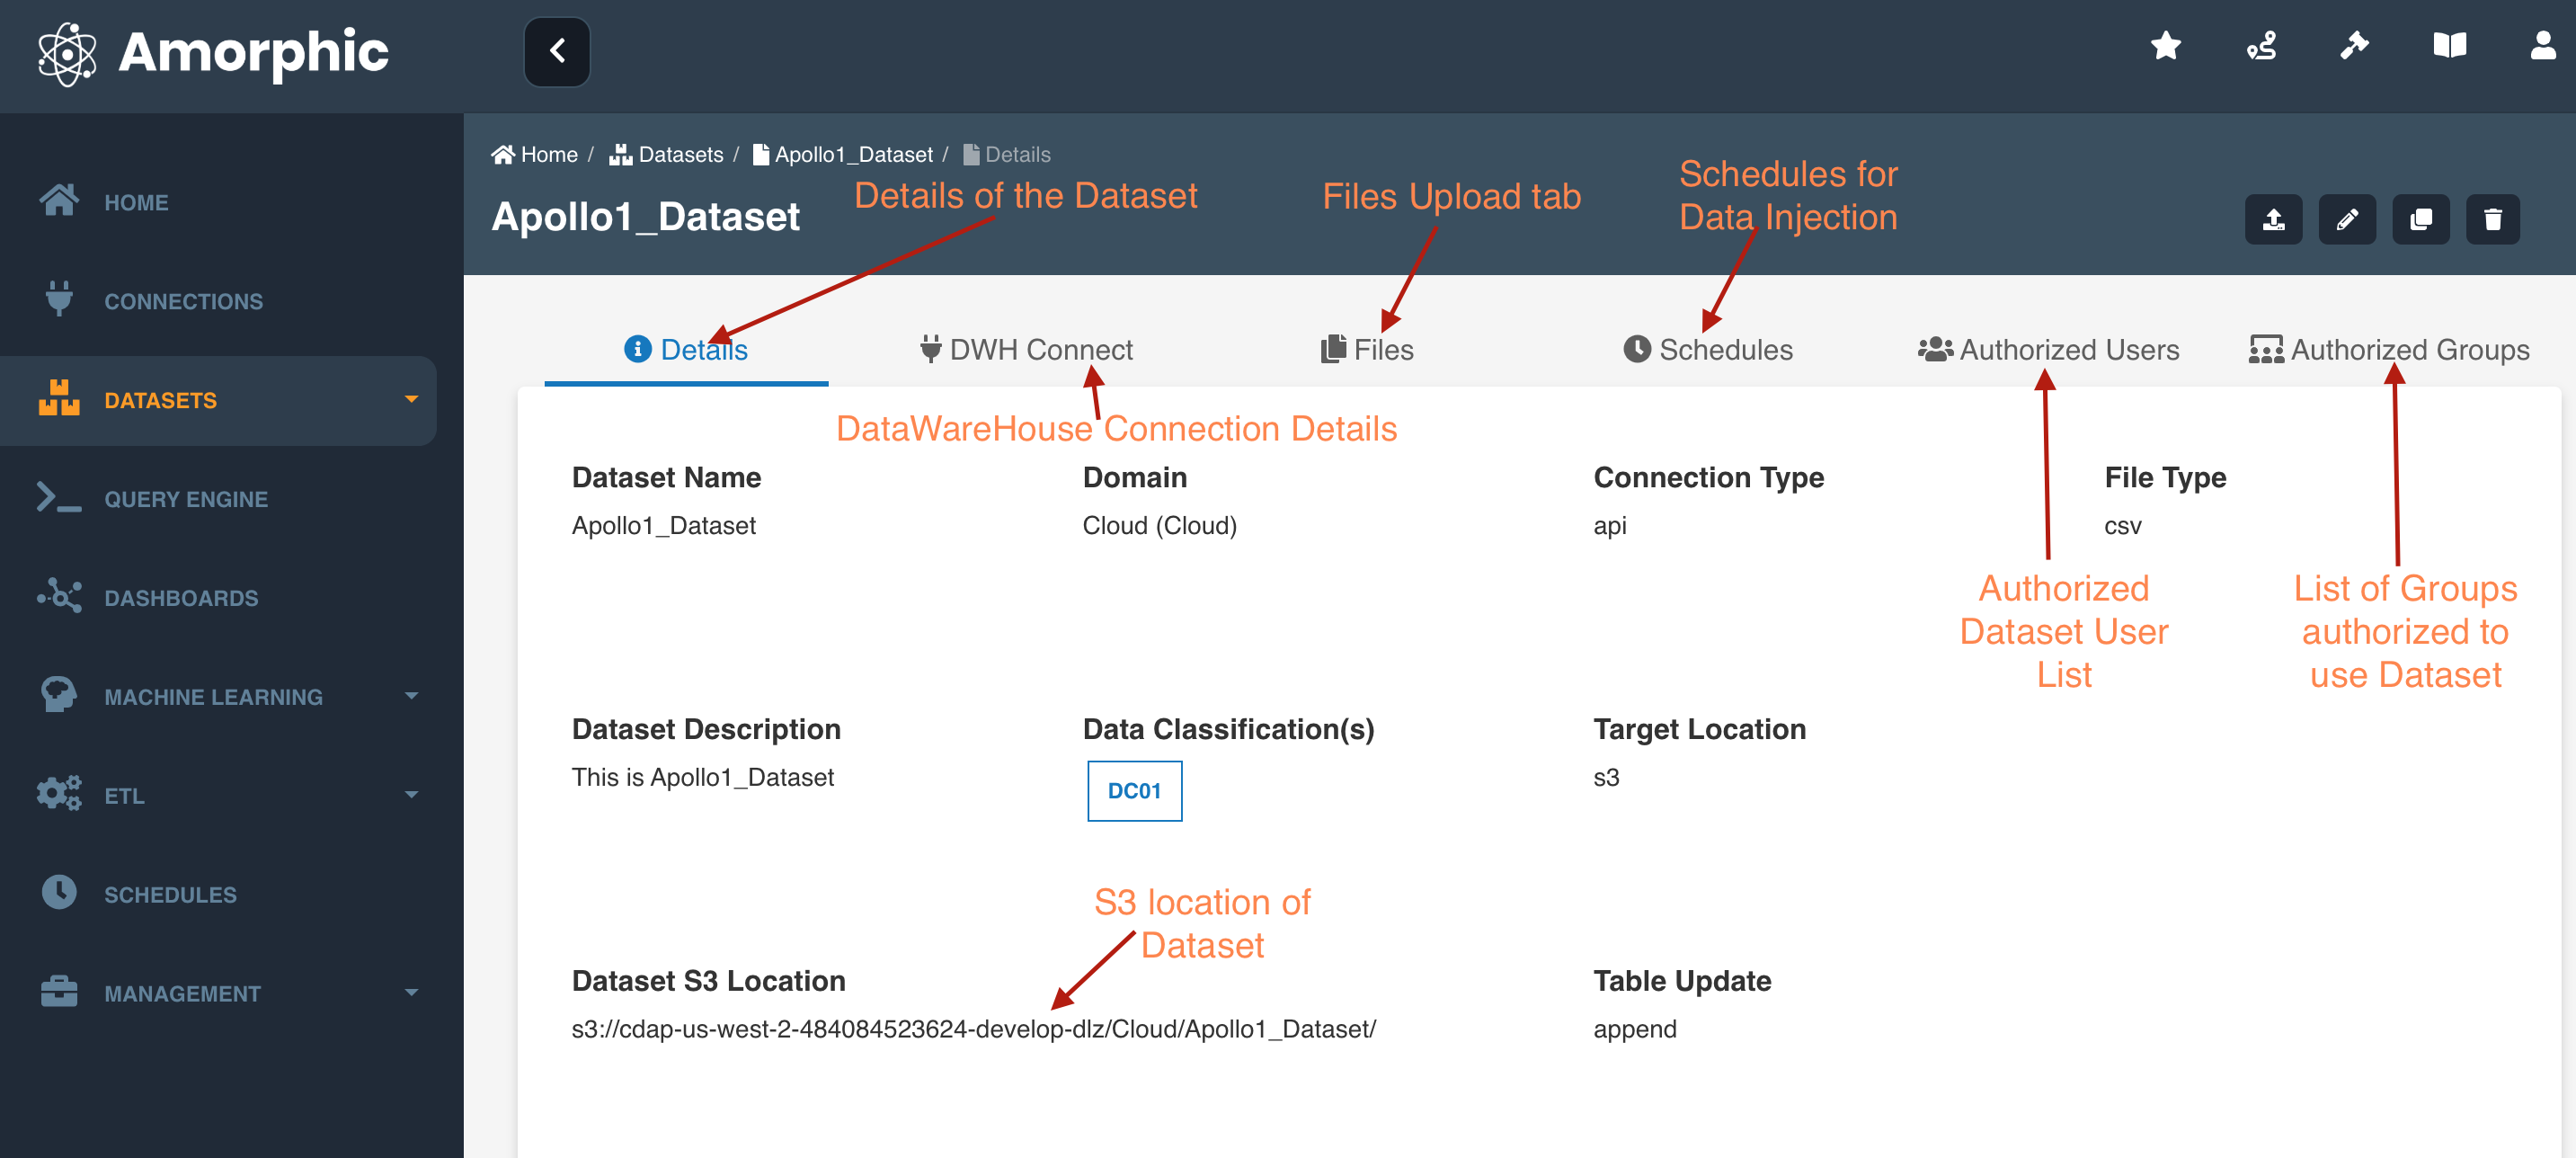
Upon clicking on View Details under a dataset, the user will be able to see all the following details of the dataset:
- Details
- Profile
- Files
- Resources
- Authorized Users
- Authorized Groups
Details
Details tab would have the dataset information like Dataset Name, Dataset S3 Location, Target Location, Domain, Connection Type, File Type etc.
Along with the user input Dataset Details like Dataset Name, Domain, Connection Type, File Type etc, the details page would have.

- Dataset Status: Status will be 'active' if the dataset is in normal state. If the dataset is under data reload process then the status will be 'reloading'. If the user initiated the truncate dataset then the status will be 'truncating'.
- Dataset S3 Location: The AWS S3 folder location of the Dataset
- Dataset AI/ML Results: Advanced Analytics Summary of the Dataset
- Created By: User Name if the user who created the dataset and the Creation Date-Time of the dataset
- Last Modified By: User Name if the user who last modified the metadata of the dataset and the Date-Time when the metadata of the dataset was last modified.
Profile
Profile tab would have JDBC connection, Host and ODBC connection information. This is useful to establish a connection between different data sources to amorphic platform.
In case of Redshift datawarehouse, When user is connected to the JDBC connection through a data source or a BI tool, all the tables (only schema not actual data) in the specific database will be displayed along with the user-owned tables (datasets). This is how amorphic works.
User can view the schema of the dataset if it is registered with target location as Datawarehouse (auroramysql or redshift). User can also download the dataset schema as JSON file using the 'Download' button on the right side in the 'Profile' tab.
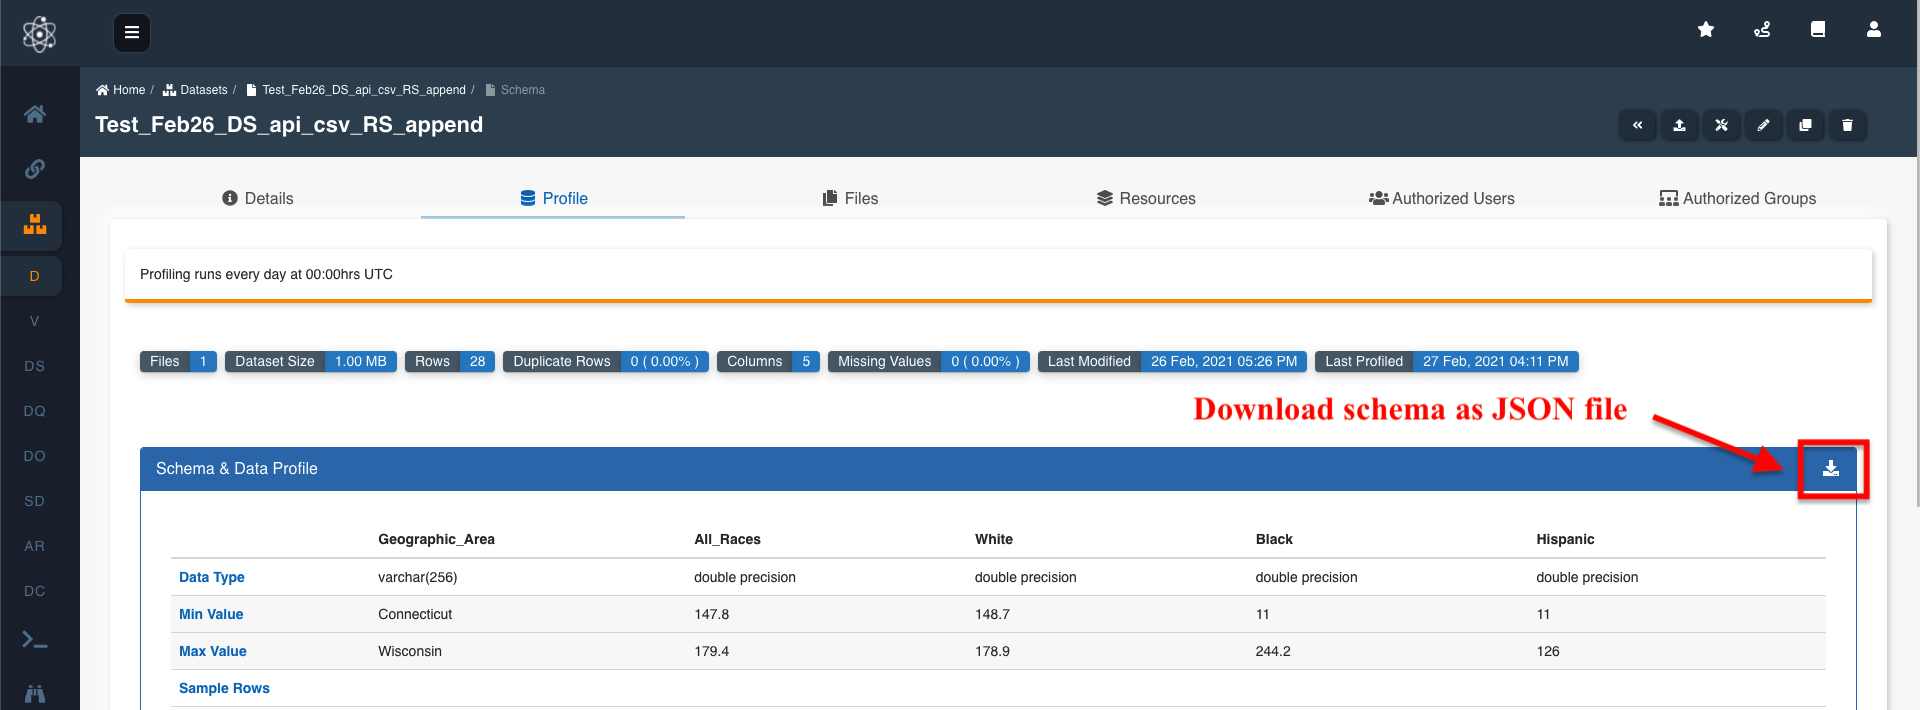
If data profiling is enabled for the dataset then data profiling details will also be displayed in the Profile tab. Please check the documentation on Data Profiling
Files
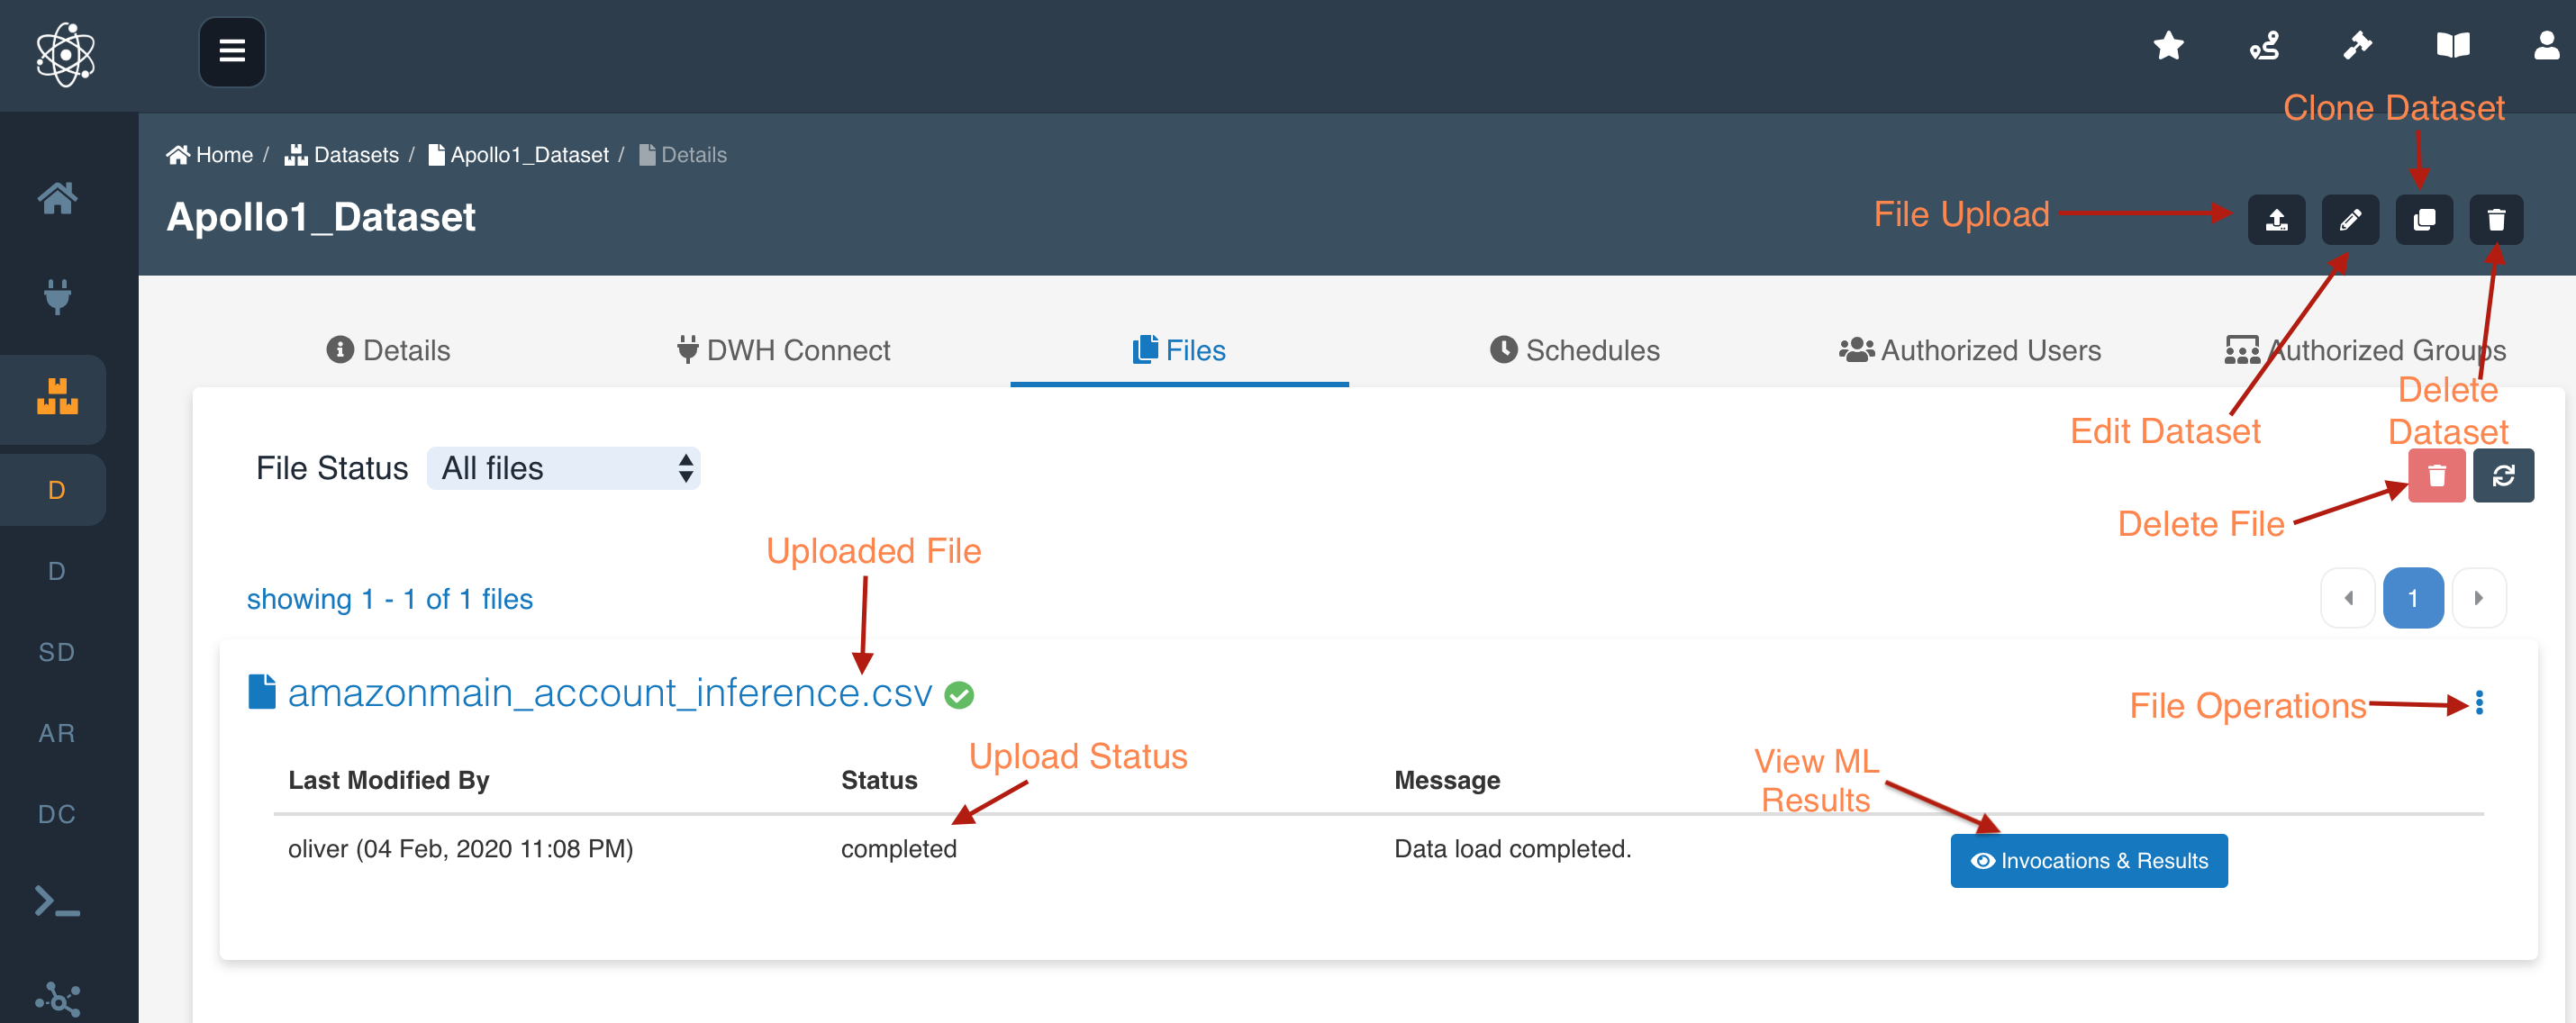
User can upload the files manually to the dataset ONLY if the connection type is API (default).
In the files tab, the user can upload files in the dataset, delete files, perform operations such as download, apply ML and view AI/ML Results. Please check the documentation on Dataset files
Invocations & Results
User can see the ML results, after applying ML model on the file, by clicking on "Invocations and Results" button next to the file. These invocation results refer to outputs after Applying ML Model on the dataset, be it structured or unstructured.
Below is a picture showing how the invocation results are displayed. The history of invocations on a file are be displayed in this view.
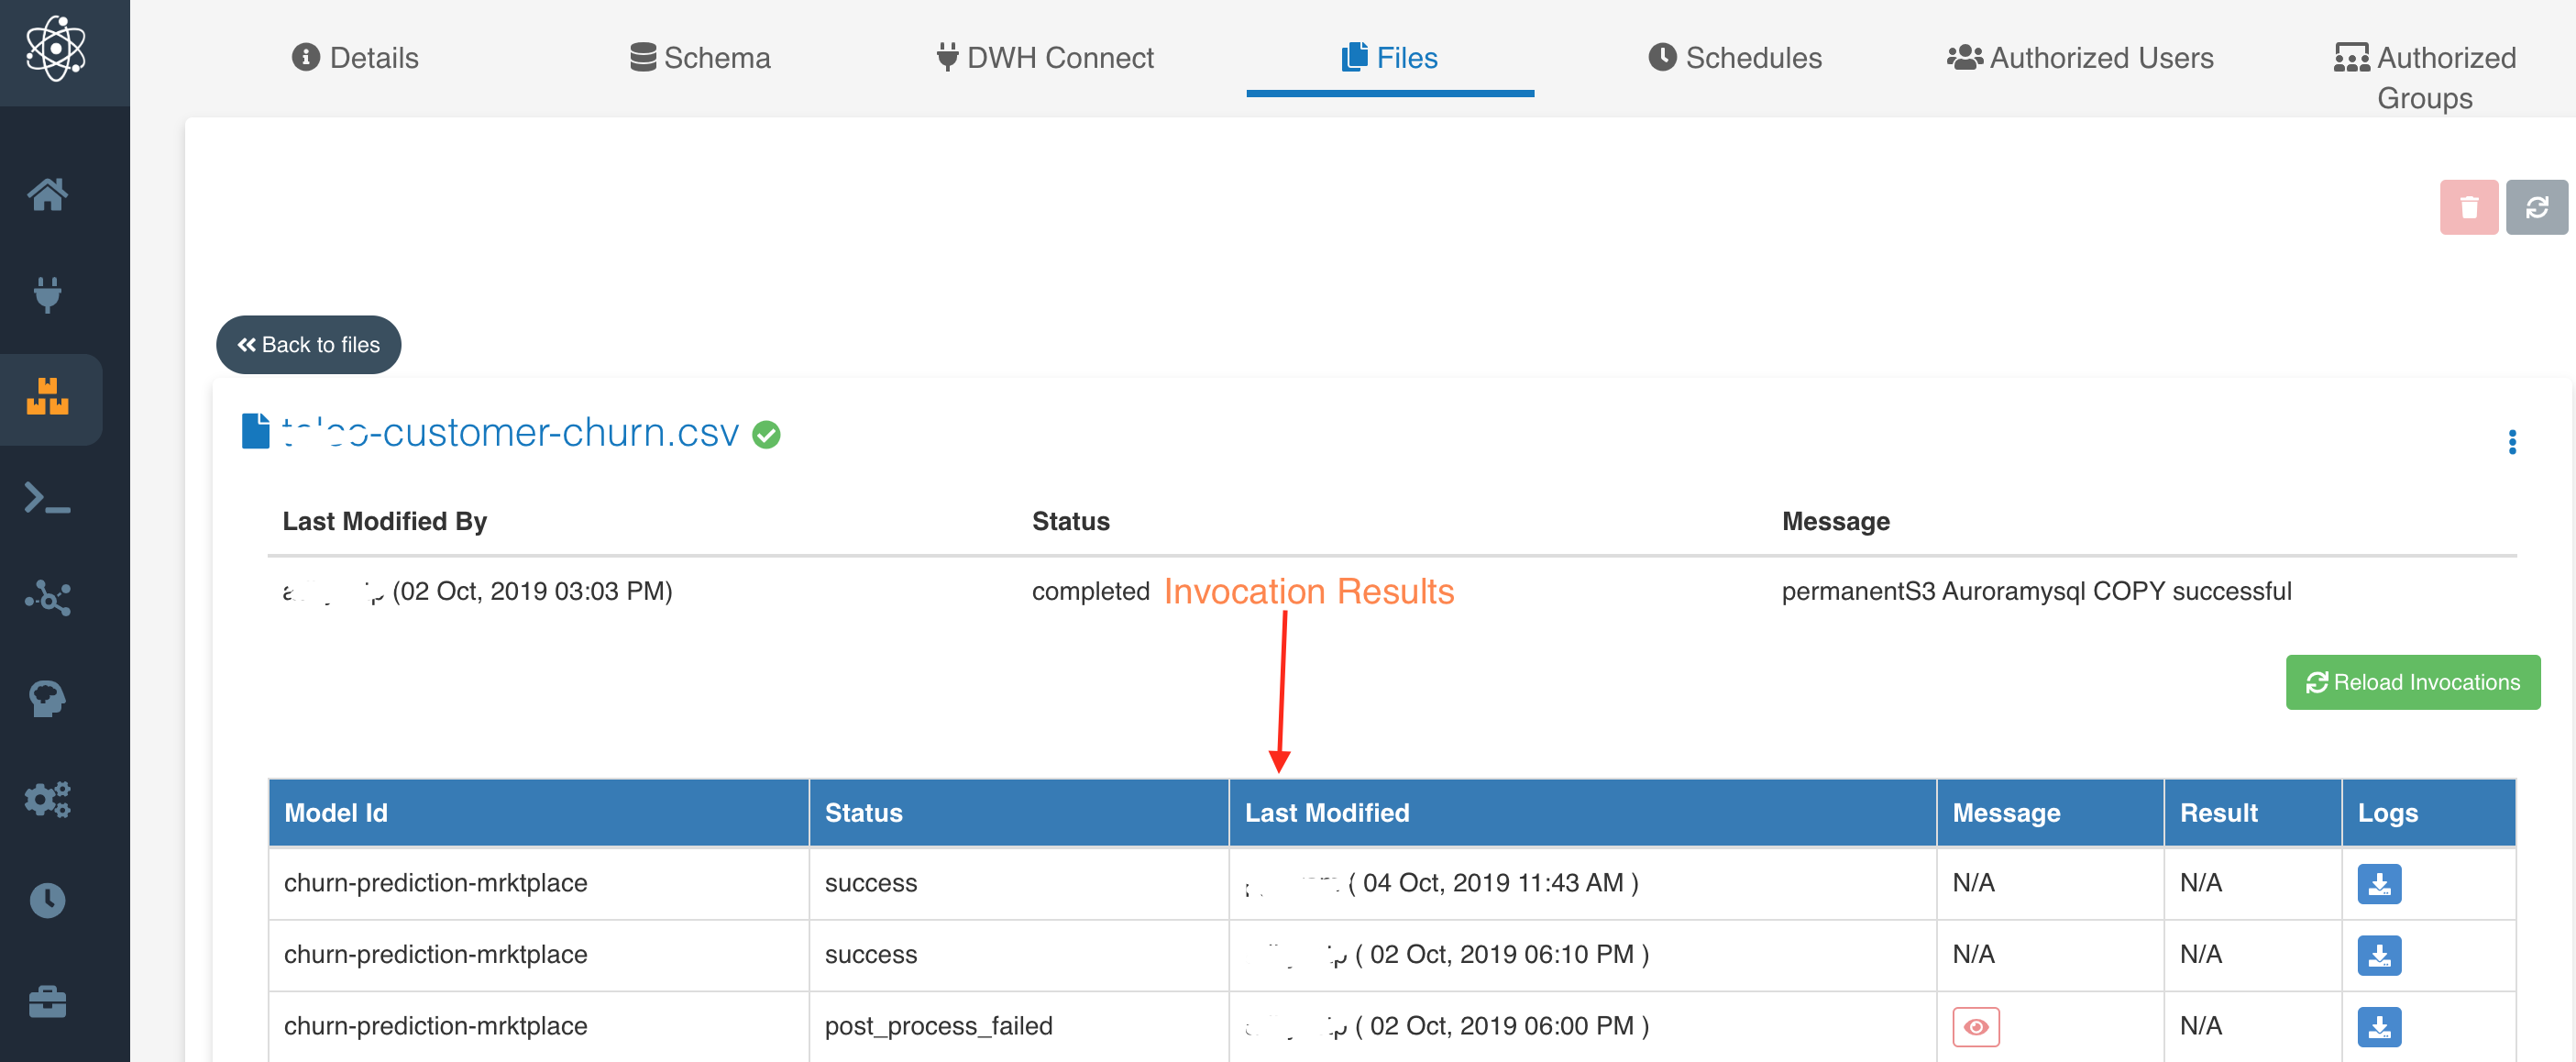
User can download these logs for each invocation by clicking on the download button in the "Logs" column. If there is no ML model applied on the file, clicking on the "Invocations and Results" button would display "No invocations" message.
Download File
User can download the file by clicking in the "Download File" option which is displayed by clicking on the File operations icon (more vertical icon) to the right corner of the file.
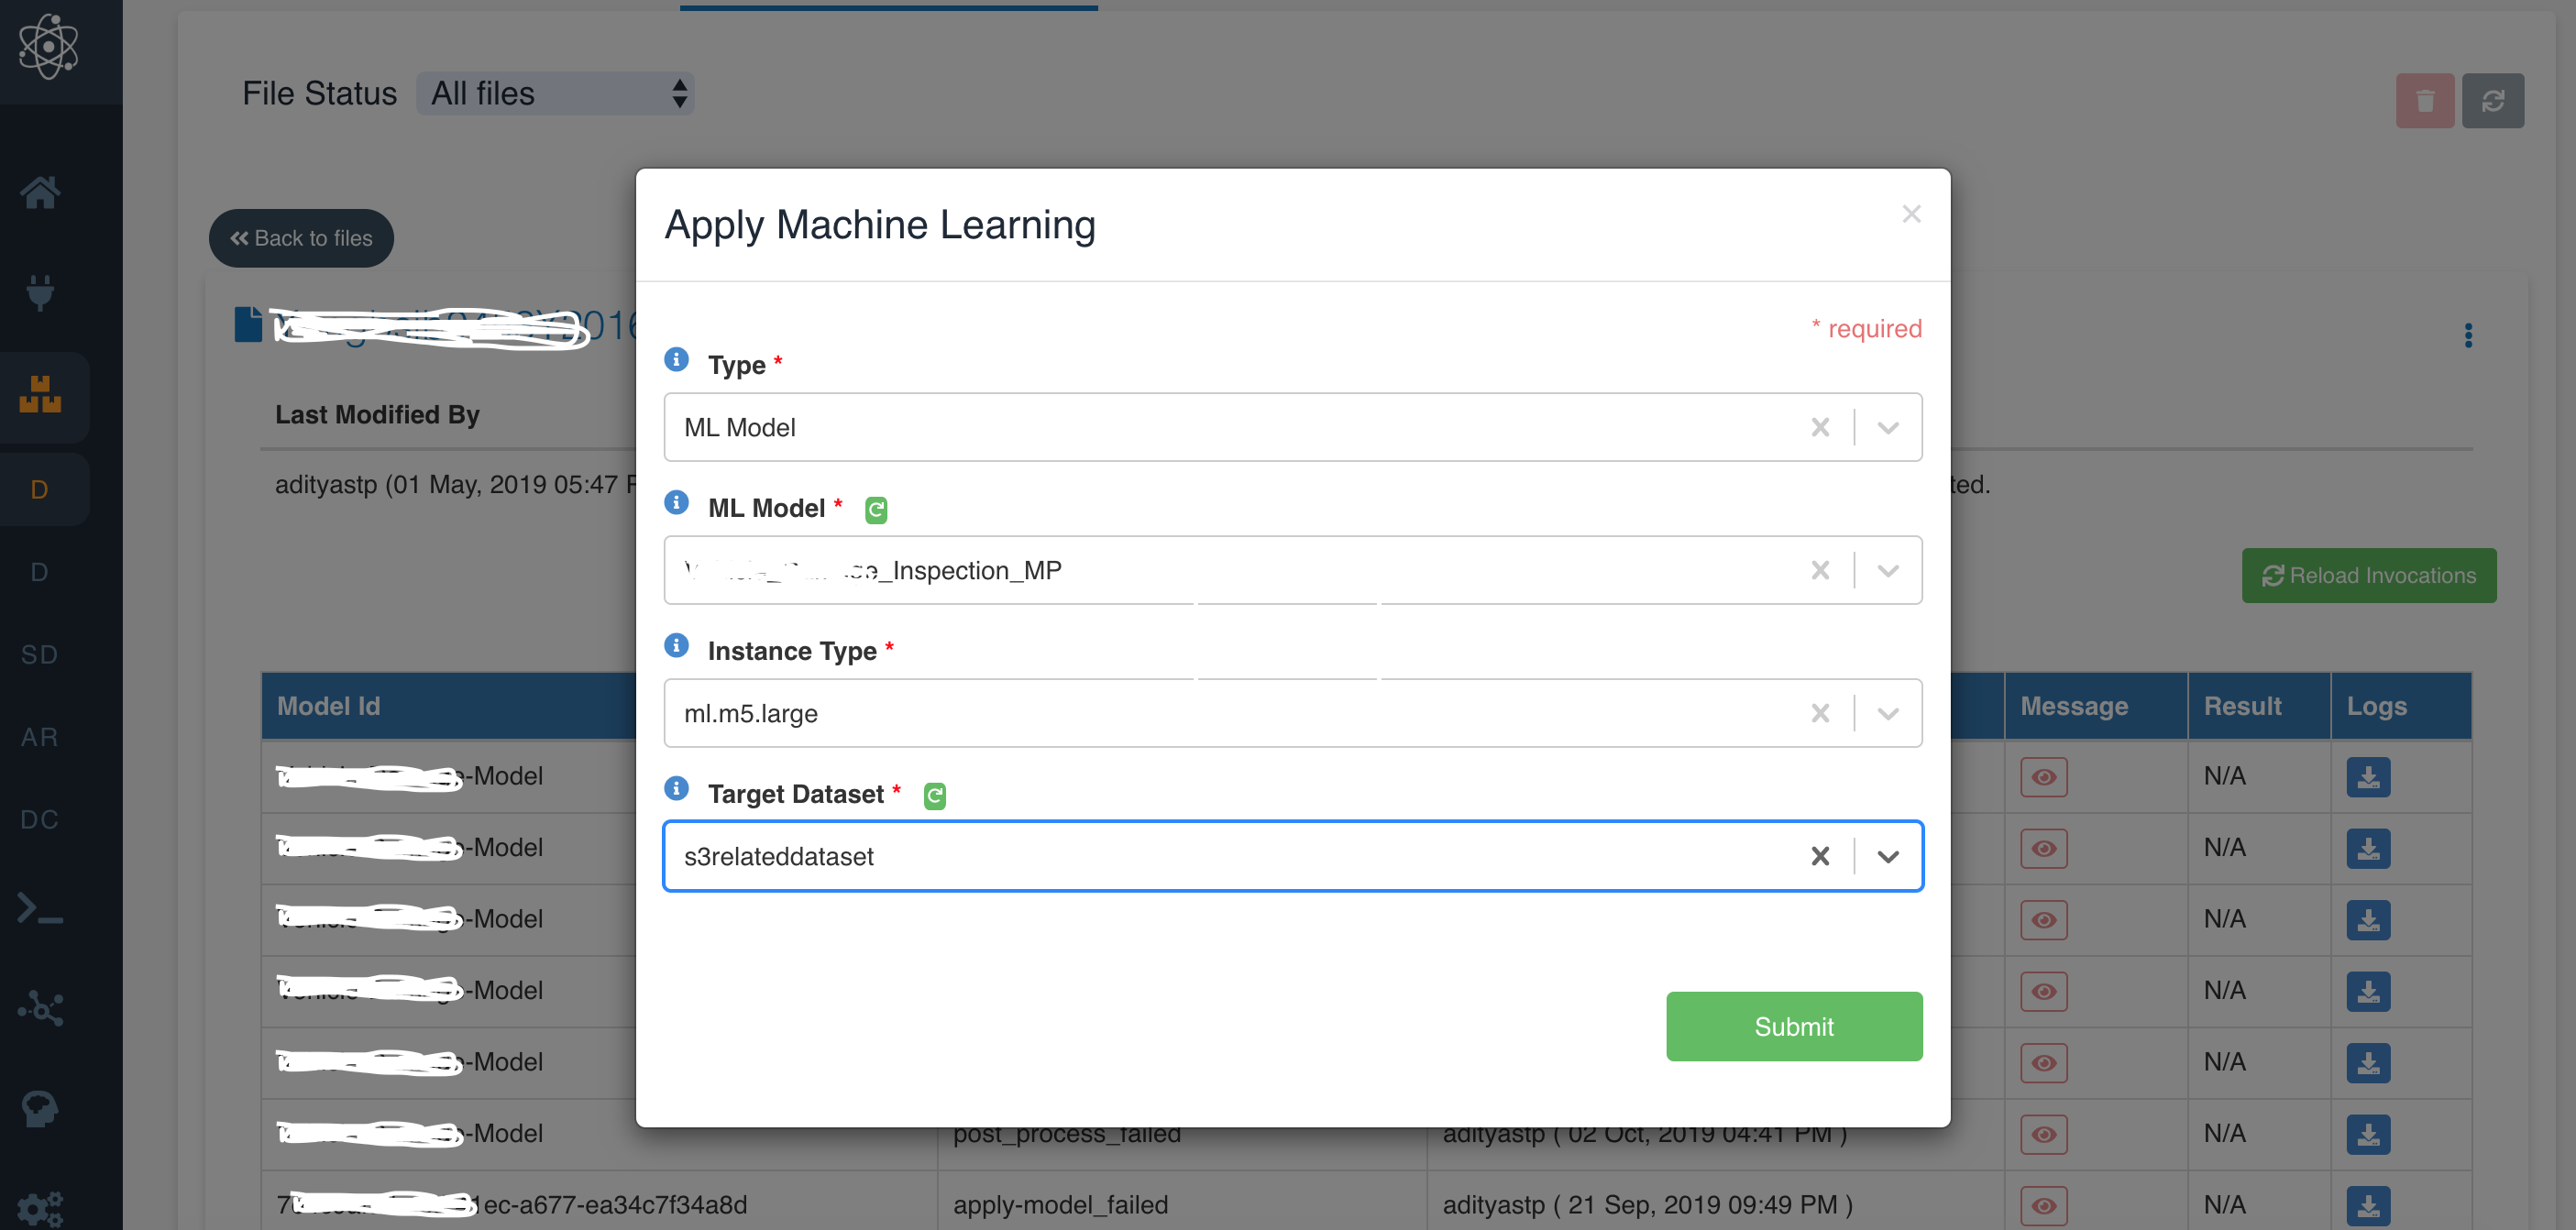
Apply ML
User can apply Machine Learning models on files in the dataset by selecting the "Apply ML" option in the dropdown of File operations, next to the file. Once "Apply ML" option is selected, the application asks for "Type" (ML Model, Entity Recognizer).
If the selected type is ML Model then user needs to provide below details:
- ML Model: The dropdown in Apply ML form shows the ML model names which are created in the platform and to which user has access to.
- Instance Type: This dropdown, show the option of different types of machines on which the user wish apply the model on the file.
- Target Dataset: This dropdown, show the list of amorphic dataset, to which the user wishes to write the output results.
Below is the picture of 'Apply Machine Learning' popup:
If the selected type is Entity Recognizer then user needs to provide below details:
- Entity Recognizer: The dropdown in Apply ML form shows the Entity Recognizer names which are created in the platform and to which user has access to.
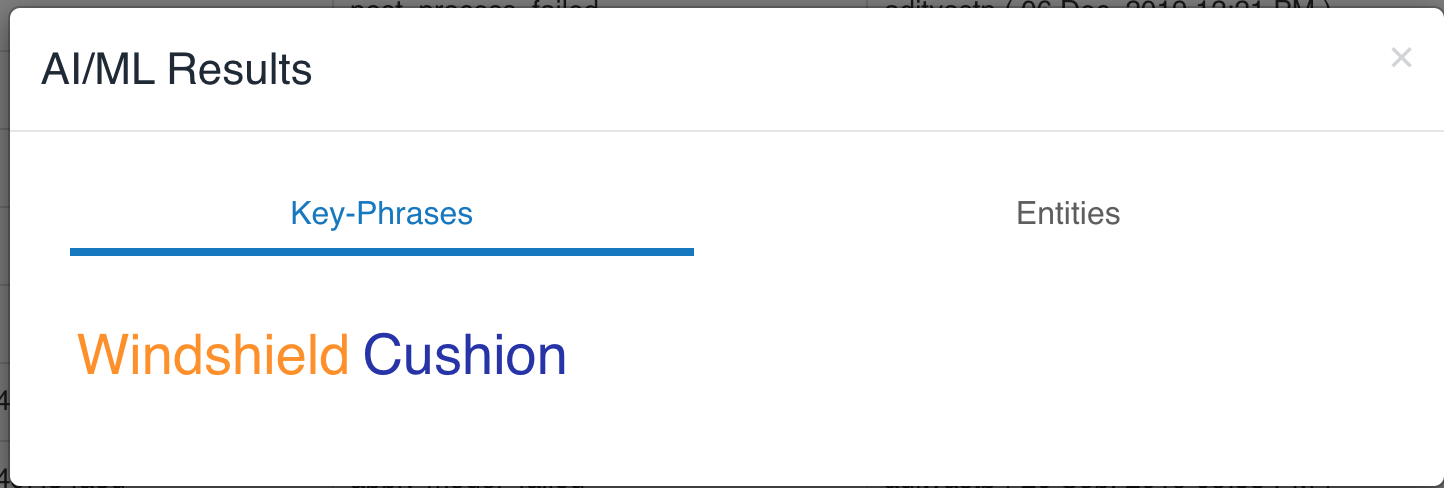
View AI/ML Results
By Clicking on View AI/ML Results, the user will be displayed the view of AL/ML results applied ML models, Entity Recognizers.
The user can view the results by either clicking on icon in "Results" field displayed in the invocation results or by clicking on "View AI/ML Results" option in File Operation.
Below is the sample view of how AI results are displayed to the user when entity recognized is applied to one of the file.
View More Details
When files are added to the dataset via S3 connection, View More Details provides the location of the file on the source, i.e., source object key.
Below is the sample view of the source file object key and how to view the same.

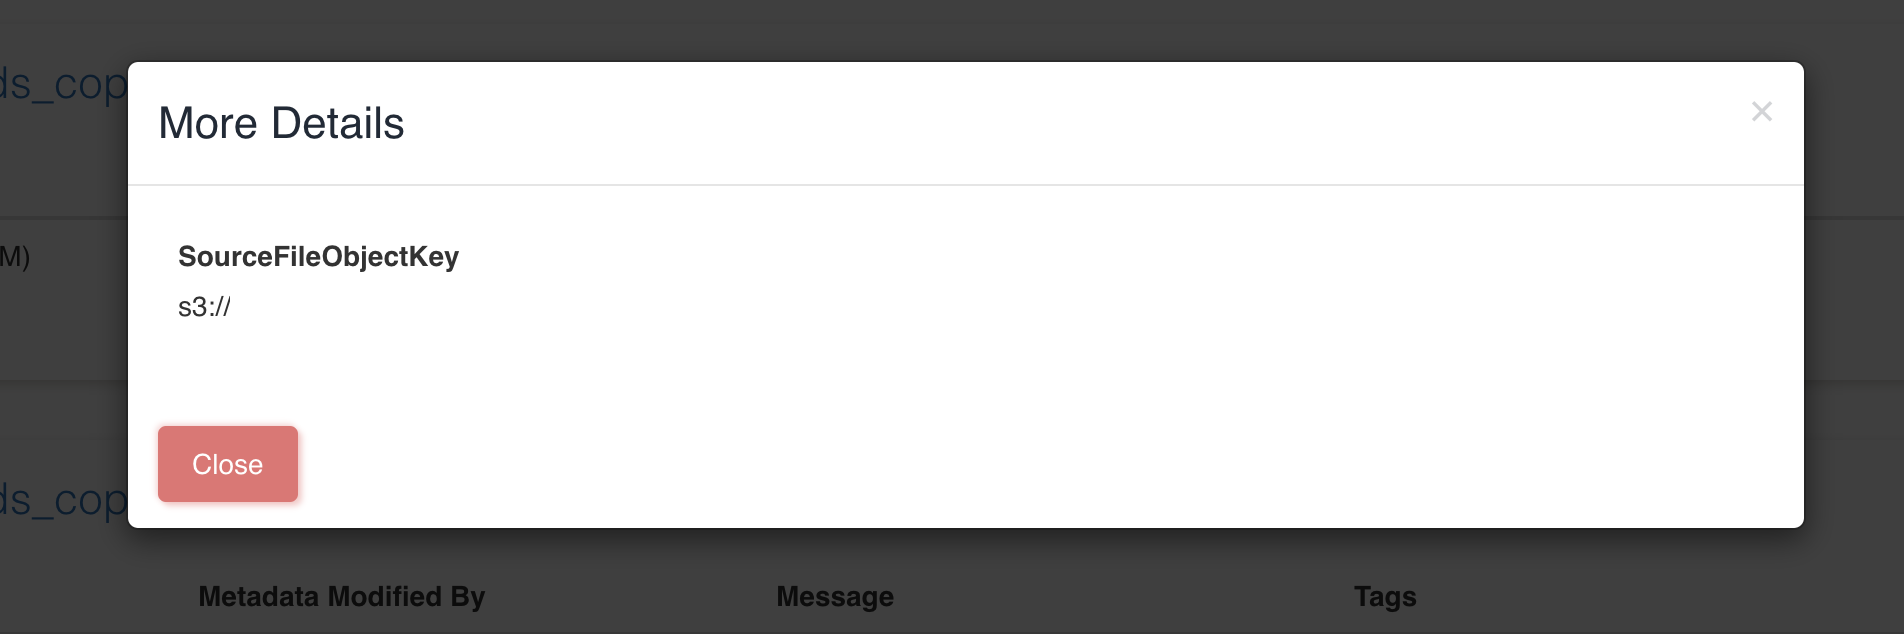
This source metadata of the file can be seen only for the data that is loaded via S3 connection & version of 1.0 and above (i.e., New connections or upgraded connections). Also, because of S3 limitations this metadata will not be available for file sizes > 5 GB
File Search
File Search option will be disabled if Search Datasets is disabled by admins. Reach out to admins to re-enable it.
For non-analytic file type datasets, user can search files metadata and add/remove tags to the files.
User can search for files metadata through the Search bar in the File Search tab. This will display the matched file results with the following options:
- Tags: User can add/remove tags to the files
- File Preview: User can preview the file. Supported file formats are txt, json, docx, pdf, mp3, wav, fla, m4a, mp4, webm, flv, ogg, mov, html, htm, jpg, jpeg, bmp, gif, ico, svg, png, csv, tsv.
- Complete Analytics: User can view the complete analytics of the file
- File Download: User can download the file

Below is the sample view of how user can search metadata, preview the file, view complete analytics and download the file.

Below is the sample view of how user can add/remove tags to the files.

Resources
This tab displays the list all the resource dependencies of the dataset like Jobs, Schedules, Notebooks, Views etc.
The following picture depicts the Resources tab in the dataset details page:

User should detach/delete all the dependent resources in order to delete the dataset.
Authorized Users
This tab shows the list of users authorized to perform operations on the dataset. The owner, user who created or have owner access to the dataset, can provide dataset access to any other user in the system.
There are two type of access types:
- Owner: This User has permissions to edit the dataset and provide access to other user for the dataset.
- Read-only: This user has limited permission to dataset, such as view the details and download files
Authorized Groups
This tab shows the list of groups authorized to perform operations on the resources like Datasets, Dashboards, Models, Schedules etc. A group is a list of users given access to a resource, in this case dataset. Groups are created by going to User Profile -> Profile & Settings -> Groups
There are two type of access types:
- Owner: This group of users has permissions to edit the resources and provide access to other user/groups for the resources.
- Read-only: This group has limited permission to resources, such as view the details.
List Datasets
In this view, the Users will be able to see the list of datasets they have access to. They can also limit the results shown per page using Results Per Page option, and can sort the them based on desired field and its order.

A user can have multiple thousands of datasets but the listing of datasets is limited to 5000 per user in reverse chronological order to avoid performance issues. To fetch or view all the datasets, user needs to avail the search dataset option under the dataset tab.
Edit Dataset
User can edit the dataset in Amorphic by clicking on edit button on the top right corner of the Dataset Details page. User can edit all the fields which are editable and relevant to the specific type of dataset.
For Redshift targeted datasets, Distribution style can be updated by editing the dataset.
Clone Dataset
User can clone a Dataset in Amorphic by clicking on clone button on the top right corner of the Dataset Details page. Clone Dataset page auto-populates with the metadata of dataset from which it is being cloned, reducing the effort to fill every field required for registering the dataset.
The only field user needs to input/change is the "Dataset Name", as dataset with the existing Dataset Name can not be created. User can edit any field if he wants to before clicking the "Register" button at the bottom right corner of the form.
Below is the picture pointing to the populated fields in clone dataset form.

Once the user clicks the "Register" button, a new dataset will be created. The created dataset will show up in the Datasets page.
Delete Dataset
Dataset can be deleted using the "Delete" (trash) icon on the right corner of the page. Once dataset deletion is triggered, it'll immediately delete all the related metadata.

Dataset deletion runs in the background asynchronously and if any new data is uploaded during this time then there is a risk of data loss. Please start any new dataload when no files are visible in the Files tab of the dataset details. When a dataset deletion is triggered, parallel delete cannot be triggered and Amorphic will throw an error for the same.
For bulk deletion of datasets, Please check the documentation on How to bulk delete the datasets in Amorphic
Repair Dataset(s)
Datasets can be repaired in 2 ways:
- Individually using the 'Dataset Repair' button on the right corner of the dataset details page.
- Globally using the 'Global Dataset Repair' button on the right corner of the dataset listing page.
For more details, Please check the documentation on How to repair dataset(s) in Amorphic