
Bulk data load v2
As part of Amorphic amorphic bulk data load v2, datasets need to be created already as a pre-requisite and based on the user selection they will be used for ingesting the data from the source tables to Amorphic datasets.
Set up bulk data load (Version 2) in Amorphic
A Bulk data load task in Amorphic can be setup by using the "Create New Task" option in the connection details page under the "Tasks" tab.
The following picture depicts the connections tasks page in Amorphic

Tasks
Task refers to a unit of work that migrates data from a source database to a target database. There are two types of tasks: those with on-demand instances and Serverless replication tasks. The steps for creating both types of tasks are outlined below.
How to create a Task
Below are the steps that are required to create a bulk data load task in Amorphic.
Task Specifications
Task Name: Name of the task to be used, an identifier of the task.Migration Type: Full Load, Change Data Capture (CDC) & Full Load and CDC- Full Load : This option simply migrates the data from your source database to your target database.
- Full load and CDC (Migrate existing data and replicate ongoing changes) : This option performs a full data load while capturing changes on the source. After the full load is complete, captured changes are applied to the target and henceforth.
- CDC only (Replicate data changes only) : In this option, only ongoing data changes are captured.
Target Location: Select the target where the data has to be migrated.Note- For S3Athena target type only Full Load is supported for now.
- For Redshift target tasks, the exported file will not include headers. This is the default behavior for the Redshift target tasks.
- In contrast, for S3Athena target types, the file will include headers by default.
Sync To S3: Only applicable when the target location is selected to DWH, this option enables the user to choose whether data should be copied to S3 or not either for full-load or CDC related tasks. For CDC type of tasks to sync the data to S3, a schedule needs to be created in the schedules page after selecting this option as Yes.Data Format: Data Format is used to determine the target data format of a task. For S3 and S3Athena target tasks files will be created for the datasets in the format that is specified here. For DWH type of targets this field is used to determine the format of data to be exported to S3 when SyncToS3 is selected as "yes" and will be shown only if it is applicable for DWH. This is an optional field and defaulted to "csv" if not specified.CDC Start Time(Applicable only for CDC): Custom start time which is used as a starting point to capture the data from the source.CDC Stop Type: Custom stop type which is used as stopping point of the change data capture. Available options are Server Time & Commit TimeCDC Stop Time: Custom stop time which is used as stopping time of the change data capture.NoteBoth CDC Stop Type & CDC Start Time are required to use the functionality of CDC stop time. This setting is only supported for DWH targets (i.e., Either AuroraMysql or Redshift)
Target Extra Connection Attributes(Optional): Extra connection attributes to be applied to target db for data migration jobs. Please refer below documentation for the available extra connection attributes.- S3 Extra connection attributes
- AuroraMysql Extra connection attributes
- Redshift Extra connection attributes
NoteFor S3 target type of datasets Amorphic uses addColumnName=true;timestampColumnName=RecordModifiedTimeStamp;includeOpForFullLoad=true as ExtraConnectionAttributes. When user provides extra connection attributes in the option above then predefined settings will be overwritten, user have to make sure to add these flags when creating the tasks to be in sync with other data loads.
Source Extra Connection Attributes(Optional): Extra connection attributes to be applied to the source db for data migration jobs. Please refer below documentation for the available extra connection attributes.- Oracle connection attributes
- MySQL Extra connection attributes
- PostgreSQL Extra connection attributes
- Microsoft SQL Server connection attributes
- IBM Db2 (LUW) Extra connection attributes
NoteTo add source extra connection attibutes, it has to added in Edit Task Payload(Beta) page only. Below is an example for the same
Source extra connection attributes sample json{
"SourceExtraConnectionAttributes": "parallelLoadThreads=5;maxFileSize=512"
}Target Table Prep Mode: To indicate how to handle loading the target at load startup. Available options are Truncate & Append, "Truncate" will delete the data in the dataset before load while "Append" will add the data to existing.NoteThis is an optional field and if no option is selected then defaulted to Append in the backend. This setting takes precedence over the setting at Dataset configuration.
Replication Configuration
Task by using on-demand instance
Use Serverless Replication: When a user wants to utilize instance-provisioned data migration, proceed with this feature disabled (it is disabled by default). If your workload is predictable, instance types may offer cost benefits.Use Shared Instance: If a shared instance should be used for a task then this option should be selected as Yes and a drop down appears where user can selected one of the shared instaces that are available for the connection. This is an optional field and will be defaulted to No if no option is specified.Replication Instance AZ: Availability zone to be used to launch the replication instance. When an AZ is selected, all the available instance classes in that AZ will be shown and one can be selected from the list.Replication Instance Class: Type of DMS instance class to be used for the data migration (When user selects the instance here then backend instance selection will be nullified). Please choose approx Instance based on the data volume of all the tables.Allocated Storage: Amount of storage space you want for your replication instance. AWS DMS uses this storage for log files and cached transactions while replication tasks are in progress.NoteBoth the ‘Allocated Storage’ and ‘Replication Instance Class’ parameters are required to use the instance setting provided by the user for the DMS task, if above two parameters are defined then Approx Table Size parameter that was selected in the table metadata page will not have any affect and Amorphic uses the instance setting provided by the user else instance config is decided based on the aggregate sum of all Table Sizes in the task.
Serverless replication task
Use Serverless Replication: To access serverless functionality, the user should select this option as Yes. The Serverless replication feature eliminates replication instance management tasks like capacity estimation, provisioning, cost optimization, and managing replication engine versions etc. Choose serverless for unpredictable migrations, as well as for simplicity and ease of use. This can scales automatically based on your workload. Keep in mind that if your workload is predictable, instance types may offer cost benefits.Max Capacity Units: Maximum DMS Capacity Units (DCU) that AWS DMS can provision, depending on your replication's capacity prediction. This is also the maximum DCU that autoscaling could scale up toMin Capacity Units: Minimum number of DCU that AWS DMS will provision. This is also the minimum DCU that autoscaling could scale down to.MultiAZ: Setting this optional parameter creates a standby replica of your replication in another Availability Zone for failover supportReplicationAZ: Availability zone to be used to launch the serverless replication task
All other attributes remain the same as tasks with on-demand instances. However, there are some limitations with serverless replication. Notably, serverless tasks do not support Views in selection and transformation rules.
The video below demonstrates how to choose the replication task configuration between on-demand instance types and serverless options.
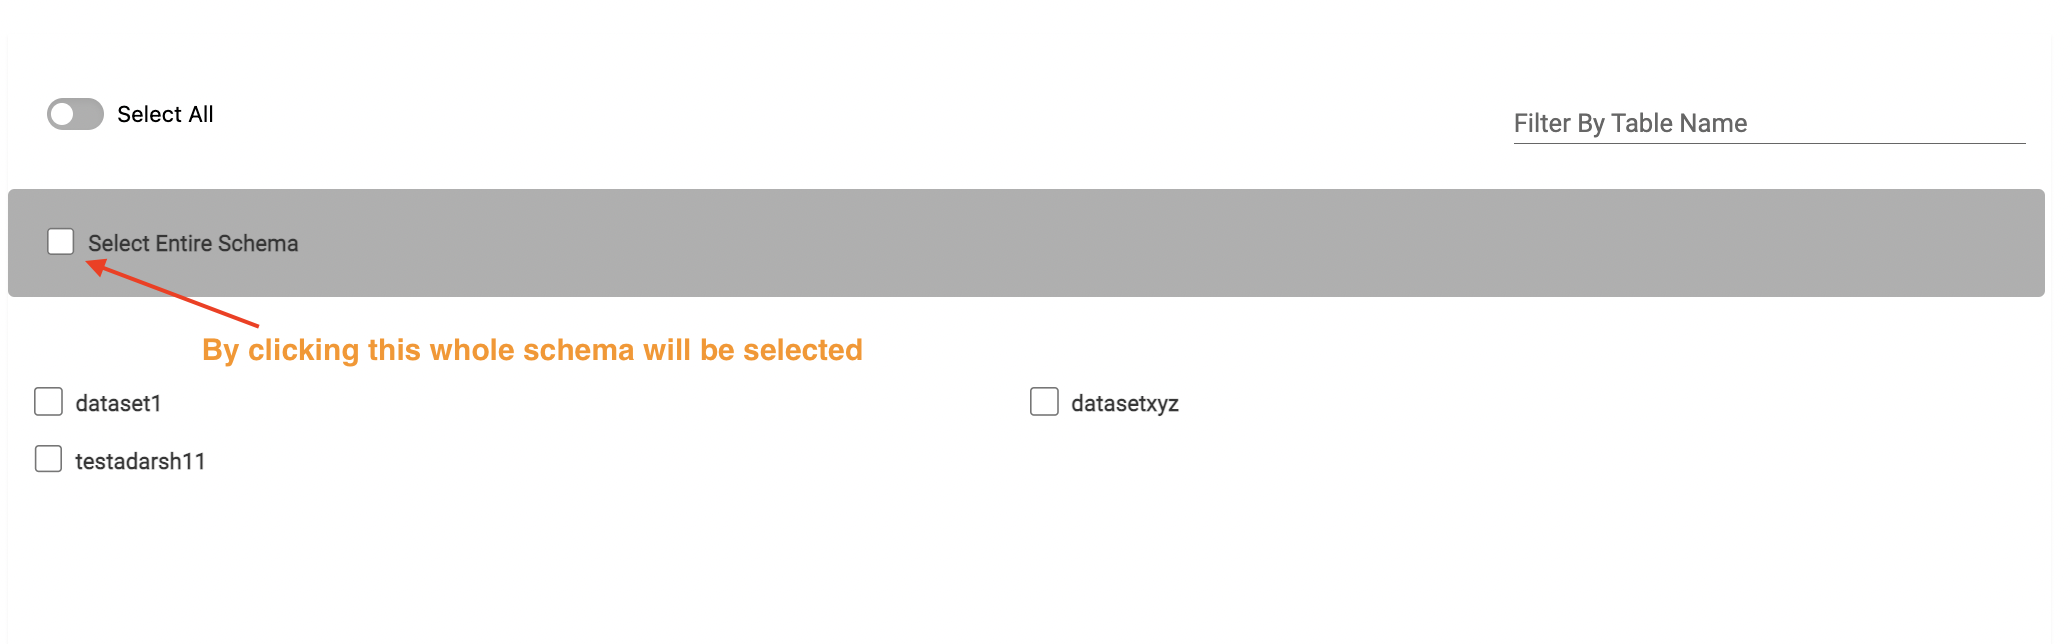
Table(s) selection
- Select all the tables that are needed to be loaded into Amorphic.
- Schemas and tables can be filtered if necessary with the filter on the top.
- After selecting the tables, click on Next which is at the end of the page to proceed with the metadata edit/update.
- In case of S3 target location whole schema can also be selected instead of individual selection.
Ingestion Configuration
Bulk Edit:
- Bulk Edit is used to map the source tables to Amorphic datasets, users will be able to see a list of datasets that they have access to.
The following are the options available in Bulk edit page and their corresponding use.
Target Dataset Name: This option is used to select the dataset in Amorphic where the data needs to be ingested. User can select the datasets based on selected target location. For example, If user selects S3 as target location then only S3 datasets are applicable. For S3 and S3Athena datasets, only append-type datasets can be selected, while for Redshift datasets, both append and update (latest record) types can be selected.Size: This parameter is used to determine the type of Instance to be used while running the data migration task and has nothing to do with the metadata of the dataset. Please select approx size of the source table with this parameter so that instance can be decided accordinglyEnable Filters, Transforms And Sort: This option will enable additional config that can be applied either on the source tables or on the target data while running the task and during the data ingestion.
Note- Users should ensure they select the correct dataset when using BulkLoadV2 connection tasks.
Filter & Transformation rules
Filter rules are used to filter the data while ingesting the data to Amorphic. Below are the rules that are supported during ingestion.
- Equal to
- Greater than or Equal to
- Less than or Equal to
Transformation rules are used to modify the column names or datatype of the table while ingesting the data to target, below is the list of transformation rules that are available.
- Rename To
- Remove Column
- Make UpperCase
- Make LowerCase
- Add Prefix
- Remove Prefix
- Replace Prefix
- Add Suffix
- Remove Suffix
- Replace Suffix
- Change Data Type (Only Integer, Double & String data types are available for conversion now)
- Add Column
Below is the sample table which illustrates the column names that will be created in Amorphic when Transformation rules are applied on the columns. An example name of column_name is used to for all the rules.
Rulename Old value New value Result Rename To N/A new_column_name new_column_name Remove Column N/A N/A N/A Make UpperCase N/A N/A COLUMN_NAME Make LowerCase N/A N/A column_name Add Prefix N/A prefix prefix_column_name Remove Prefix column/COLUMN N/A name Replace Prefix column col col_name Add Suffix N/A _suffix column_name_suffix Remove Suffix _name/_NAME N/A column Replace Suffix _name _nm column_nm Change Data Type N/A N/A Datatype changes Add Column N/A new_column_name new_column_name
When multiple transformation rules are applied on a single column then AWS will consider only the first rule that is applied and rest others are ignored. Incase if multiple transformation rules needed to applied on a column then consider using Rename Column Transformation rule
Preview and Submit
Here all the details that were entered can be reviewed along with the Transformation and Filter rules added for each dataset.
If the task name is already taken by some other task then it can be edited in this page and the edit option will be shown after Submit Task is clicked which will validate the task name in the backend.
After selecting all the options click on Submit Task which does the schema conversion and registers the datasets in Amorphic.
Please follow the below animation as a reference to create a task.
After successful datasets selection, the task can be started with the Start Task option.
How to create a Serverless Task
Serverless tasks can be created via the API, utilizing similar attributes for task creation. The necessary payload changes for creating serverless tasks are outlined below
These attributes are unnecessary for serverless task creation:
Use Shared Instance, Replication Instance AZ, Replication Instance Class, and Allocated Storage.
Instead, the following attributes are required:
MaxDCU: Maximum DMS Capacity Units (DCU) that AWS DMS can provision, depending on your replication's capacity prediction. This is also the maximum DCU that autoscaling could scale up toMinDCU: (Optional) Minimum number of DCU that AWS DMS will provision. This is also the minimum DCU that autoscaling could scale down to.ServerlessReplication: Set this parameter to true to create a serverless replication task. If set to false, the system will create a task using on-demand instances.MultiAZ: Setting this optional parameter creates a standby replica of your replication in another Availability Zone for failover supportReplicationAZ: (Optional) Availability zone to be used to launch the serverless replication task
All other attributes remain the same as tasks with on-demand instances. However, there is a restriction for rules in TableMappings, as mentioned below.
Serverless tasks doesn't support views with selection and transformation rules. Therefore, change "table-type": "all" to "table-type": "table".
As this feature is available only through API, here is a sample payload for creating serverless tasks in Amorphic.
/connections/{connection_id}/dataloads & POST method
    {
        "TaskName": "ServerlessTask",
        "MigrationType": "full-load-and-cdc",
        "TargetLocation": "s3",
        "TableMappings": {
            "rules": [
                {
                    "rule-type": "transformation",
                    "rule-id": "1",
                    "rule-name": "1",
                    "rule-target": "schema",
                    "object-locator": {
                        "schema-name": "SourceSchema",
                        "table-name": "SourceTable",
                        "table-type": "table"
                    },
                    "rule-action": "rename",
                    "value": "amorphicdomain",
                    "old-value": null
                },
                {
                    "rule-type": "transformation",
                    "rule-id": "2",
                    "rule-name": "2",
                    "rule-target": "table",
                    "object-locator": {
                        "schema-name": "SourceSchema",
                        "table-name": "SourceTable",
                        "table-type": "table"
                    },
                    "rule-action": "add-prefix",
                    "value": "Amorphic_dataset_s3/schema_name=SourceSchema/table_name=",
                    "old-value": null
                },
                {
                    "rule-type": "selection",
                    "rule-id": "3",
                    "rule-name": "3",
                    "object-locator": {
                        "schema-name": "SoureSchema",
                        "table-name": "SourceTable",
                        "table-type": "table"
                    },
                    "rule-action": "include",
                    "filters": []
                }
            ]
        },
        "TaskDefinitions": [
            {
                "TableName": "SourceTable",
                "SchemaName": "SourceSchema",
                "TargetDatasetId": "9f065361-7d35-49fd-a59f-96ca98614e7d",
                "Size": "2"
            }
        ],
        "TaskS3Payload": "no",
        "MaxDCU": 2,
        "MinDCU": 1,
        "MultiAZ": false,
        "ReplicationAZ": "eu-west-1c",
        "ServerlessReplication": true
    }
View Task Details
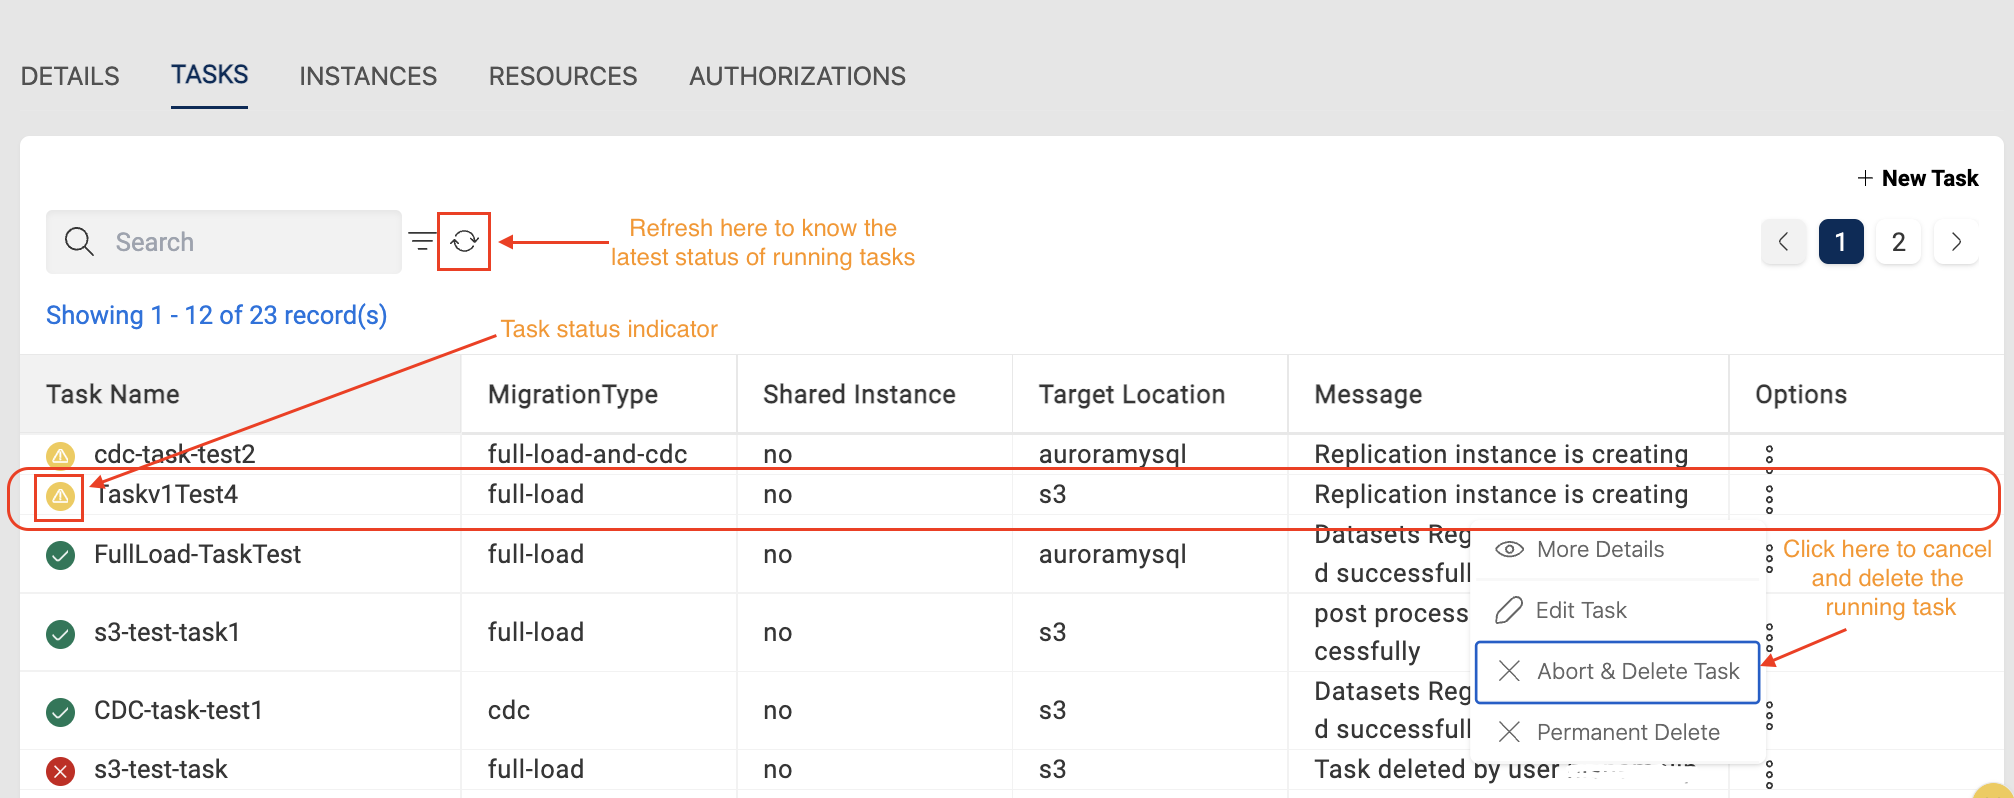
Once the task is started, the status of the task will be changed to running and the latest status can be fetched with the page refresh page.
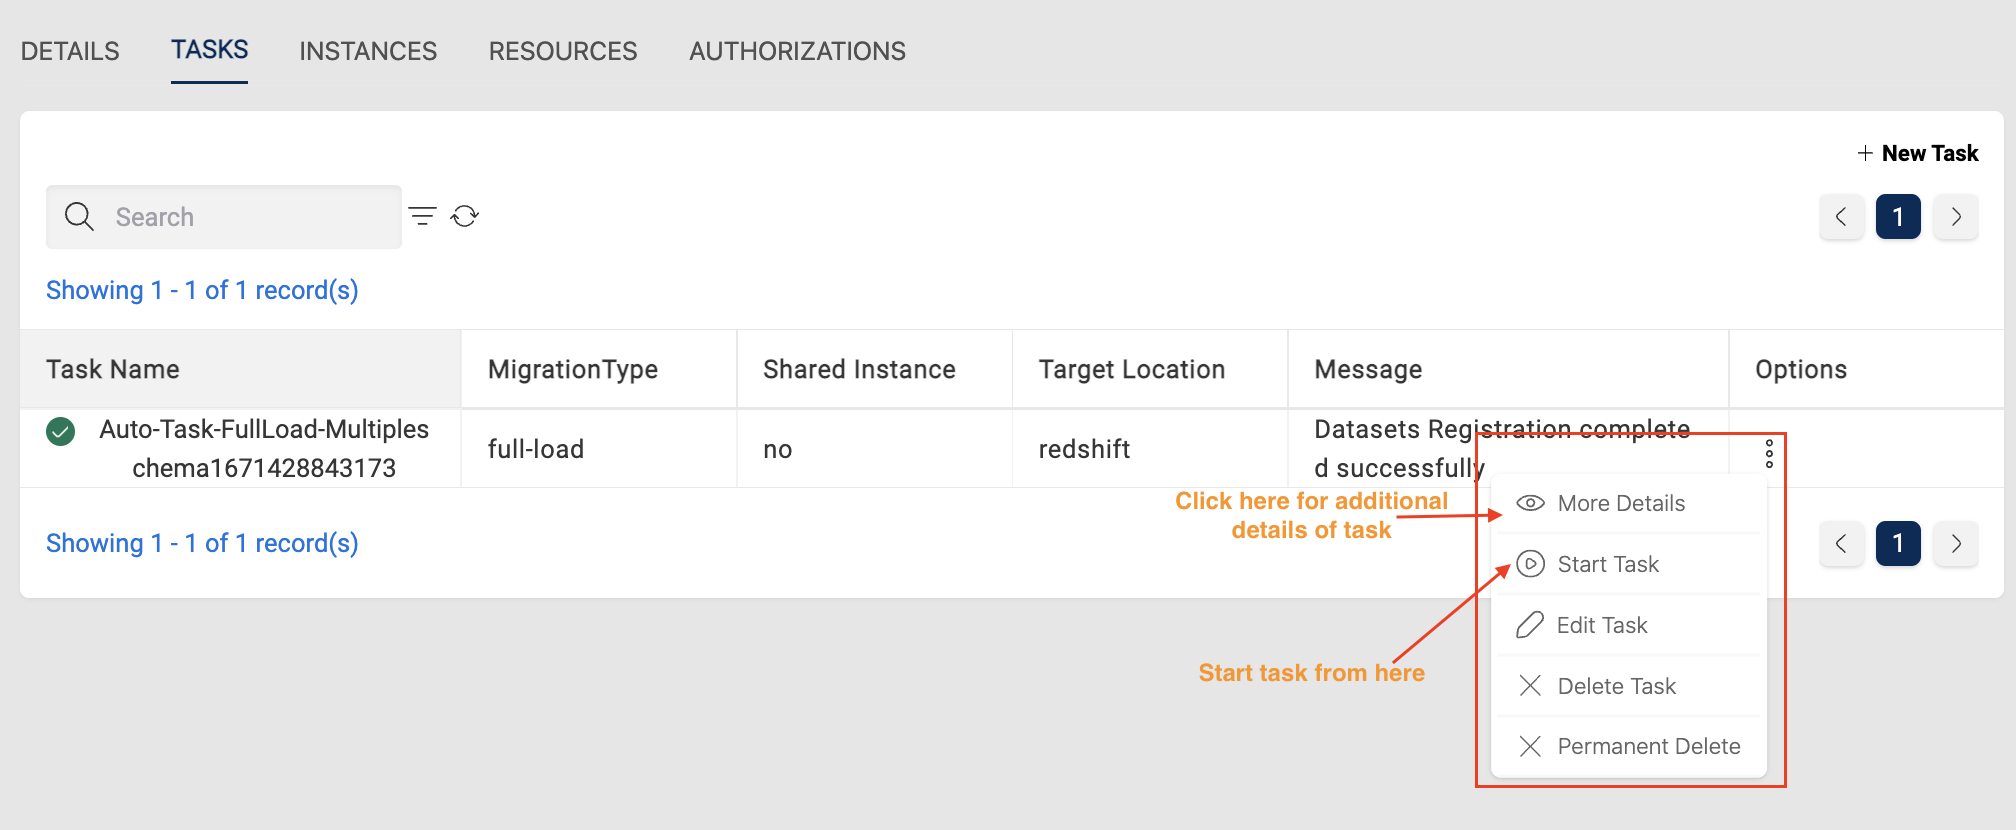
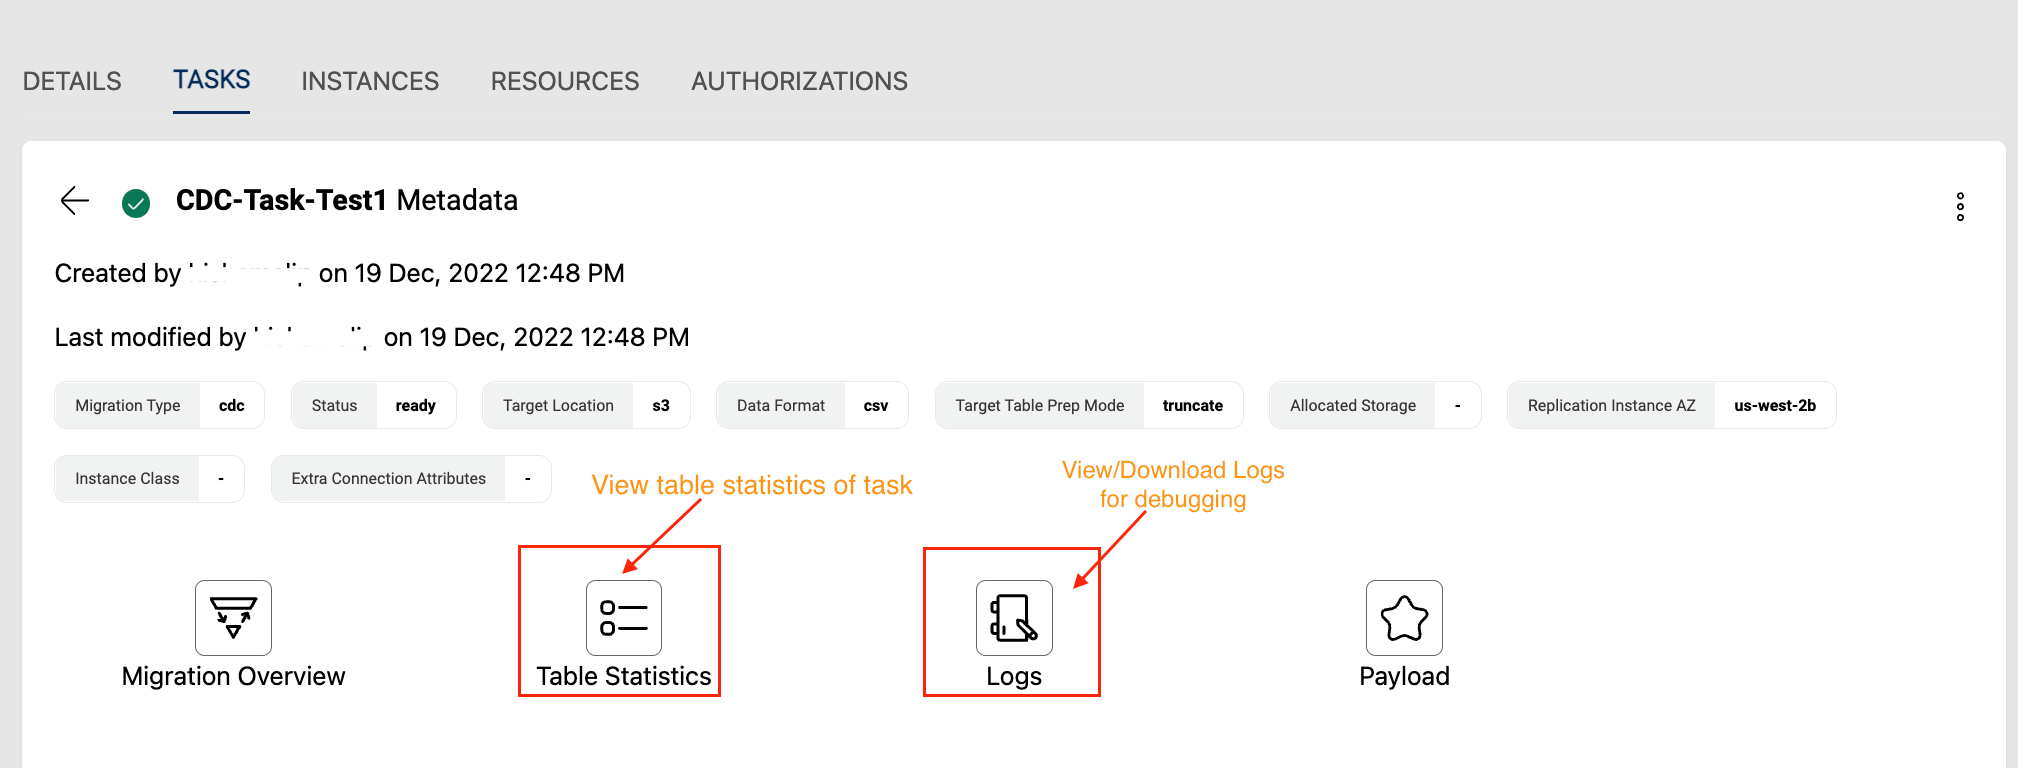
Task Stats
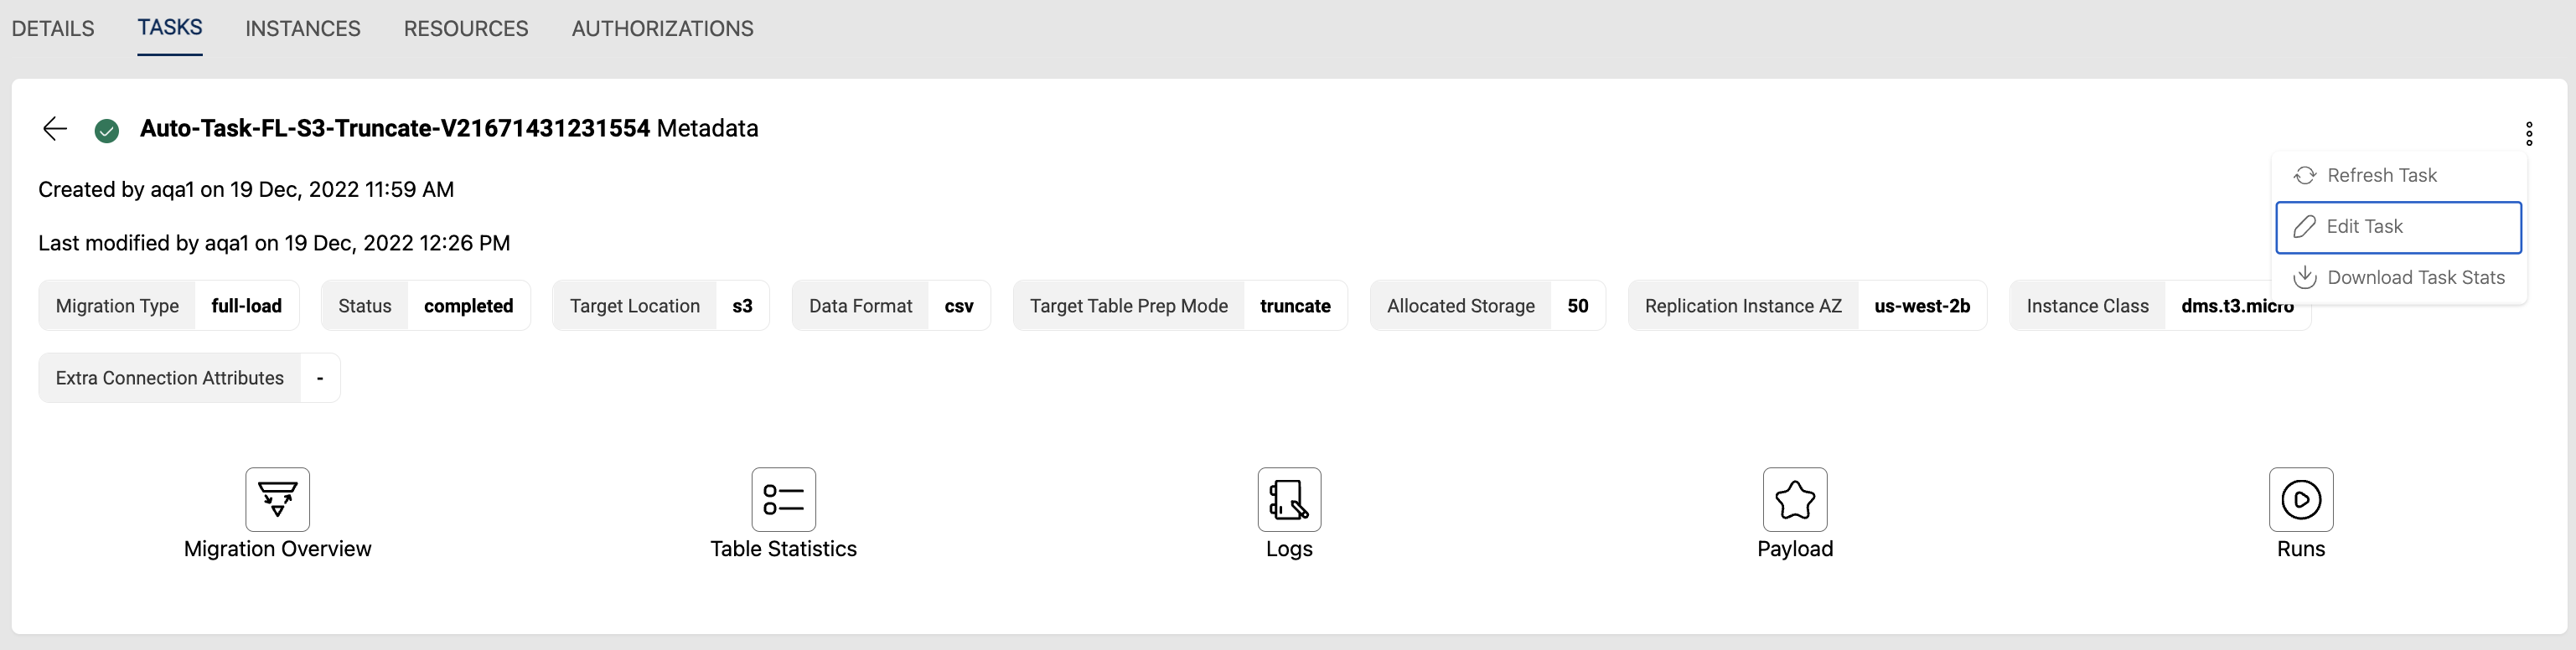
Data migration statistics can be viewed by clicking More Details option or task name on the task details.
Task statistics can be downloaded using the 'Download Task Stats' option from the more (three vertical ellipses) option in the task details page. Also user can retrieve the latest stats using the 'Refresh Task' option.

For Full-load type of tasks an additional tab called Runs will be shown which gives the run history of the task and their corresponding metrics.
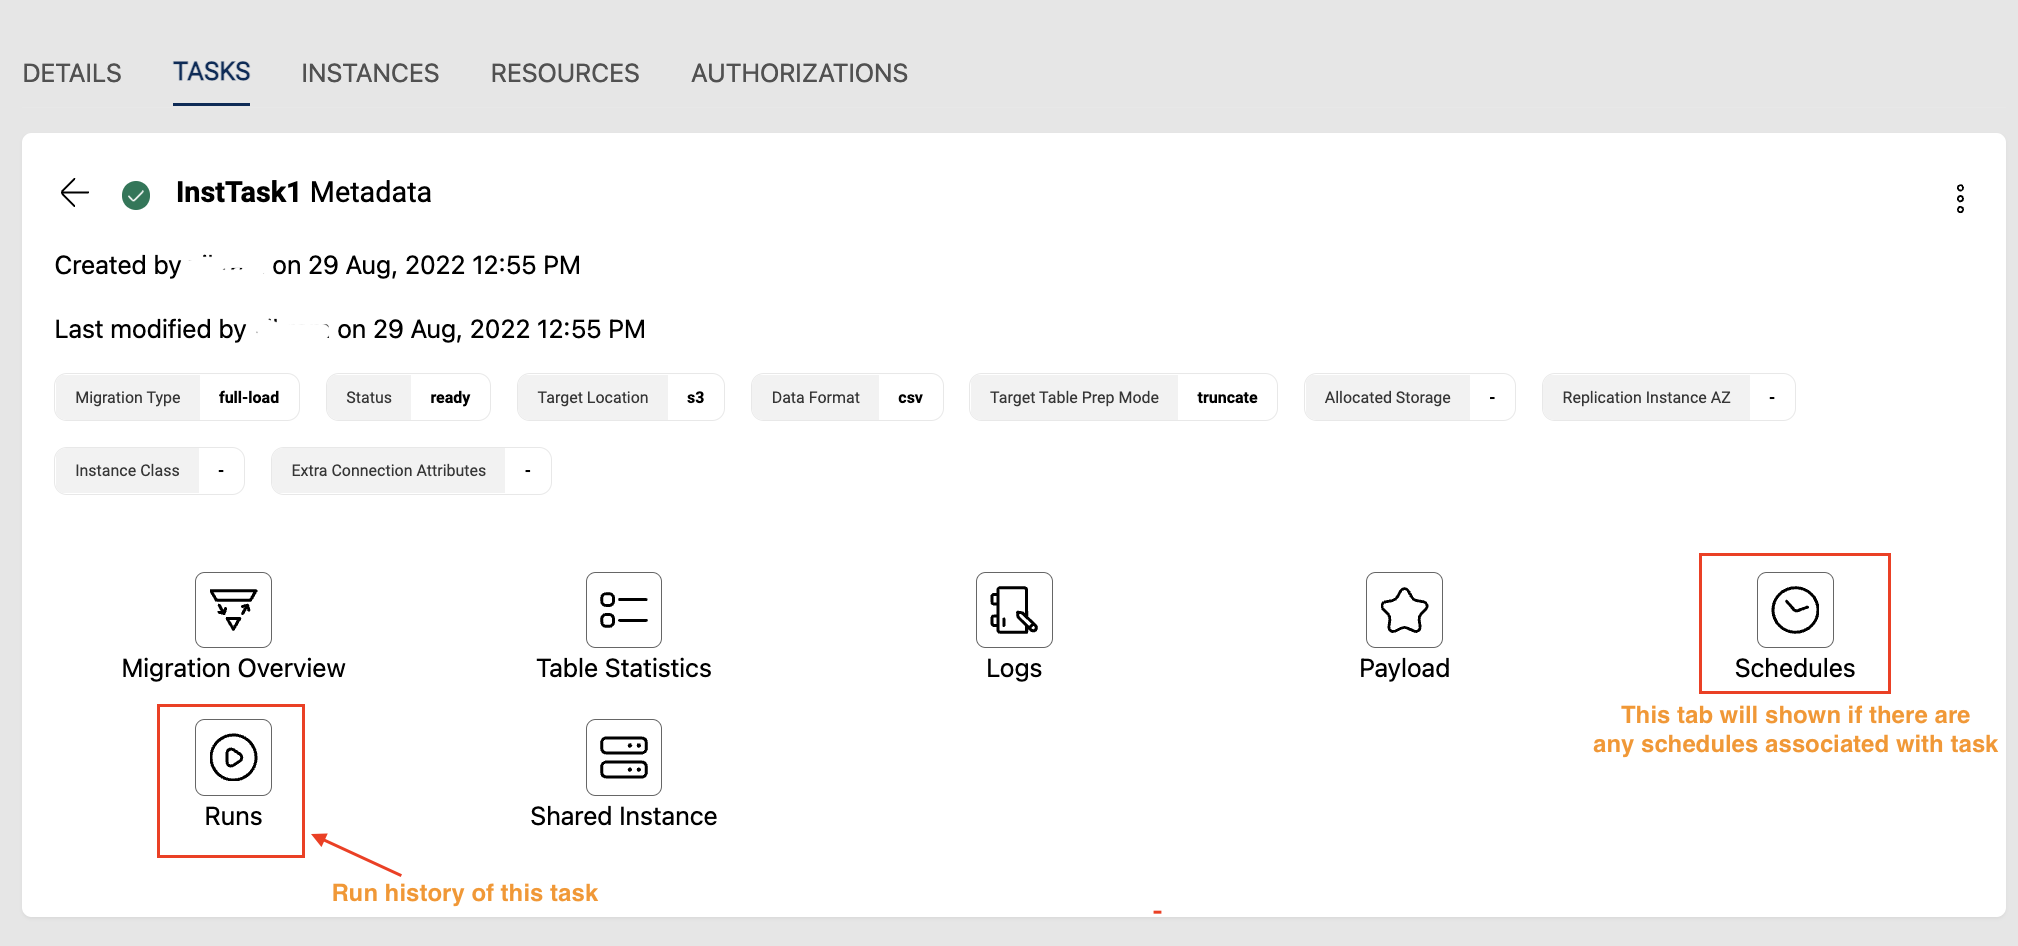
Schedules tab shown in above image is applicable to any task type and is visible only when a schedule is created for the task.
Additional Info
Additional info related to the task like Datasets Registered, View/Download logs can be viewed under the View of Stats, Schedules, Datasets & Logs page.
Please follow below animation for the details
Instance configuration can be changed to a running task if required. Editing an instance can be done only when the task is in Stopped state.
Edit task
Edit task is also available which is used to change the configuration of the task like mapping rules or changing other config whichever are applicable.
Below image shows where the task edit option is available
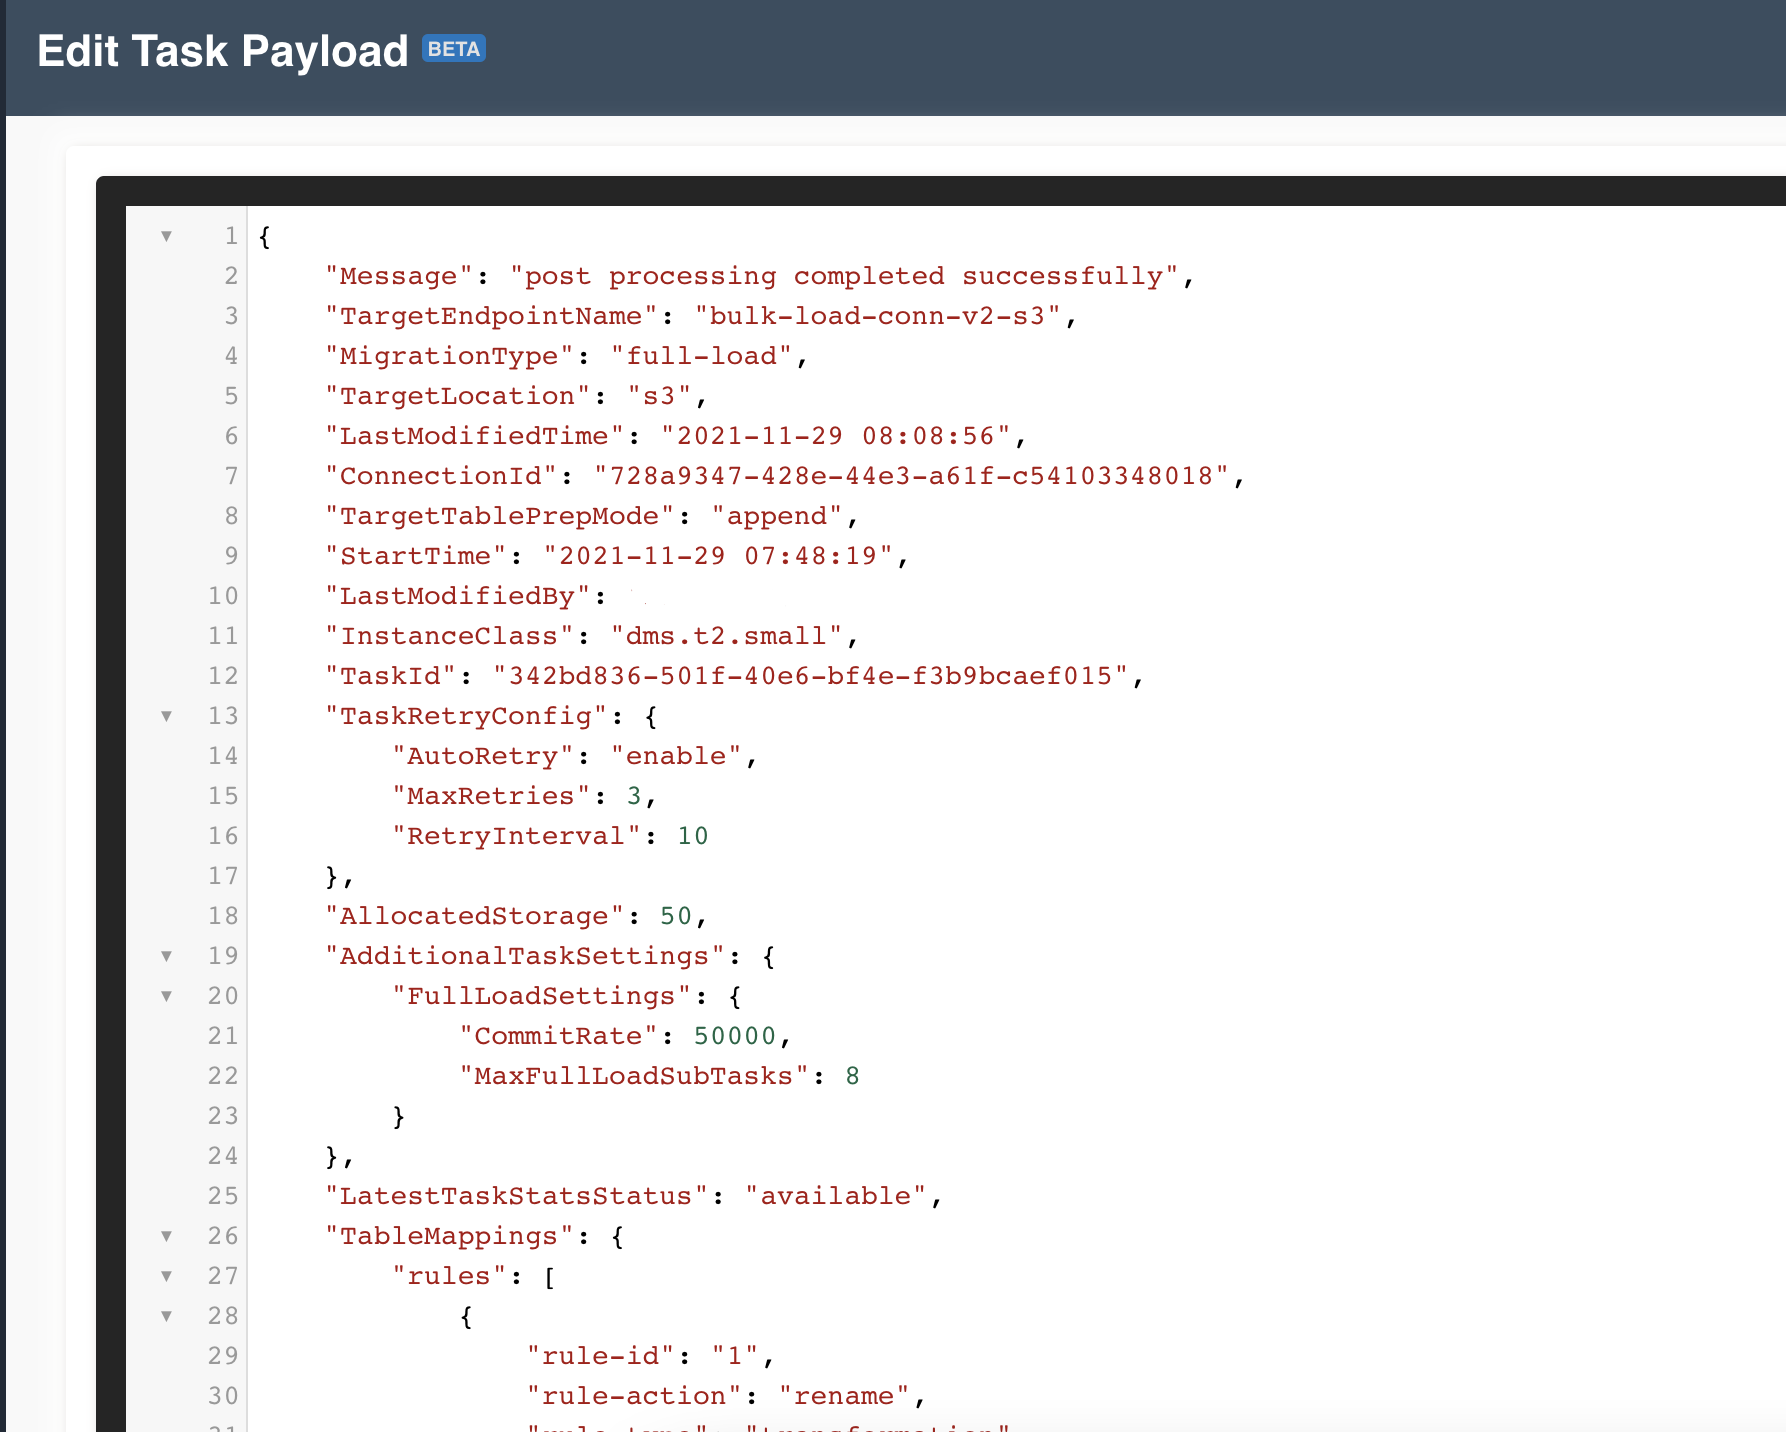
Edit Task Payload(Beta)
Edit payload is also which is used to add any custom table mapping rules that are not possible via UI. User can click on Edit task payload option from the UI and can add the rules as required.
Below image shows where the Edit task payload option is avaialble.

Addtional configuration
Amorphic also supports few additional configurations that can be applied to a task. These configurations are optional and will be defaulted if not provided by the user. Below is the list for the same.
TaskRetryConfig : If a task fails for some reason in its first attempt then based on this configuration task will be retried. This configuration can be applied only from Edit Task Payload option and is applicable to full load tasks only. Below is the payload reference.
Add TaskRetryConfig to the payload
    "TaskRetryConfig": {
        "AutoRetry": <string> ("enable" or "disable" are the allowed values),
        "MaxRetries": <Integer> (Allowed values are between 1 &3)
        "RetryInterval": <Integer> (Allowed values are between 10 & 60)
        }

    Notes:-
    RetryInterval is the metric in minutes, i.e. if user gives the input as 10 then task waits for 10 mins before a restart
    When "AutoRetry" is "disable" then "MaxRetries" & "RetryInterval" are not applicable
AdditionalTaskSettings : Any additional settings can be applied to a task with the help of this configuration. Below is the AWS documentation with the list of all available settings.
Below is an example payload where both TaskRetryConfig & AdditionalTaskSettings are applied on a task
        "TaskRetryConfig": {
            "AutoRetry": "enable",
            "MaxRetries": 2
            "RetryInterval": 10
            },
        "AdditionalTaskSettings": {
            "FullLoadSettings": {
                "MaxFullLoadSubTasks": 8,
                "CommitRate": 50000
            }
- DmsVersion : This setting is used for the creation of DMS replication Instance, if no value is provided by the user then Amorphic picks the latest non-beta version that is available in that AWS region. This setting is applicable to all task types. This parameter is optional, and users can update it as well. Both creation and updation are exclusively possible through the API.
Below is an example payload where DmsVersion is applied on a task
"DmsVersion": "3.4.5"

Reload table/s in a task
If the data ingestion is failed for few tables in a task then the user can reload the ingestion for only failed tables instead of re-running the entire task again. Amorphic supportes reload table/s in a task via API only feature. Below is the API & the method to be used for reloading table/s in a task.
/connections/{id}/dataloads/{taskid}?action=reload-tables & PUT method
    {
        "ReloadTables": [
            {"SchemaName": "schema1", "TableName": "table1"},
            {"SchemaName": "schema2", "TableName": "table2"},
            {"SchemaName": "schema3", "TableName": "table2"},
            .
            .
            .
            ]
    }
Addtional Info
Only below configurations are editable when using
Edit Task Payloadfeature.- TargetTablePrepMode
- DatasetDefinitions
- TaskDefinitions
- TableMappings
- SyncToS3
- DataFormat
- CdcStartTime
- CdcStopPosition
- TargetExtraConnectionAttributes
- TaskRetryConfig
- AdditionalTaskSettings
- SourceExtraConnectionAttributes
- InstanceConfig (InstanceMultiAZ, InstanceClass, AllocatedStorage, InstanceAZ)
- SharedInstance
- DmsVersion
By default Amorphic assumes the My Data Files Have Headers setting as No for datasets when a task is created. So, user must select the datasets accordingly when creating a task, else there will be a mismatch in counts between Redshit/AuroraMysql and S3Athena when SyncToS3 setting is enabled for a task.