
Connect to Amorphic Warehouse using ODBC
Amorphic provides connection details to connect to its Data Warehouse, which can be used to connect via preferred BI tools and create reports over the data. The connection is only provided for data which is stored in the data warehouse(redshift) and not for data in an unstructured format. One can connect to it via JDBC or ODBC and details can be found in dataset connection details as shown below,

1. Power BI - Redshift
For connecting to Amorphic via Power BI, we need to have an ODBC driver for redshift which is made available by Amazon Web Services.
1.1 Install Redshift Drivers
Download one of the following ODBC drivers based on the architecture of your SQL client.
Run the installer and follow the instructions.
1.2 Create ODBC Data Source in Windows
- In the Start menu, open ODBC Data Sources.
- Users can either install User DSN or System DSN, the latter requires Admin privileges.
- Choose Add and select Amazon Redshift ODBC driver and choose Finish.
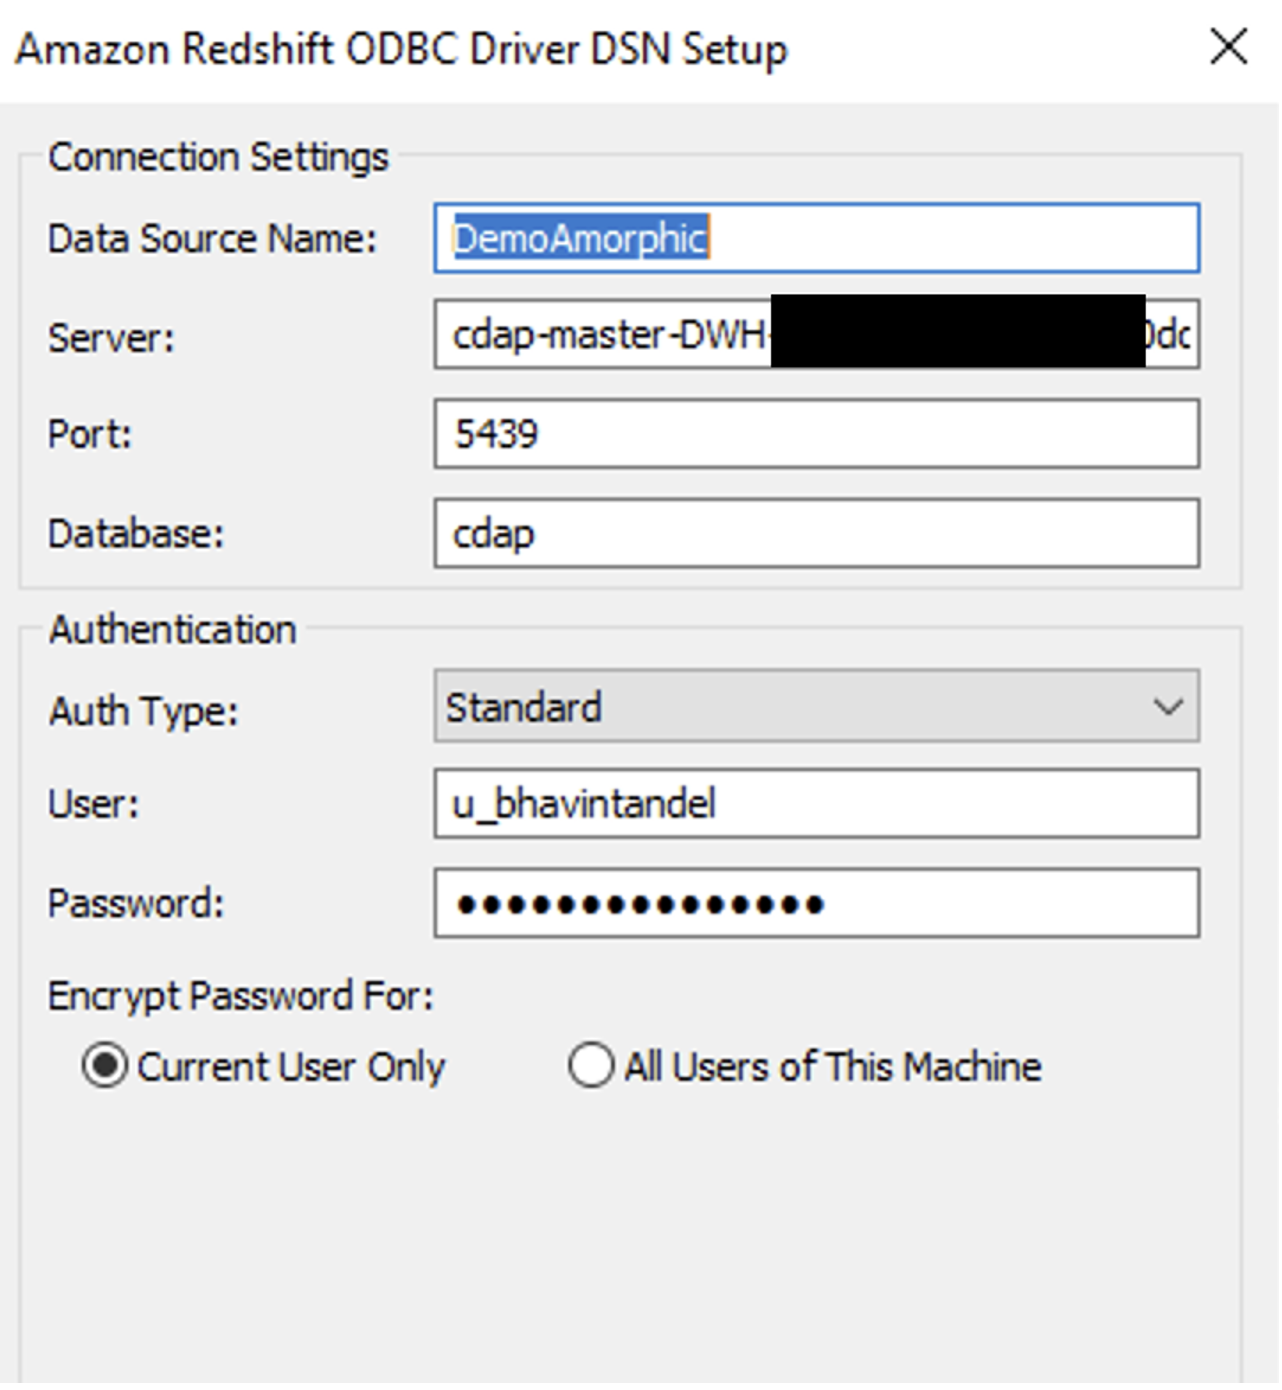
- Fill the details to connect Amorphic which is described below,
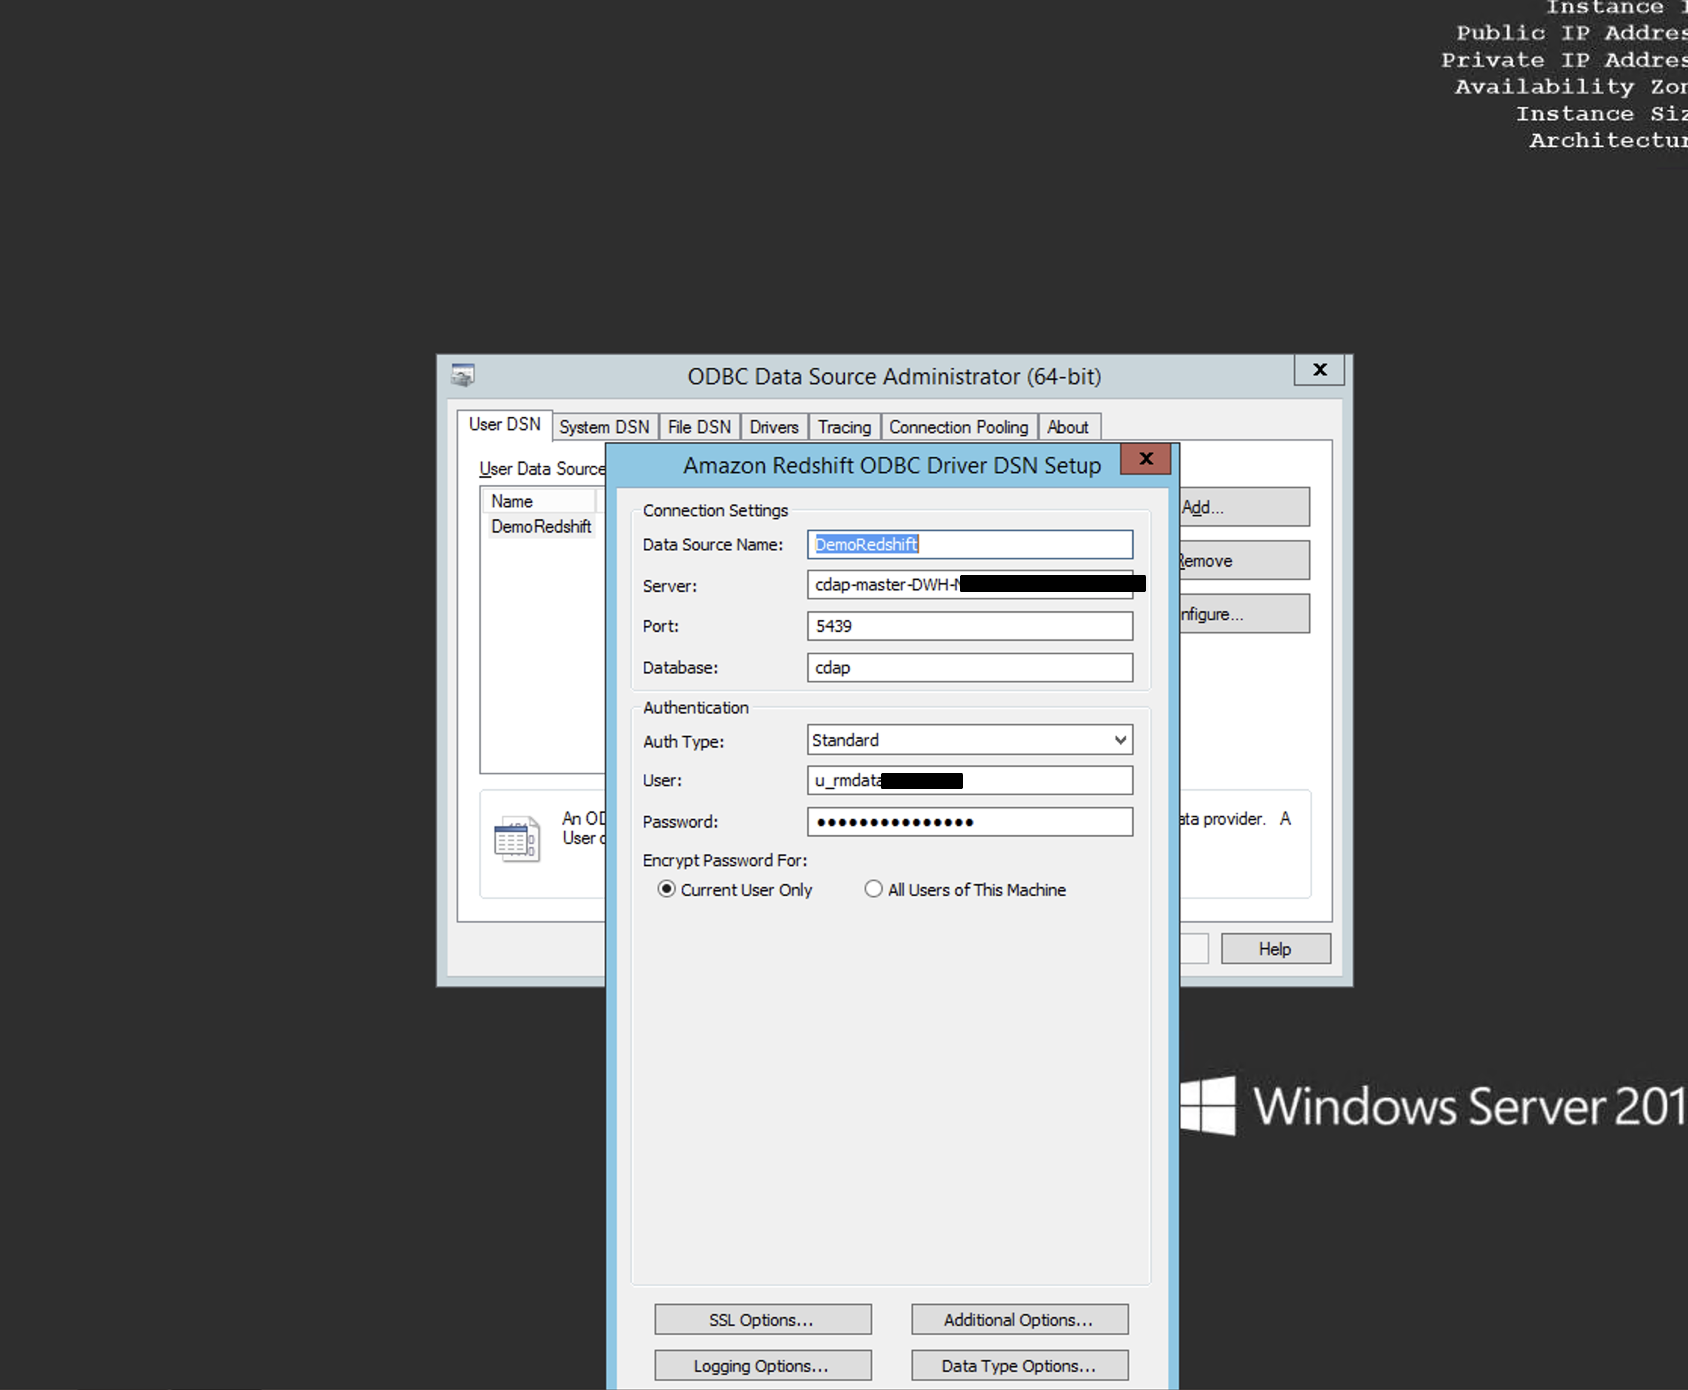
Username and password are the DWH credentials which are generated at users first login. Users can reset the password to get new credentials for Data Warehouse.
1.3 Create ODBC Data Source in PowerBI
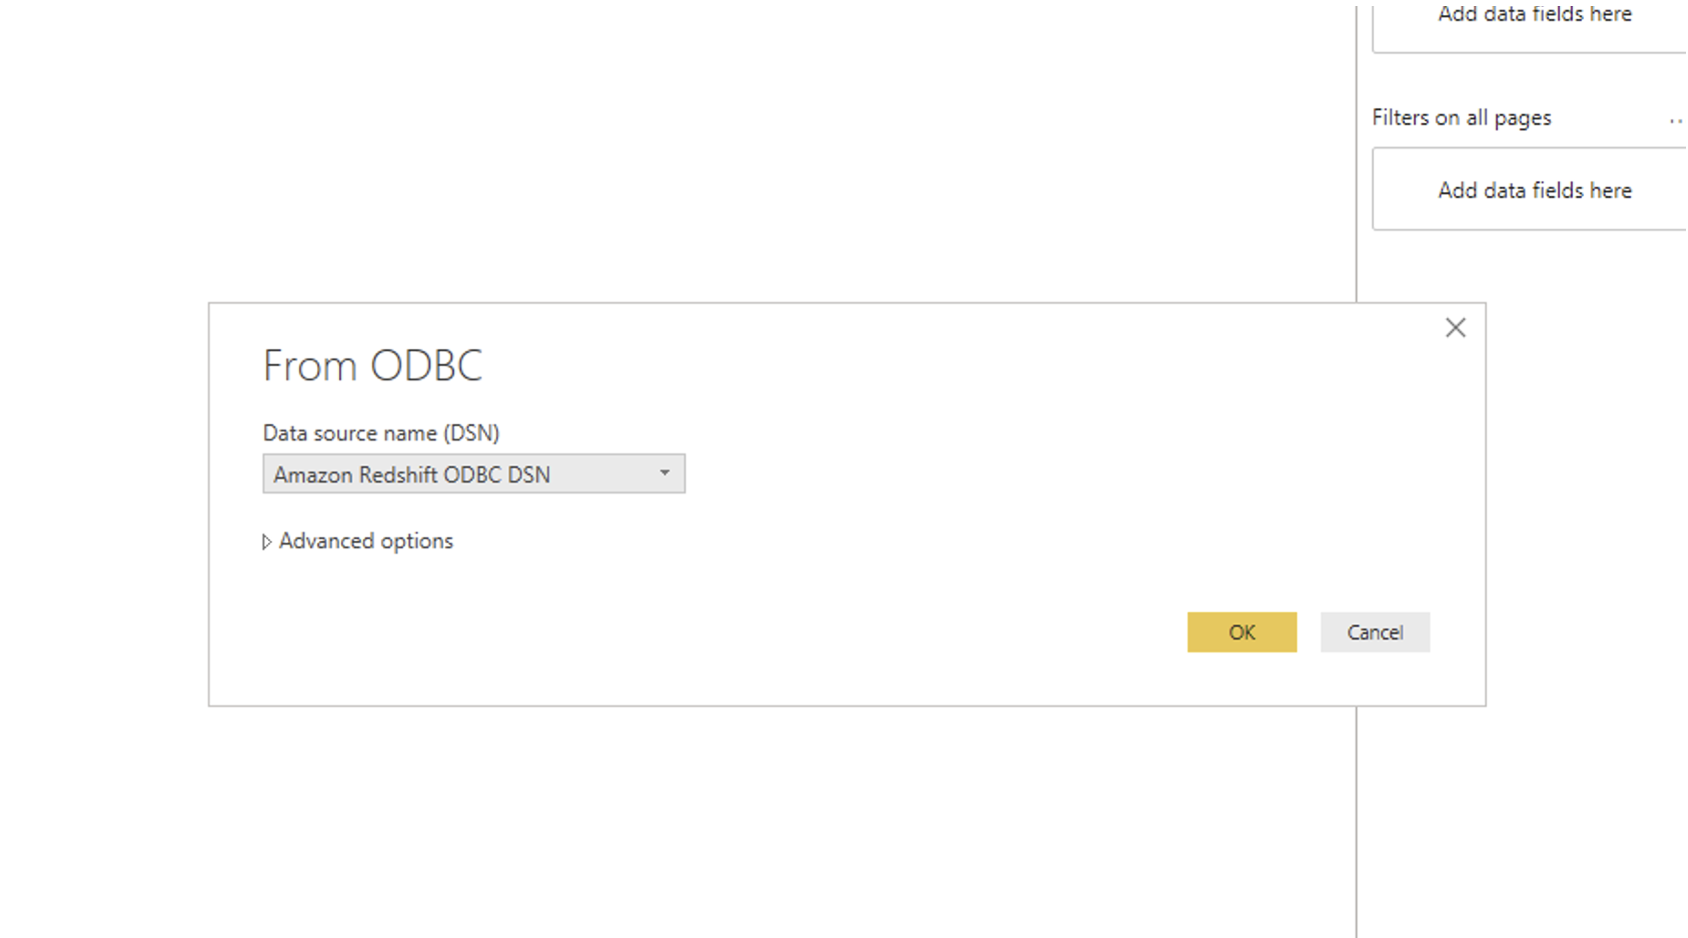
In PowerBI, the user can get data using From ODBC as the source and selecting the above-created ODBC source. Users will have to enter the data warehouse details (username and password) and then can create the report.
2. Power BI - Athena
In this type of Authentication, we periodically update credentials by creating a task in Windows Scheduler. Similar to Redshift ODBC for PowerBI, there are drivers available to connect with Athena. Download and install the following ODBC driver.
Once the driver is installed, we can schedule the task by following the steps below
Download the executable file update_driver_auth.exe
- If the Python file is selected instead of the executable, then make sure that
pyinstaller,pywin32,pyjwtandrequestspackages are installed using PIP. - Run command
pyinstaller –onefile .\update_driver_auth.pyto generate an executable file with nameupdate_driver_auth.exein{cwd}/dist. - To download the python script
- If the Python file is selected instead of the executable, then make sure that
Download the Powershell script schedule_task.ps1
Execute the powershell script by running the command .\schedule_task1
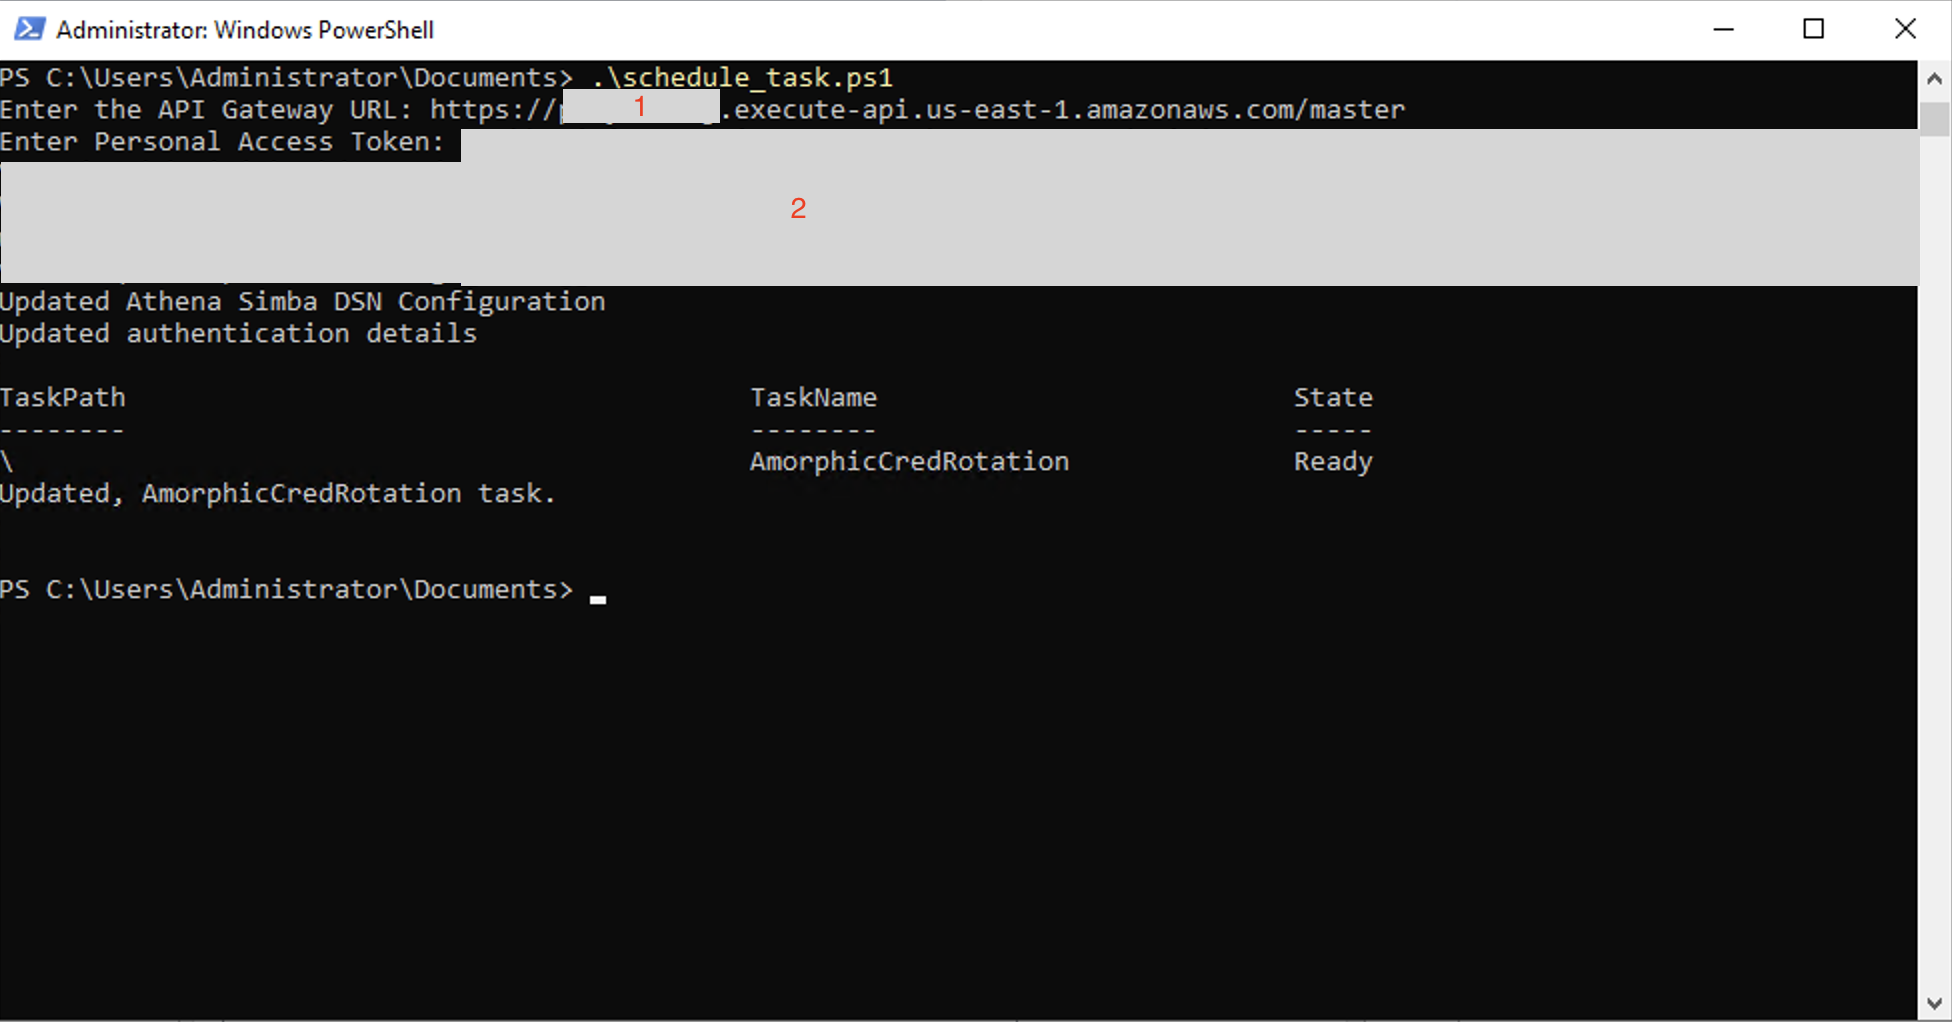
Prompt asks for details to be entered, one after the other. Following are the details that the font expects
| S.No | Property | Value |
|---|---|---|
| 1 | API Gateway URL | https://{api_gateway_domain}/{api_stage} |
| 2 | PAToken | Personal Access Token, should be generated from ADP |
- Once the details are entered, the program makes a REST API call to the Amorphic API.
- Details retrieved using the API call are then updated in System DSN
SOFTWARE\ODBC\ODBC.INI\Simba Athena. - Once the update is complete, then a basic scheduler task is created.
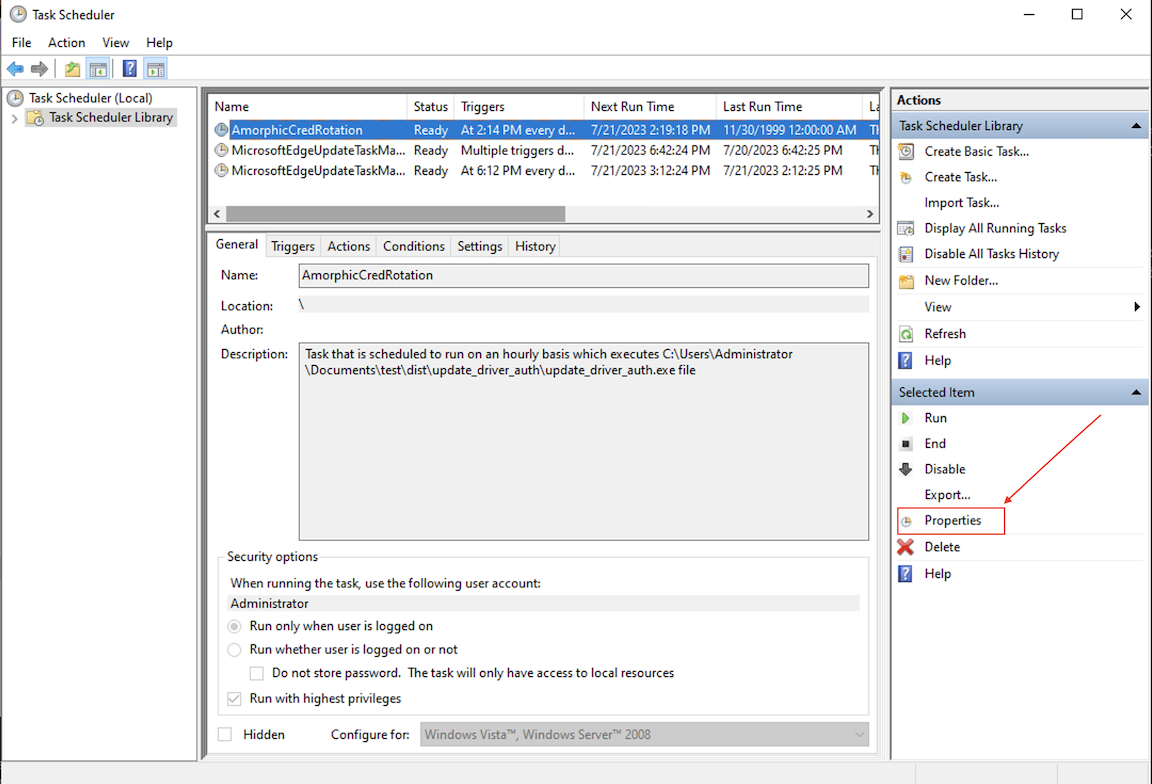
- This task can be accessible from Task Scheduler, review it and if the details added to the task are accurate.
- Every time a user needs to update credentials, they will have to run the PowerShell script and provide the details.
There might be some warnings thrown by browser and Windows at the time of downloading scripts and executing them,
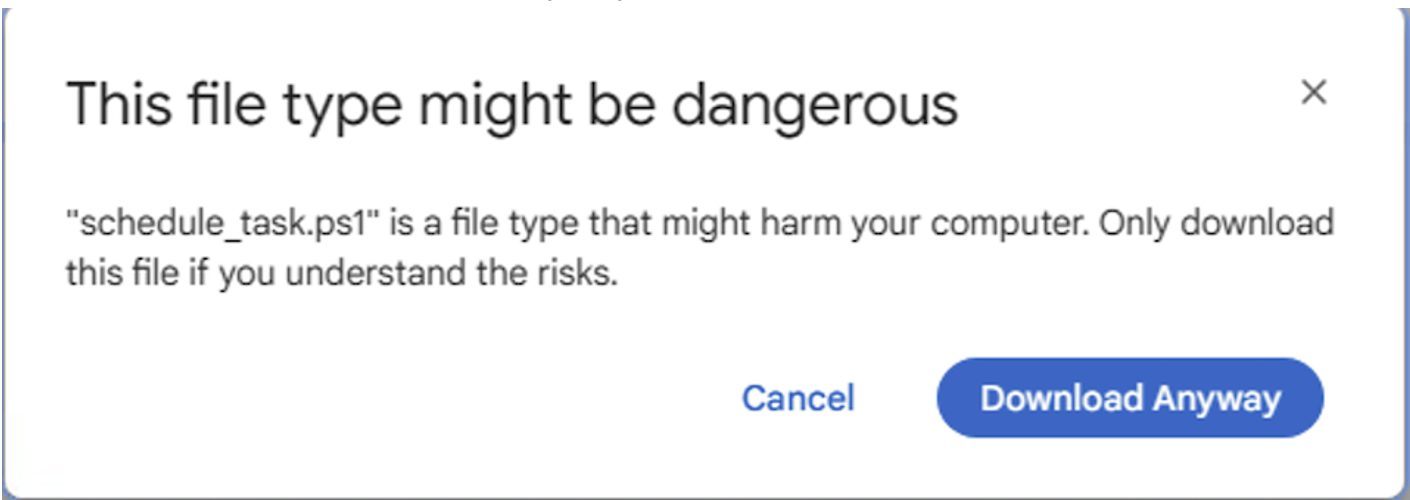
This message may pop when downloading any of the three files, select Download Anyway.
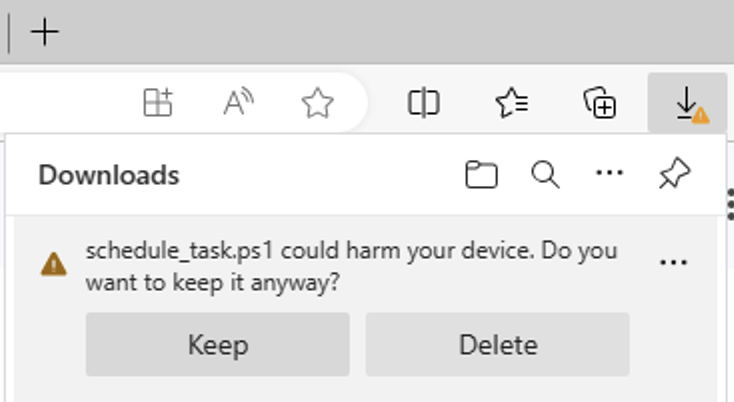
When downloading the file, there is a possibility of this warning
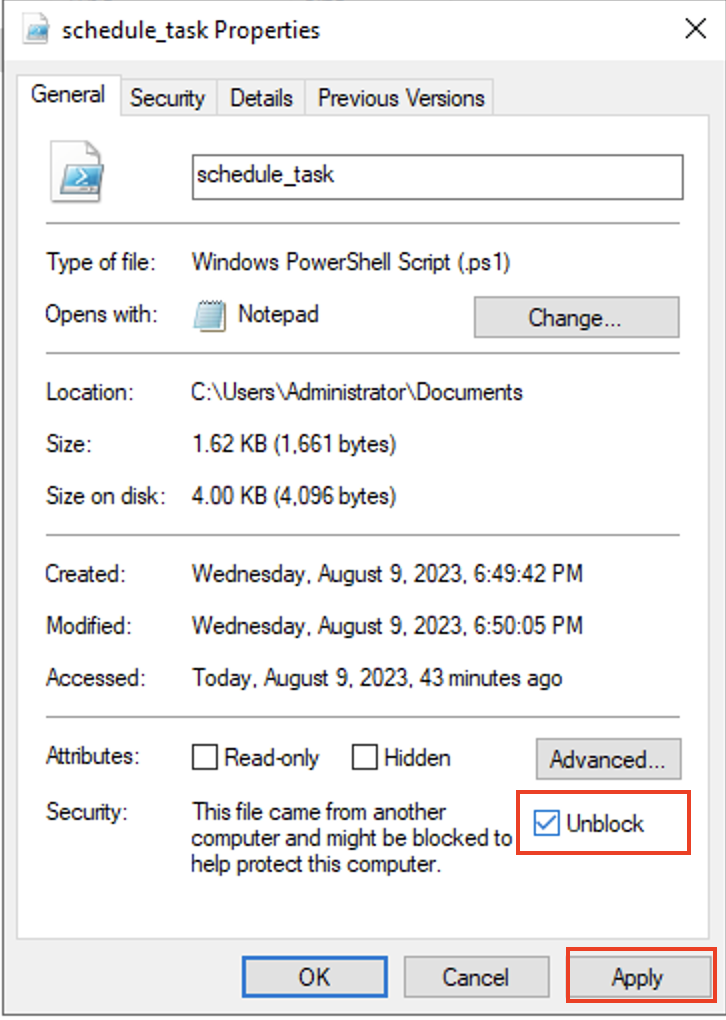
Before executing the script, open properties and update unblock for schedule_task.ps1
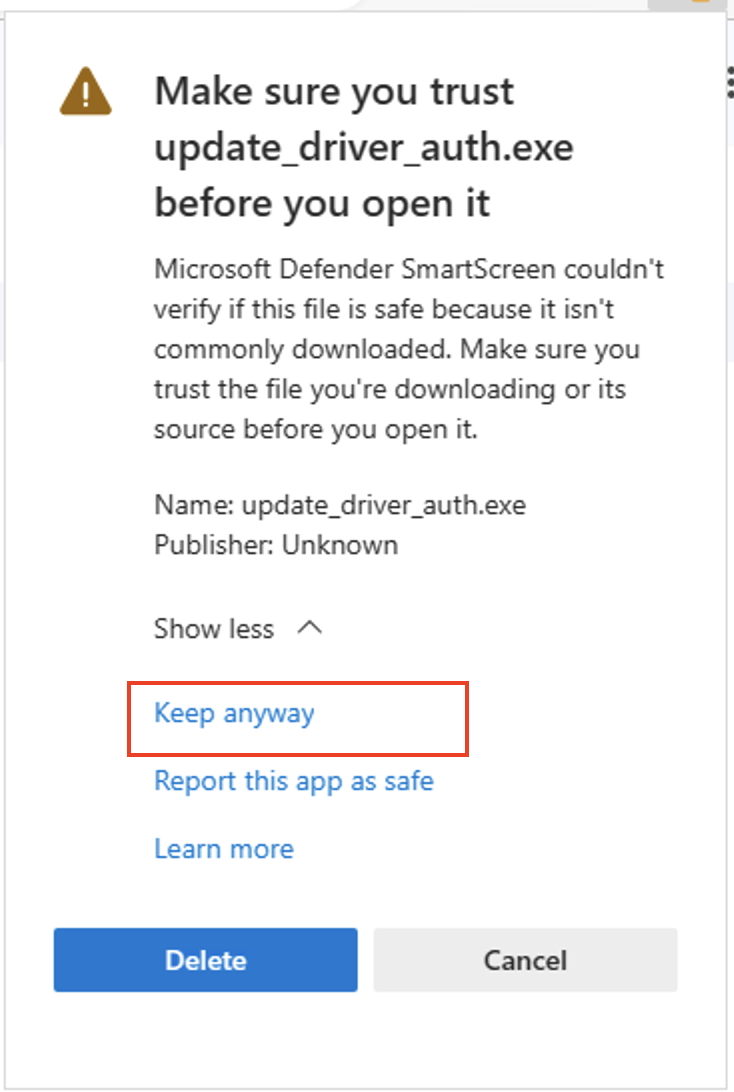
When downloading the executable, there is a possibility that this box could appear, select Keep anyway
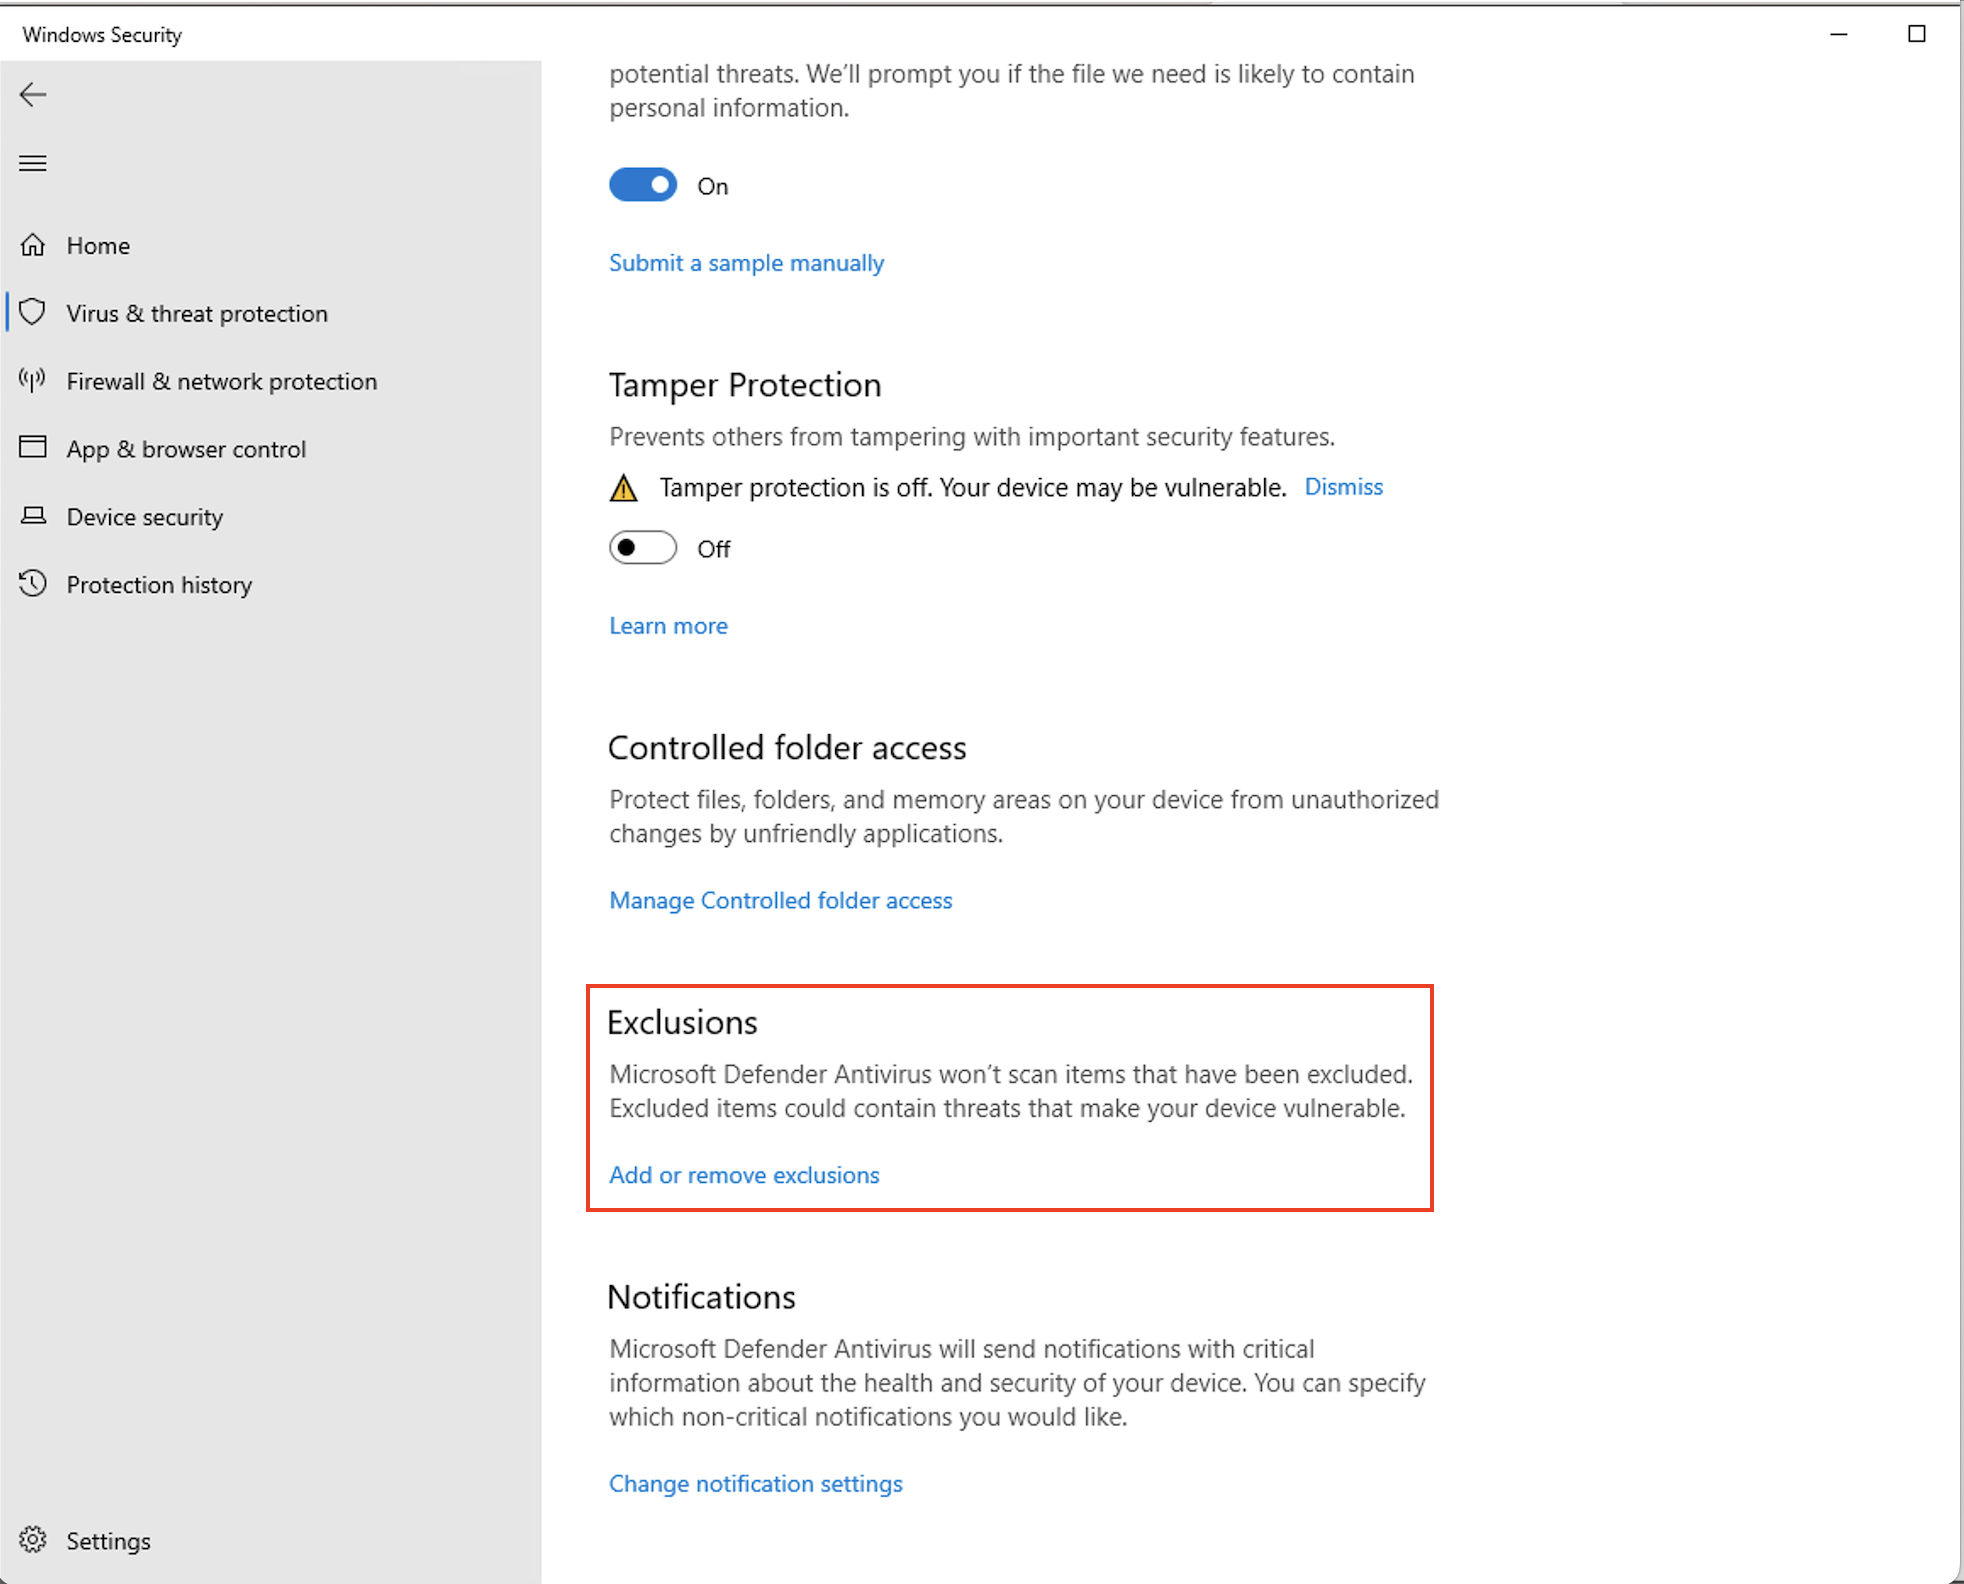
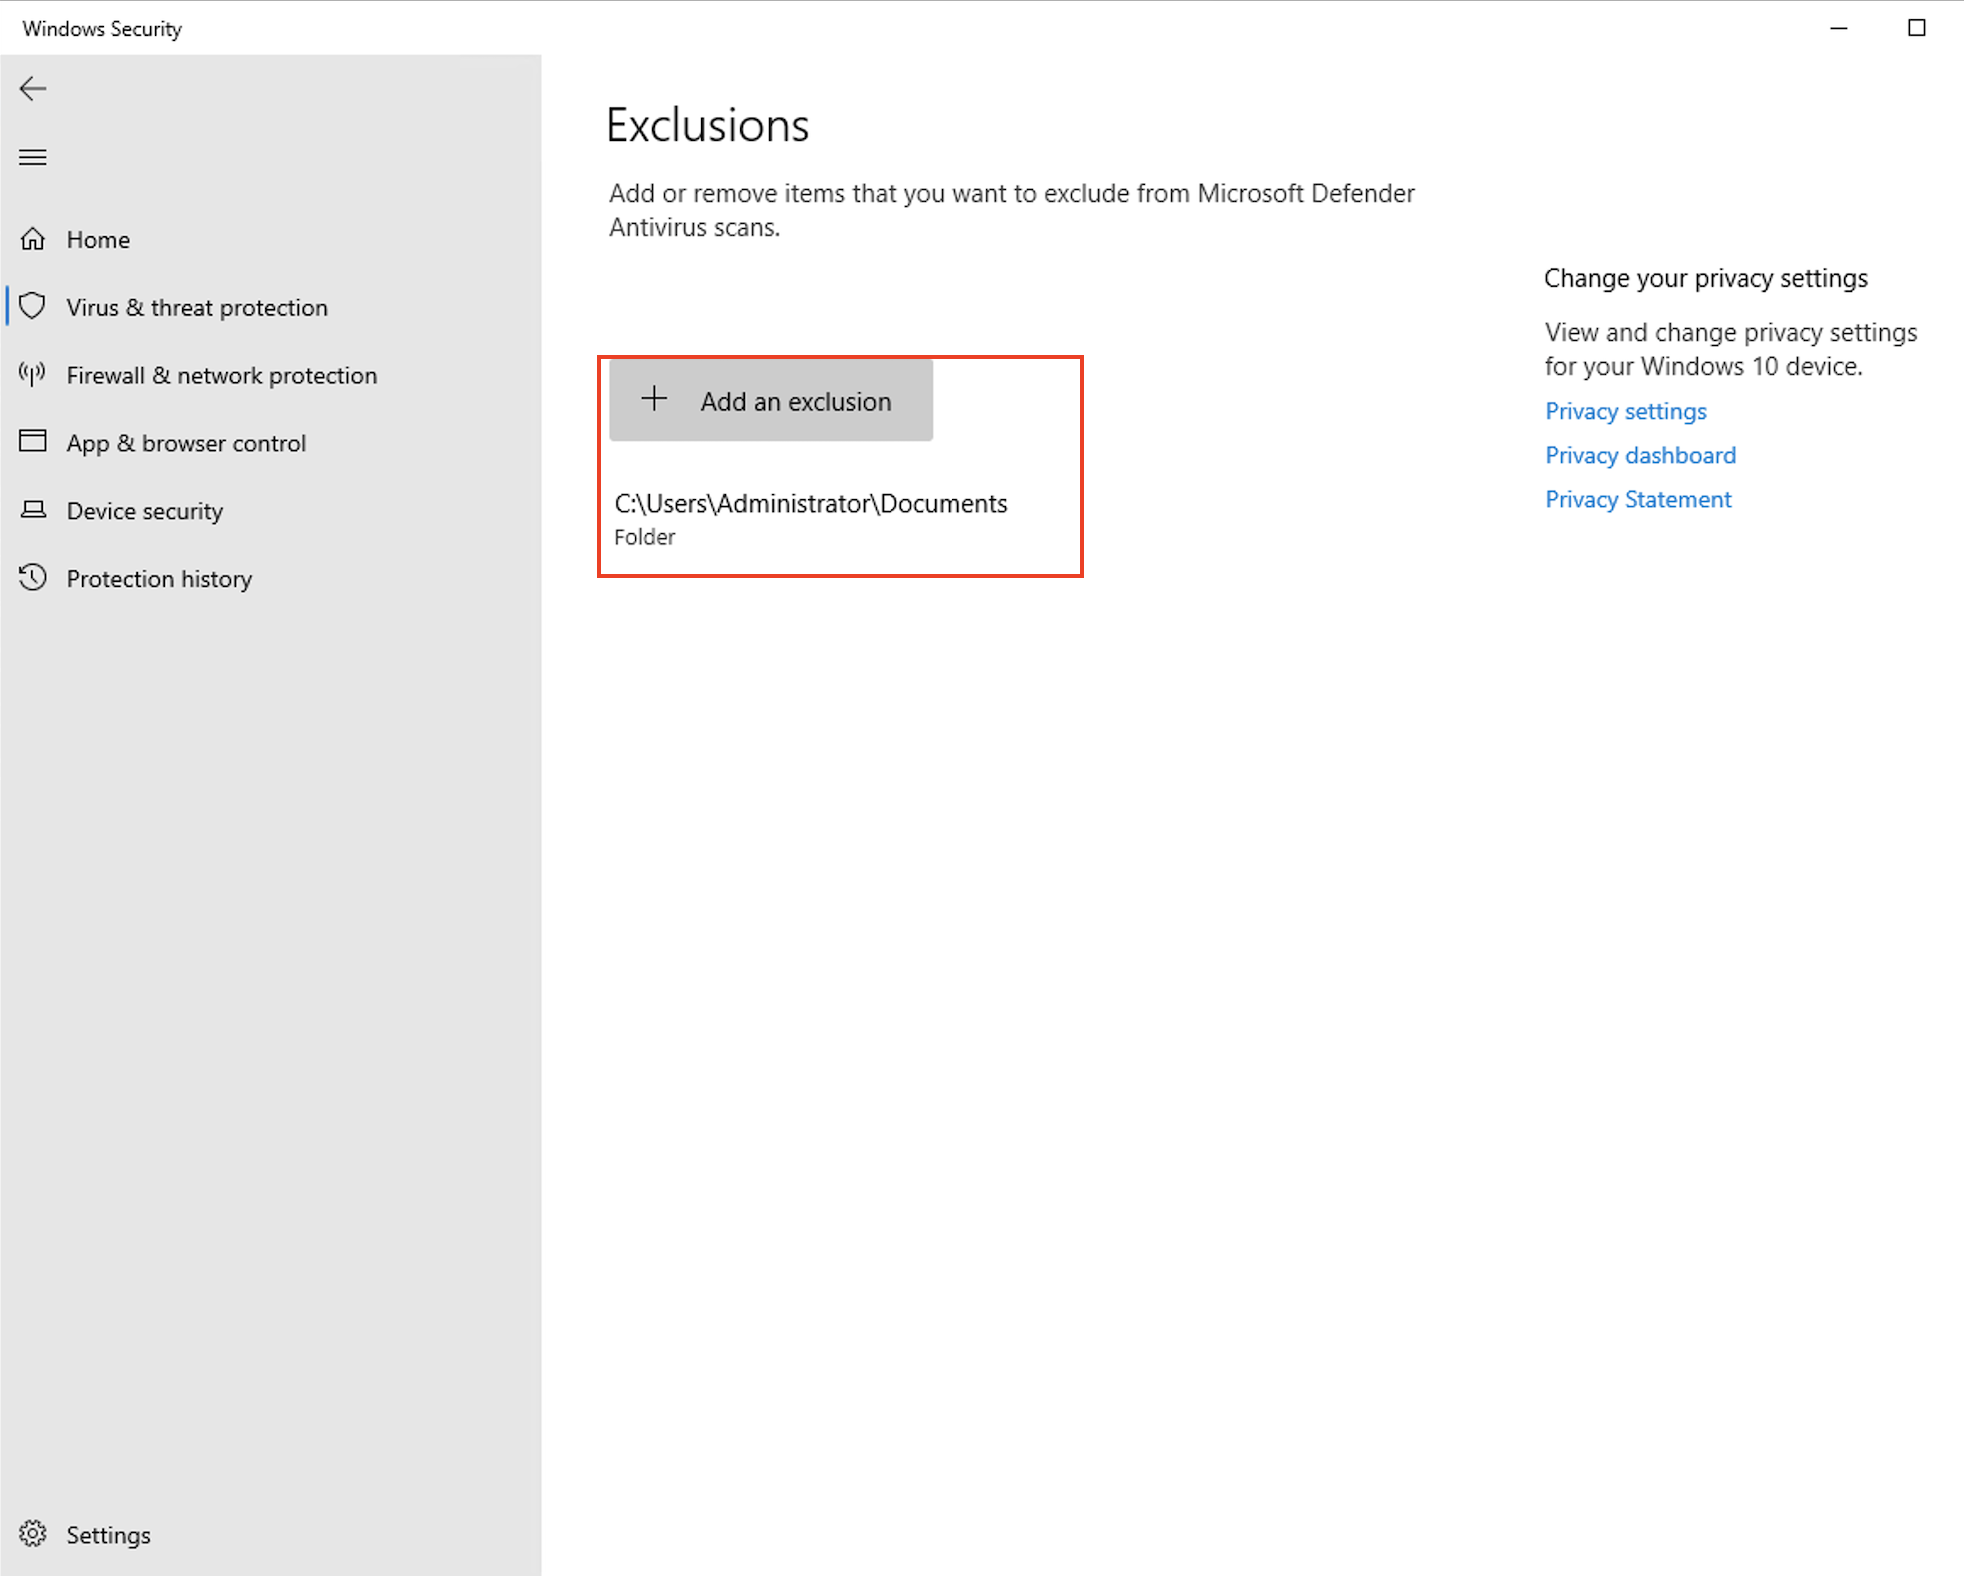
To avoid windows defender/security from deleting it, exclude the directory where the files are stored
3. R Studio - Redshift
3.1 Prerequisite
To access the Amorphic Data warehouse we need to install a relevant driver. Please follow sections 1.1 and 1.2 for driver installation.
3.2 Create Connection to ODBC in RStudio
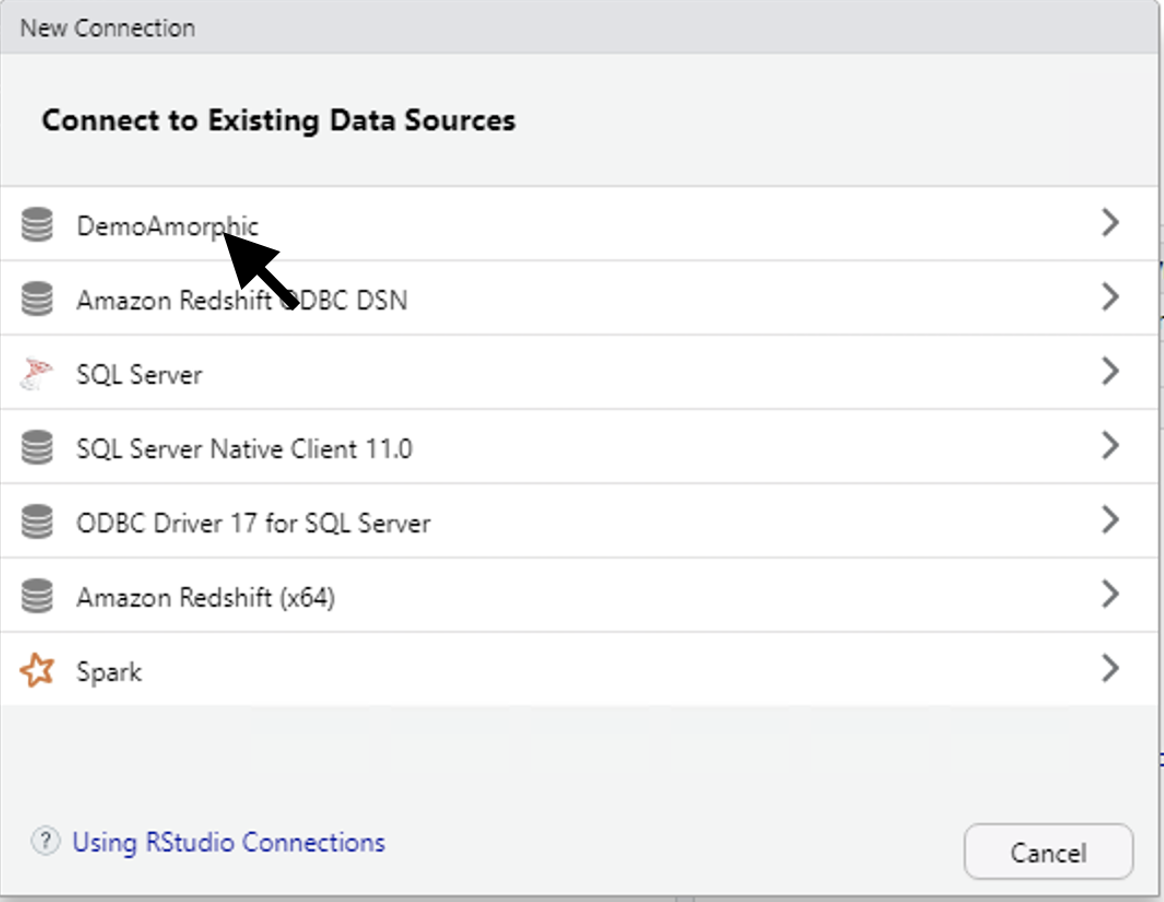
Click on New Connection to create a new source

Select the appropriate source which was created in the previous step
4. Grafana - Redshift
4.1 Get the required information from the Amorphic dataset
Get the required information from the Amorphic dataset for a dataset of type Redshift, using the Profile tab. It is best to have a column of type timestamp or other time related format in order to be able to utilize all Grafana visualizations.
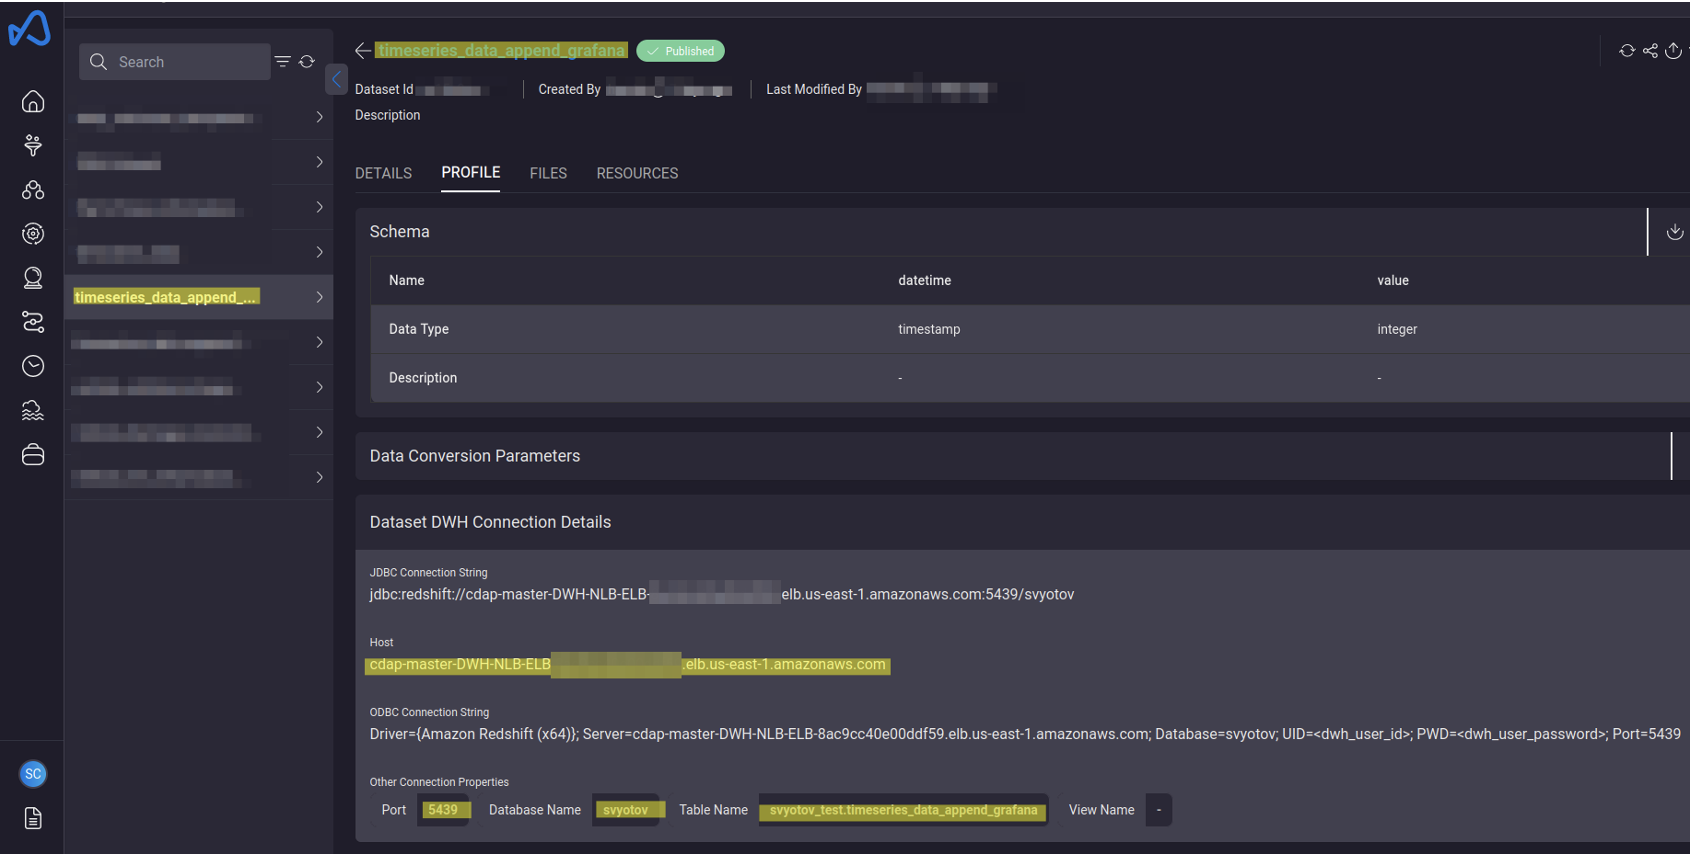
From the profile view you require the following Host: cdap-master-DWH-NLB-ELB-xxxxx.elb.us-east-1.amazonaws.com (sample) Port: 5439 (sample) Database name: svyotov (sample) Table name: svyotov_test.timeseries_data_append_grafana (sample)
You will also need the username and password. Username and password are the DWH credentials which are generated at users first login. If you do not have them you can regenerate them, however anything using the old credentials will lose access.
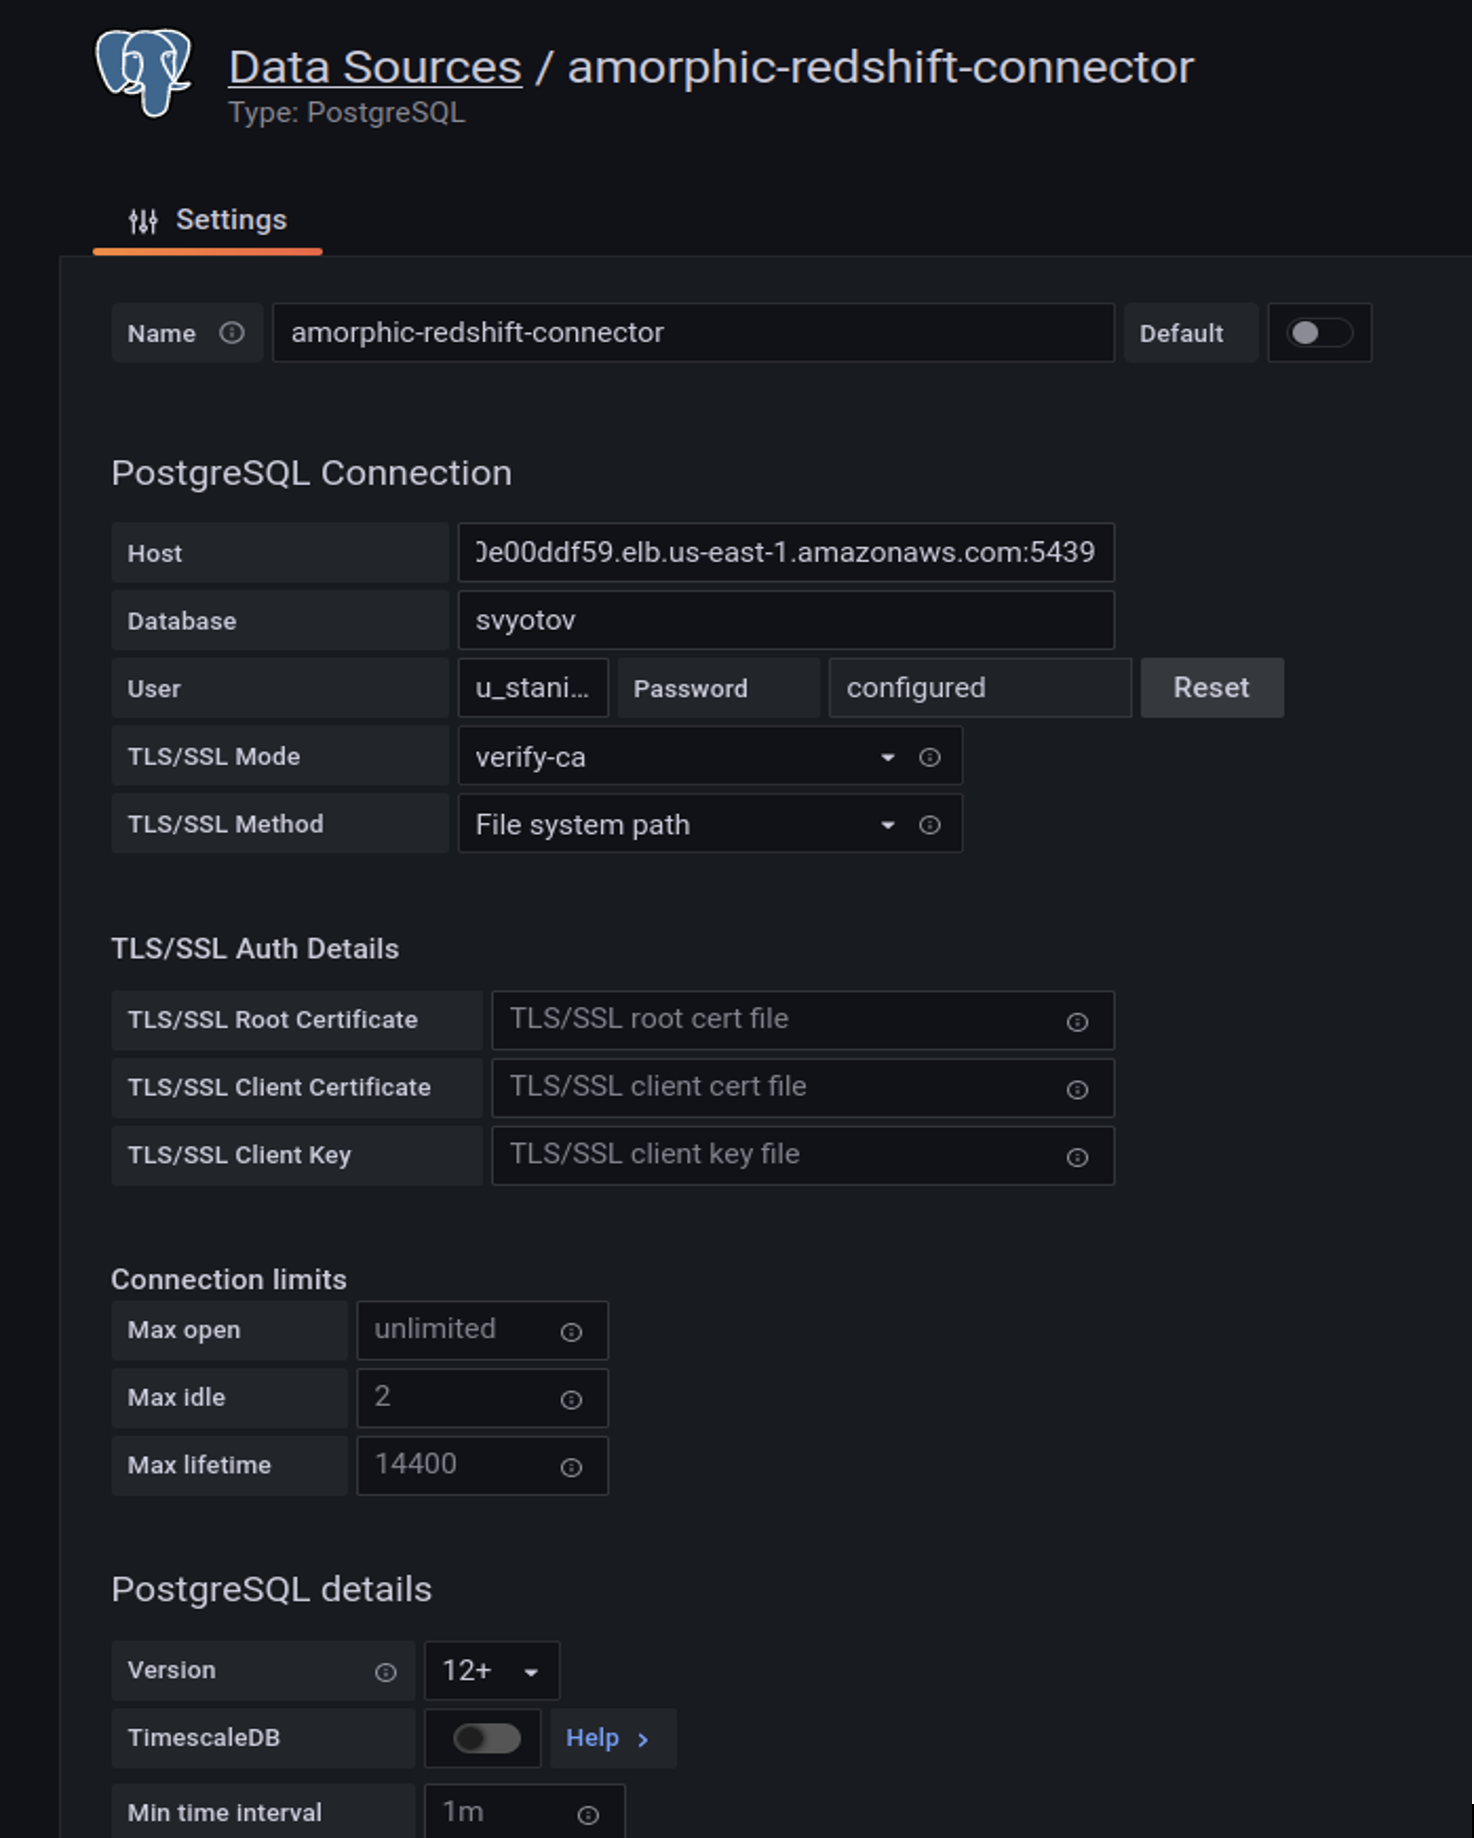
4.2 Connect to grafana and from the plugins configuration UI, configure a Postgres data source
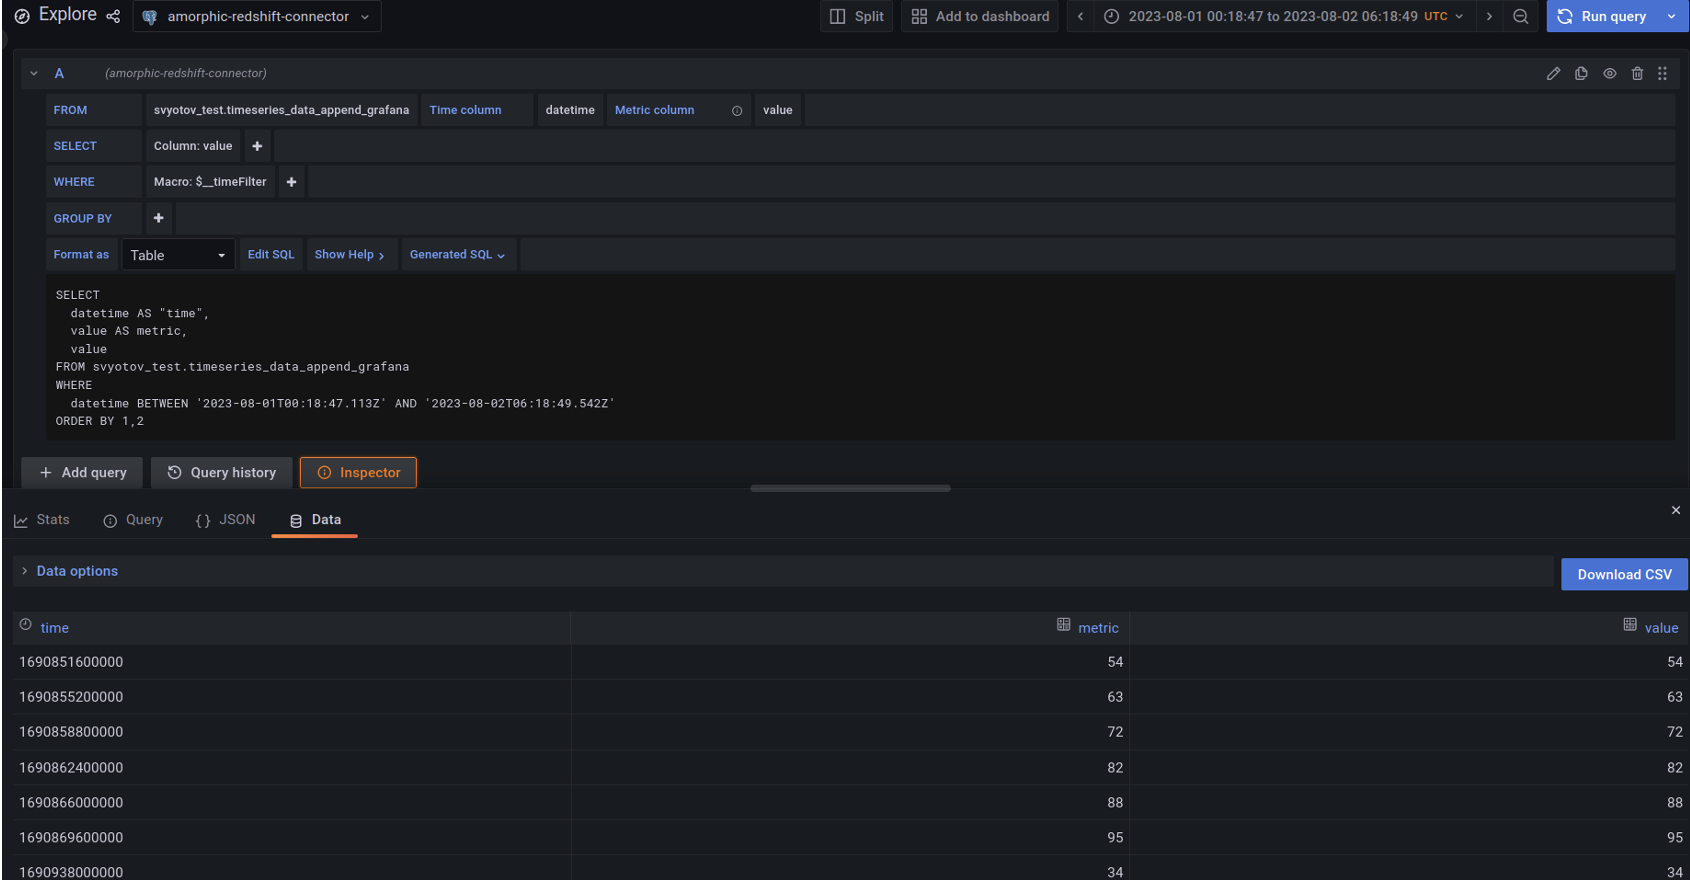
4.3 Perform queries using Grafana and the Amorphic Redshift Source
In the “FROM” field, provide the value of the “Table Name” field from Amorphic’s Datasource profile view.
In the “Time column” provide the name of the column which contains the data of TIMESTAMP or equivalent data format.
In the “Metrics Column” provide the name of the column you would like to visualize over time.
5. Grafana - Athena
5.1 Ensure you have installed the Amorphic Athena Grafana data source plugin to Grafana
A copy of the release 0.0.1 can be found here. You need to unzip the file into /var/lib/grafana/plugins/amorphic-athena-datasource/ of your Grafana cluster(s).
5.2 Create an Amorphic token with sufficient permissions to read all the datasets required
You can find documentation here on how to acquire the token.
5.3 From the Amorphic Dataset view, gather the required information for the dataset
You will need the database and the table names, as well as the name of the column containing the time stamp.
5.4 From the Amorphic Rest API view you will need to acquire the Rest API URL
You can find documentation here on how to acquire the URL.
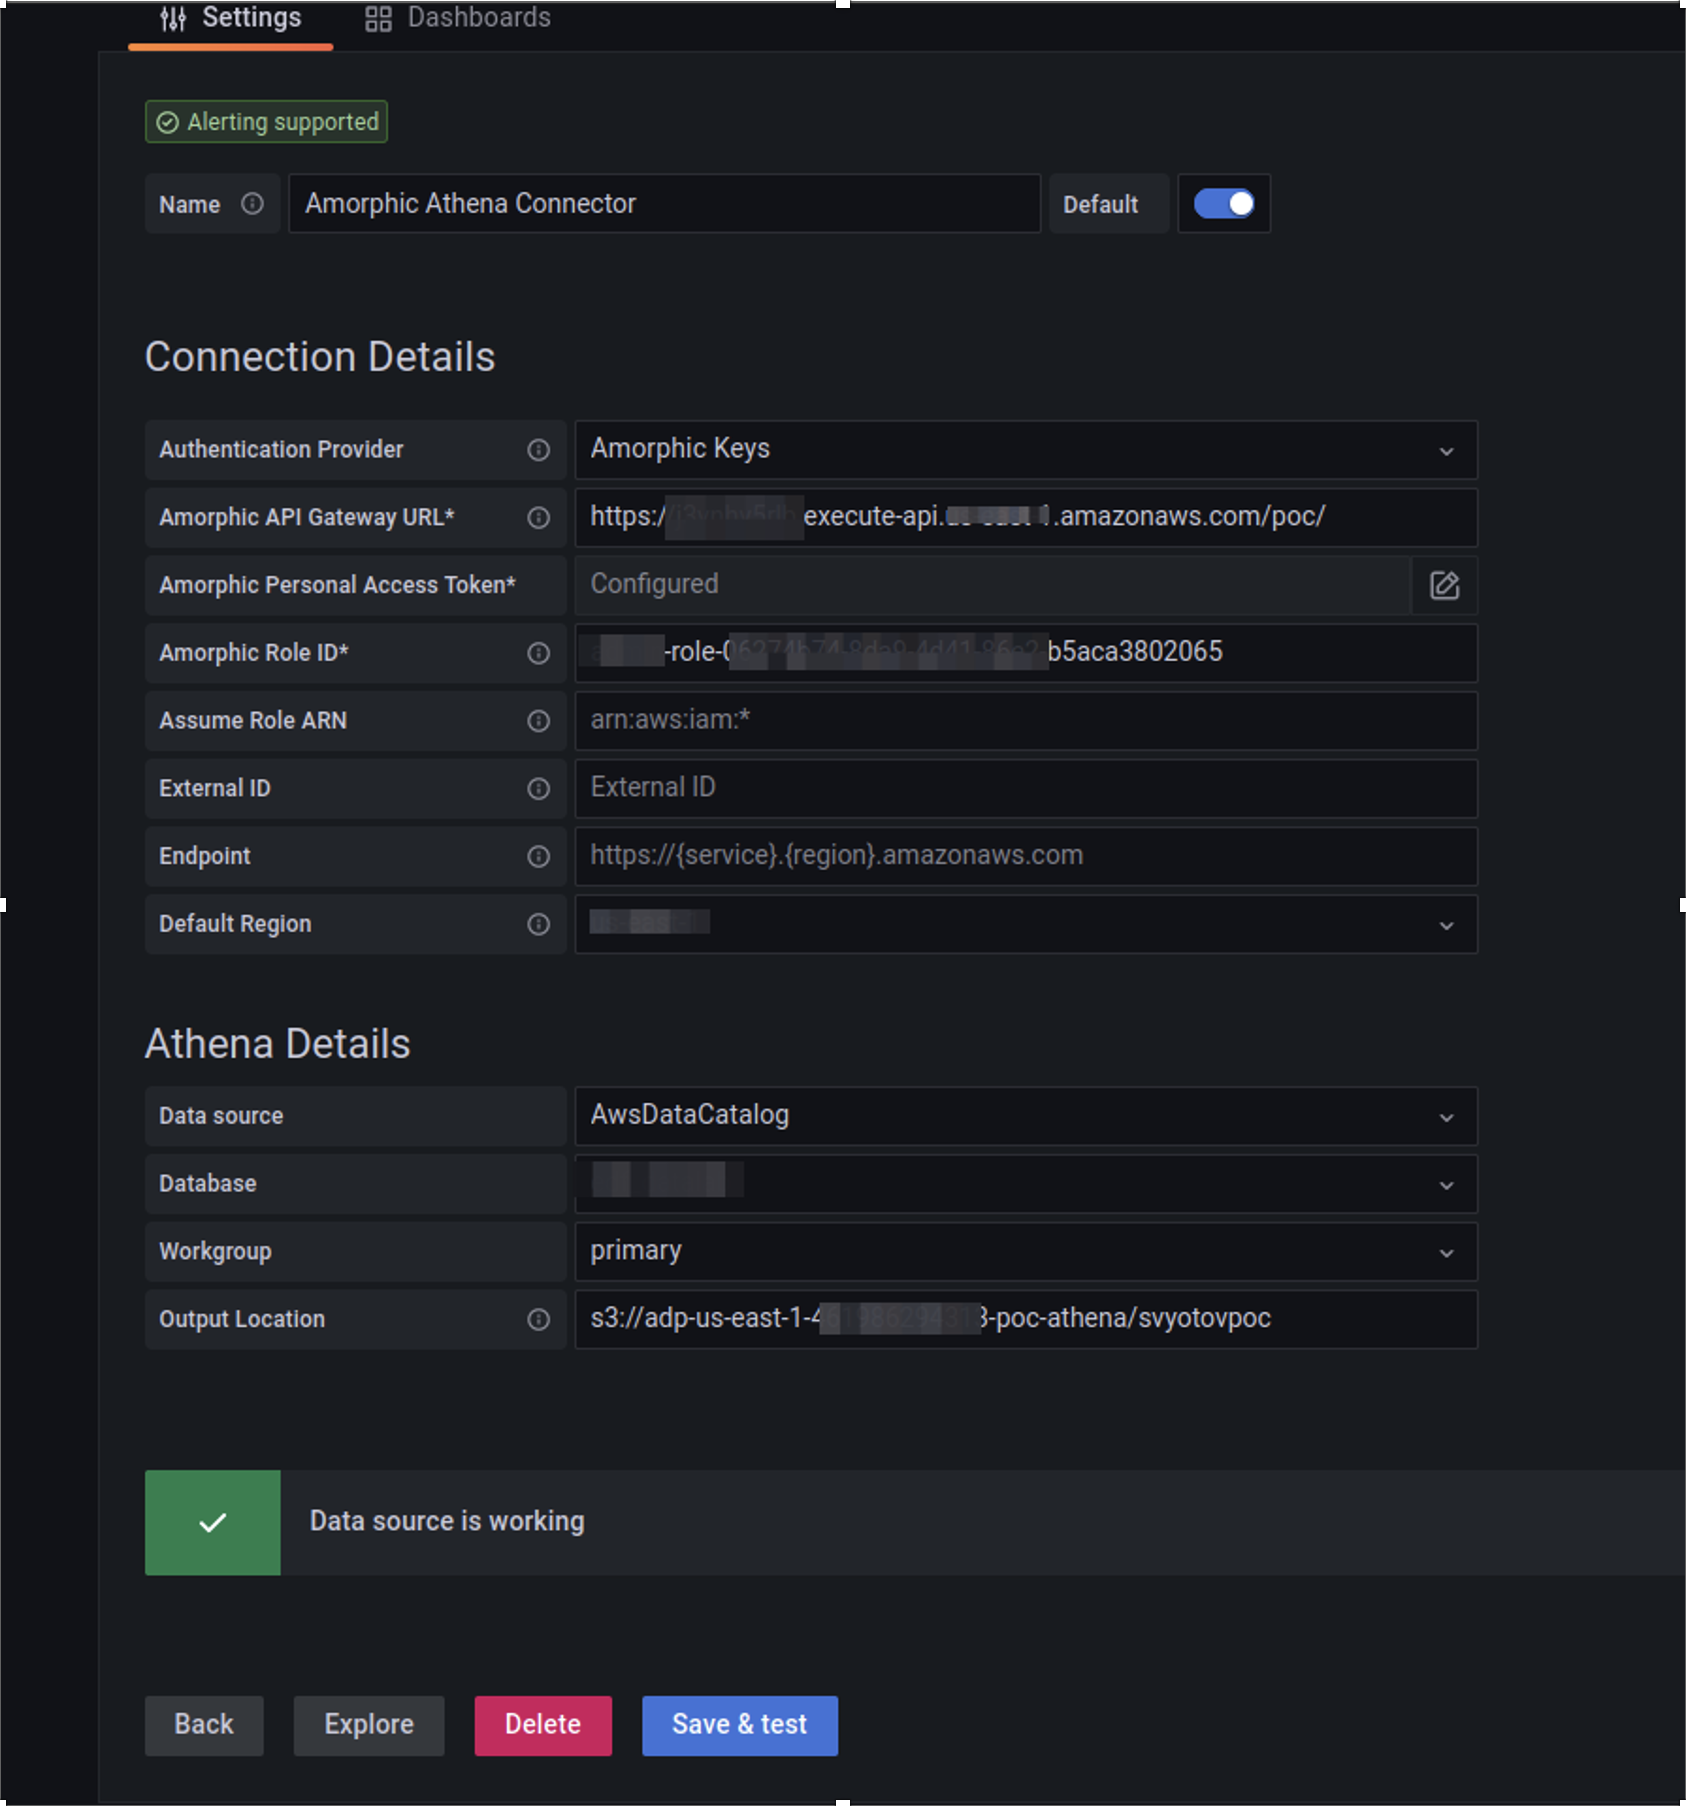
5.5 Connect to grafana and from the plugins configuration UI, configure an Amorphic Athena data source
You need to configure the primary configuration block:
- Amorphic API Gateway URL
- The Amorphic Personal Access Token - PAT
- The Role ID for the token. This is available when a user lists the details of a role.
- The default region
You also need to configure the secondary configuration block:
- For “DataSource” use the AwsDataCatalog
- For “Database” use the database from the Amorphic dataset view.
- For “Workgroup” use “primary”.
- For “Output Location” use the same s3 bucket the Amorphic dataset has, however replace the
-dlzsuffix with-athenaand for prefix use your Amorphic user name. The Amorphic user name can be viewed in the Amorphic UI, under the User profile section.
5.6 Perform queries and create dashboards