
Process Flows
Process Flows is where user can define the extraction logic for the output dataset. Users can define keys, predefined business rules and/or a custom script to extract/validate the results. Here, users can also review the results generated by the flow, suggest changes and update the results. The generated results are stored in the corresponding dynamodb dataset in Amorphic.
How to create a Process Flow?
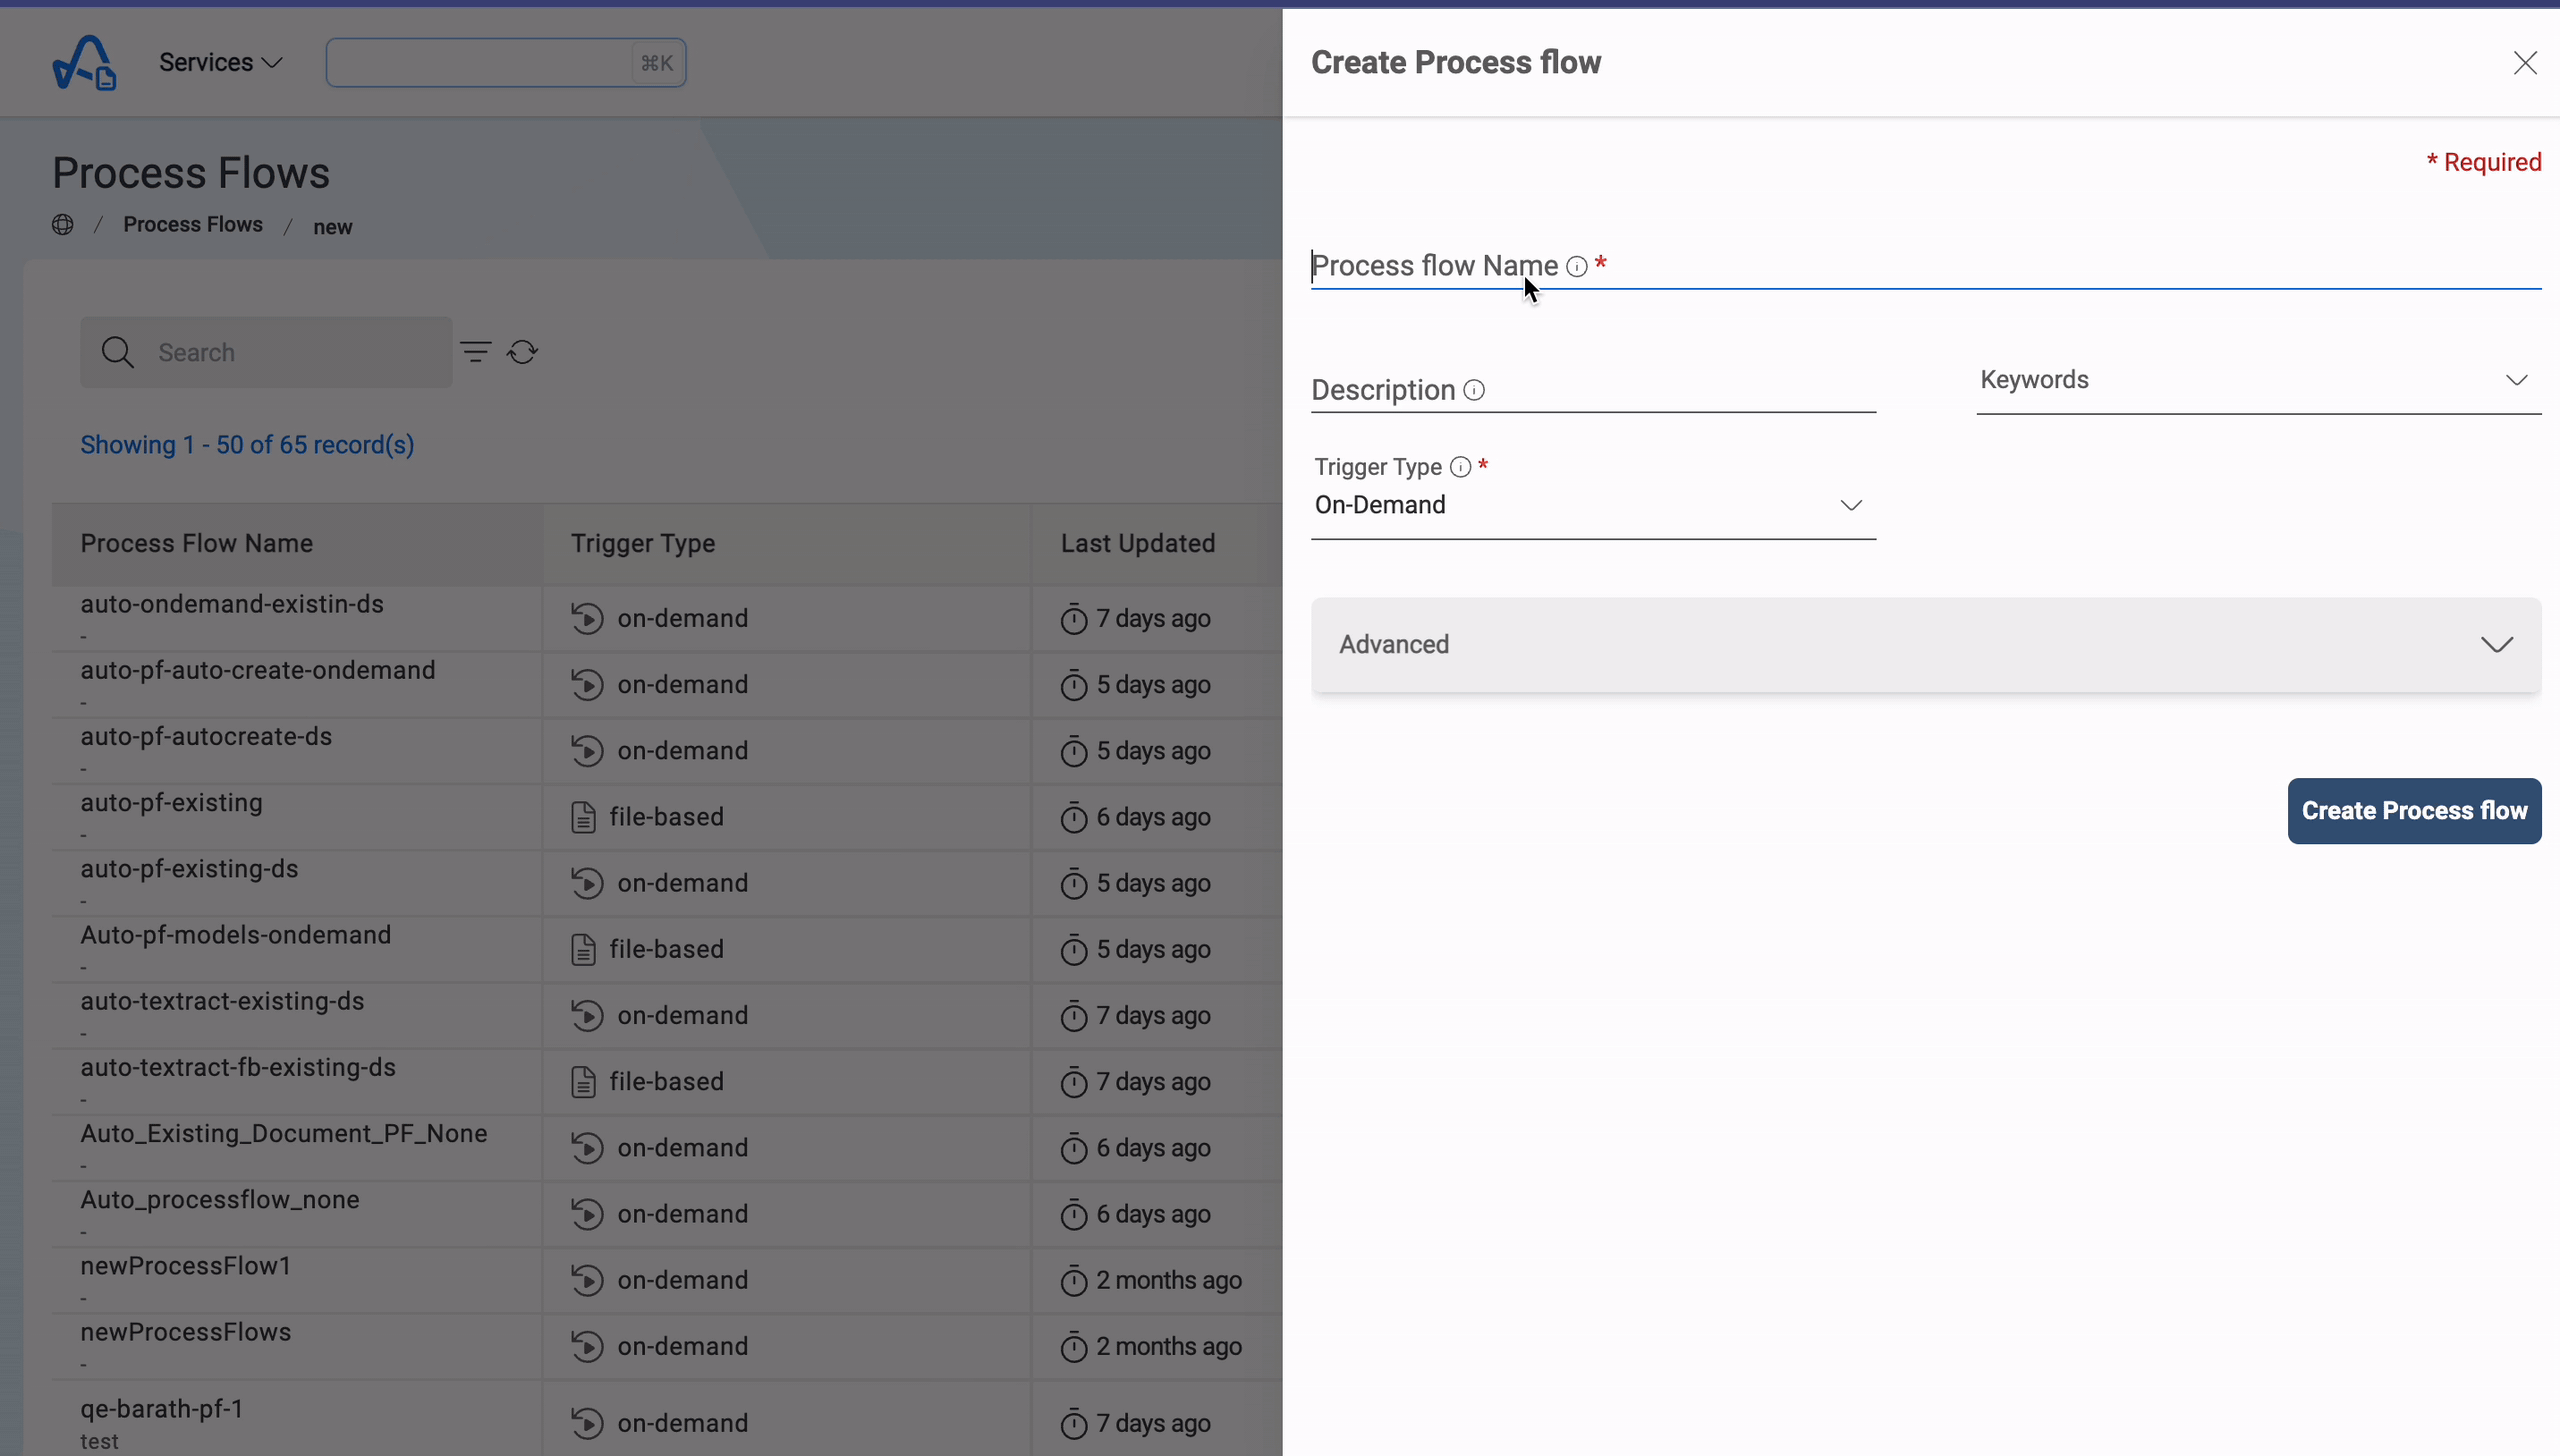
- Click on
+ New Process Flow - Fill in the required fields (Details listed below).
Following fields are needed to create a process flow:
| Properties | Details |
|---|---|
| Process Flow Name | A name for the Process Flow. This should be unique across the platform. |
| Trigger Type | There are three trigger types:
|
| Schedule Expression | Time-Based trigger type require a schedule expression. i.e., Every 15 min, daily, etc. Read more |
| Description | Description of the Process Flow being created. |
| Keywords | Keywords indexed & searchable in app. Choose meaningful keywords to flag related flows & easily find them later. |
| Auto Create Document Store | Enabling this option allows user to auto-create the Source Document Store. User can choose an existing source Document Store by disabling this option. |
| Features | Applicable when Auto Create Document Store is enabled. Features are not required if the Engine is selected with any of the models. Types of features that user want to enable for Document Store: FORMS, TABLES, SIGNATURES. |
| Engine | Applicable for auto-creating Document Stores. Choose 'Textract' to run text extraction using Amazon Textract. For using other OpenAI/Bedrock models for text extraction, select the corresponding option by verifying the model's modality(TEXT/IMAGE) according to the use case. If text extraction is not required and you have your own custom script for that, select 'None' from the list. |
| Use Default Domain | Amorphic dataset for Process Flow will be created in default domain by enabling this option or user can choose a different domain from Amorphic. |
| Store Flagged Results | This option can be used to configure whether or not to store the file results which are flagged in the output dynamodb table. This option will be enabled by default. It is editabled but changing it will not affect the existing files |
| Advanced Configurations | This feature allows user to set up notifications and sending message to queue for each file's terminal statuses - succeeded, failed, or rejected. |
| Output Dataset Keys | List of keys that the user wants to extract from OCR Results or new keys that the user wants to map some output to. Users can either select from list of keys from OCR output(if present) or define custom keys |
| Rules | Users can select from a predefined set of rules for validating or extracting data for a particular key. The rules will be applied sequentially. For files processed by the 'Textract' engine, this rule is applicable only when the 'FORMS' feature is selected for the corresponding document store. |
| Custom Script | If the user has some custom logic that cannot be applied using existing rules, they can define it in a Python script following the format specified in the documentation. |
Output Dataset Keys should not have dots in the name, if a Custom Script is associated with the Process Flow.
Advanced Configuration
When a file has any of these statuses: succeeded, failed, or rejected, user can choose to receive an email alert and/or a message in queue, detailing the file's status and information.
- SendAlert: Sends an email alert to the user.
- SendMessageToQueue: Sends information about the file and its status to a queue. For example:
- User can select the file status as Rejected and configuration as SendMessageToQueue
- Whenever a file rejection occurs in that process flow, the user will receive a message in the queue named
FileStatusQueue.fifowith details regarding the action.
Output Dataset Keys
These are the list of keys that the user wants to store in the output. If the user creates a process flow with a source document store in which has OCR process is already run with "FORMS" selected in the features, they can select the keys from the list of keys extracted from the OCR output. For such keys, the result value would be directly mapped from the OCR output.
Only the first occurrence of such keys would be extracted. Users can also specify custom key names which they want in the output. The values for these keys can be populated using extraction rules or using the custom script. By default, the result value for output keys would be set to an empty string.
It is mandatory to specify at least one output dataset key in order to run the process flows.
For the Document stores, Features are only applicable for 'Textract' type of engines.
For the process flows associated with 'None' type engine Document Stores, OCR results will not be available. In such cases, users must manually add the keys required to run the process flows.
Rules
Rules are not applicable to Process Flows which associated with Document Stores using the 'None' type of engine. If "FORMS" is selected as one of the Features in document store linked to the process flow, users can choose and select from a list of predefined rules that need to be applied on the OCR output.
There are mainly two types of rules - extraction and validation rules. Extraction rules can be used for extracting data to and manipulating existing data linked to a certain target key. Validation rules can be used for validating data linked to a particular target key. If the validation rule fails, the file would be marked for review. If the target key specified is also defined in the OutputDatasetKeys, the key would also be marked for review.
Below image shows how to create a new Process Flow
You can't change the Name, Source Document Store or Domain of Process Flow after its creation.
Rules do not apply to files processed using the 'None' type of engine.
Store Flagged Results
When a user disables the Store Flagged Results option, i.e. opts for not storing flagged results -
- If a file is flagged during a process flow run, the result will not be stored in the output dynamodb table
- If a user flags a file or suggests any changes, the item will be deleted from the output dynamodb table(if present)
- When a user approves the file results or unflags a file, the file entry will be added back in the dynamodb table
How to Run a Process Flow?
There are 3 trigger types for running a process flow.
- On-Demand
- Time-Based
- File-Based
1. On-Demand Run
As the name suggests, users can run On-Demand Process Flows whenever they want.
Following are the step to run a process flow on-demand.
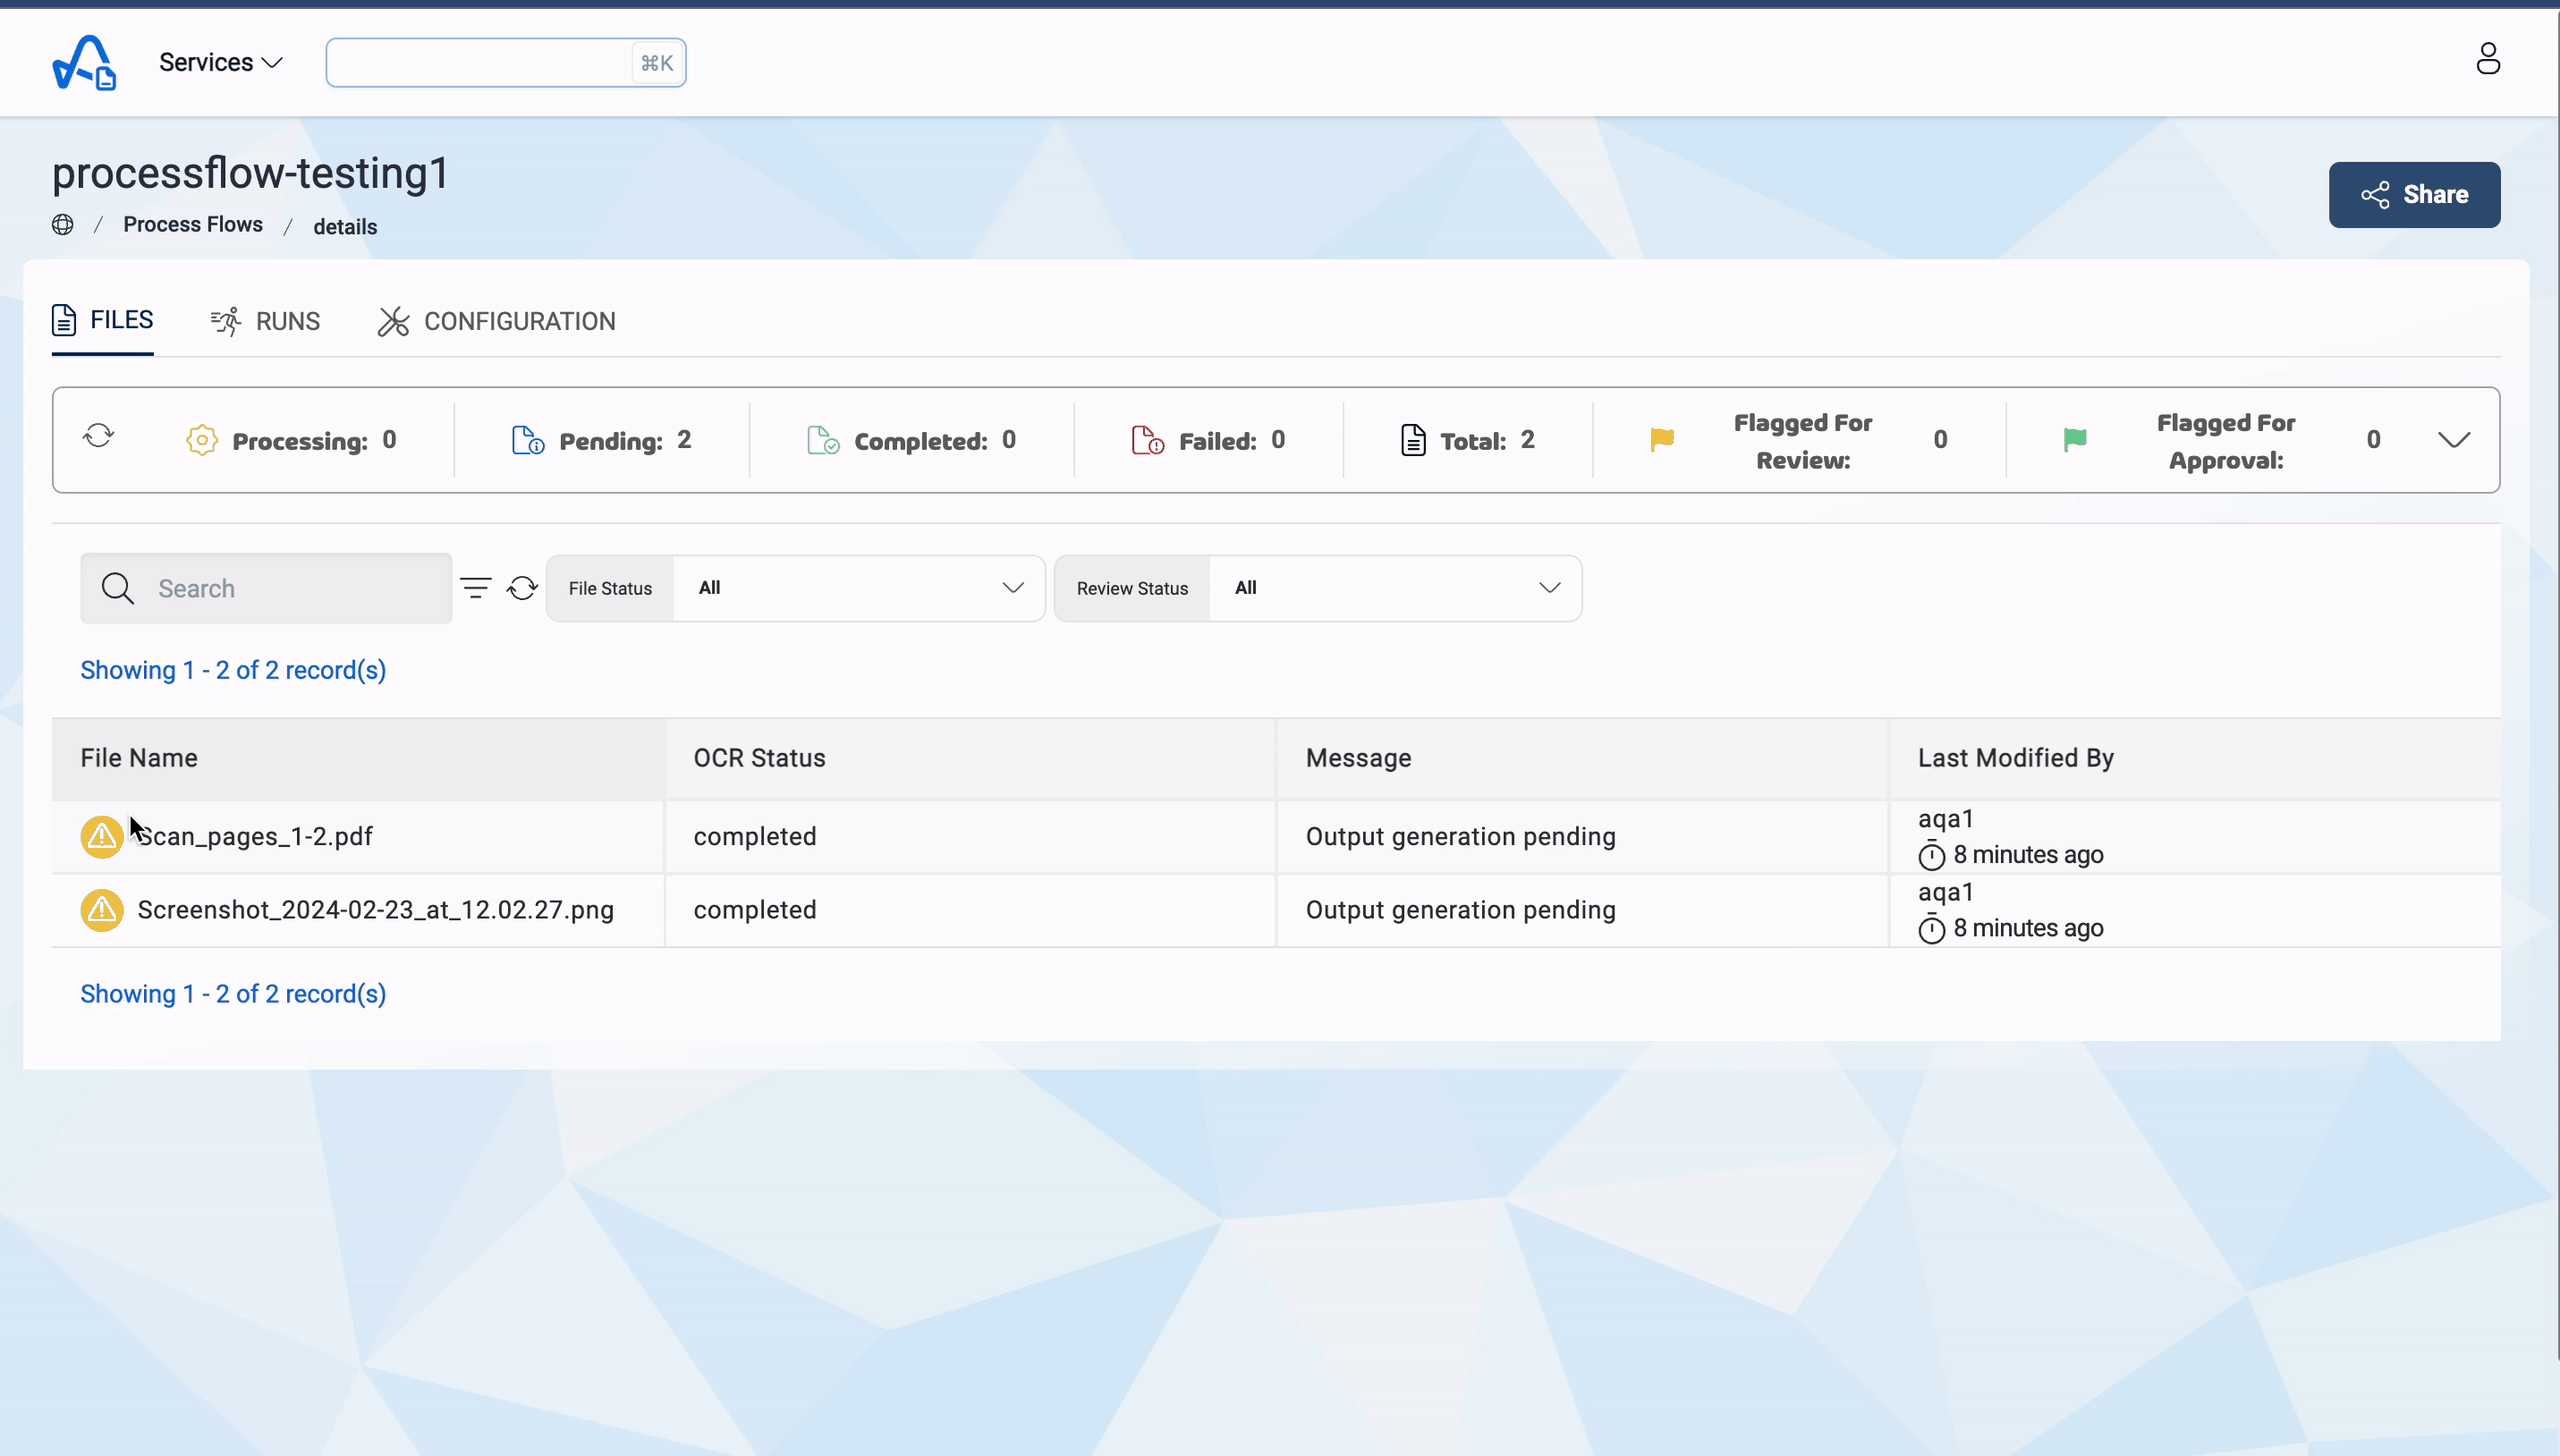
- Select the process flow you want to run and click on the
RUNStab. - Click on the
Trigger Runbutton and select the FileType from the drop-down list. - The FileType can be any of the following:
- All Files: All the files on which the OCR process is completed will be picked up irrespective of the output generation status
- Select Files: Users can select a list of files to be picked up. All the files in that list on which the OCR process is completed will be picked for processing in this option
- Latest Files: All the files on which the OCR process is completed but the output generation is pending will be picked up in this option
- Failed Files: All the files on which the output generation status is failed will be picked in this option.
- Click on the
Trigger Runbutton and to start the Process Flow run.
After the completion of Process Flow run, according to the AdvancedConfiguration setup, users will get an email with all the details of that run. If the run includes the Query-Model rule in its rules, the model usage related information will be present at both the run level and file level. The model usage is represented by Input and Output AIUs(Amorphic IDP Units).
Below image shows how to run a Process Flow
2. Time-Based
The Process Flows with the trigger type as Time-Based will run automatically based on the schedule expression specified by the user.
3. File-Based
If the trigger type is File-Based, then whenever a file is uploaded to the source document store and once the OCR process on it is completed, it'll trigger a new run for that file on that process flow automatically.
There will be a new run for each file uploaded to the Source Document Store, i.e., if you upload 50 files to the source document store, it'll trigger 50 new runs.
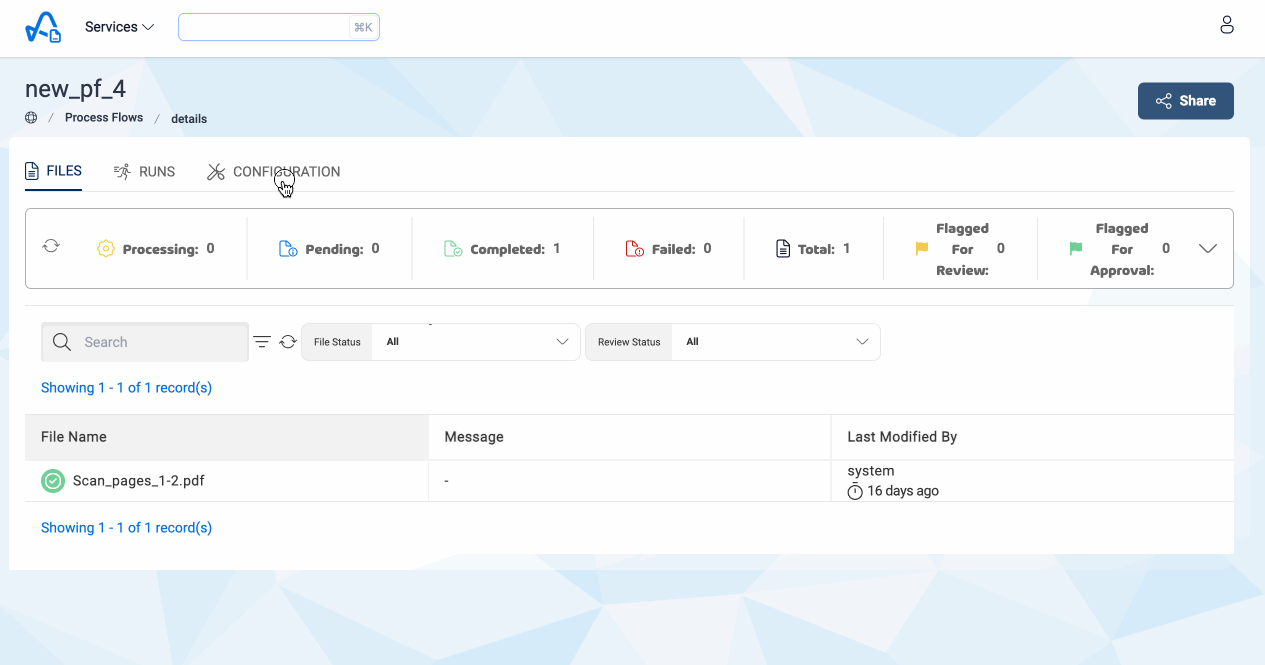
How to edit a Process Flow?
User can edit metadata and/or Rules, Script of a Process Flow
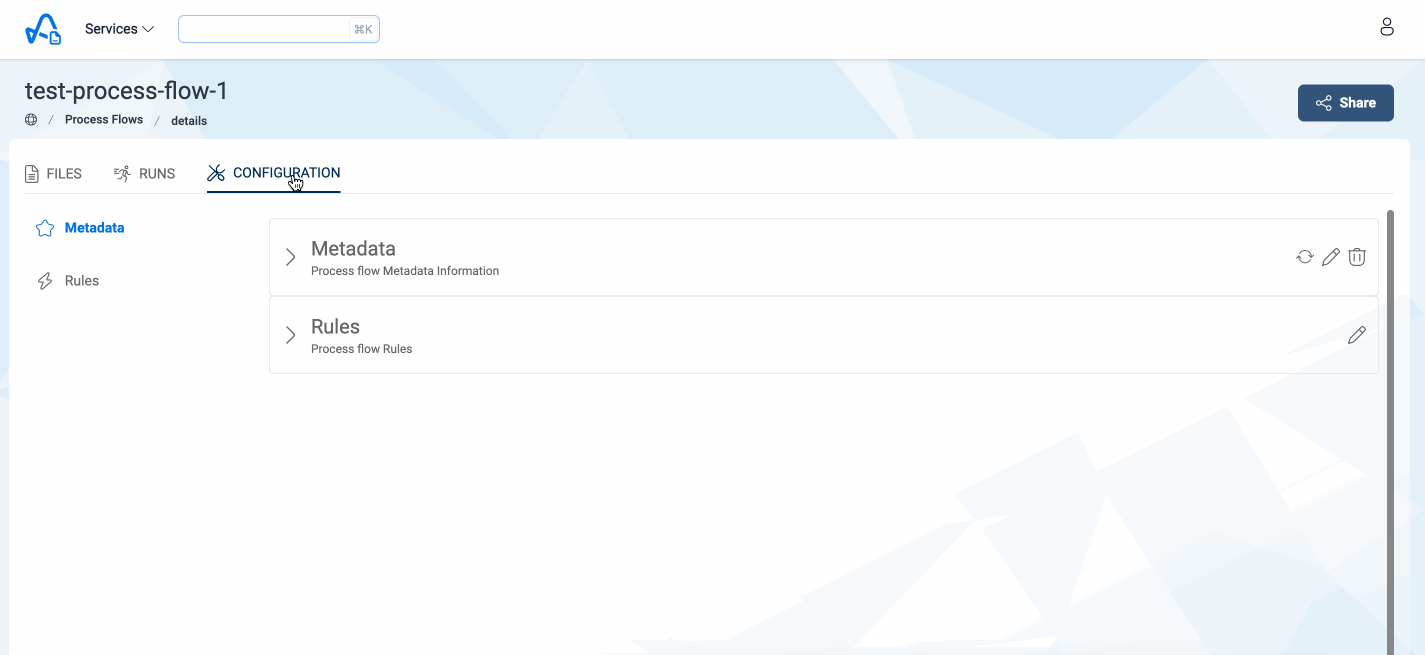
- Select the Process Flow you want to edit and click on
CONFIGURATIONtab. - For updating the metadata - Click on the edit icon in the Metadata and update the required details then click on
Update Process Flowbutton. - For updating Output Dataset Keys, Rules or Custom Script - Click on the edit icon in the Rules or Custom Script(if present) section and update the required details then click on
Updatebutton.
Below image shows how to edit a Process Flow
How to re-sync Document Store files?
User have the option to sync back the files in the Document Store to Process Flow if there are any files in the Process Flow are missing from Document Store. This will be an asynchronous process and user will get an email with details of files that synced back to the Process Flow after the completion of this process.
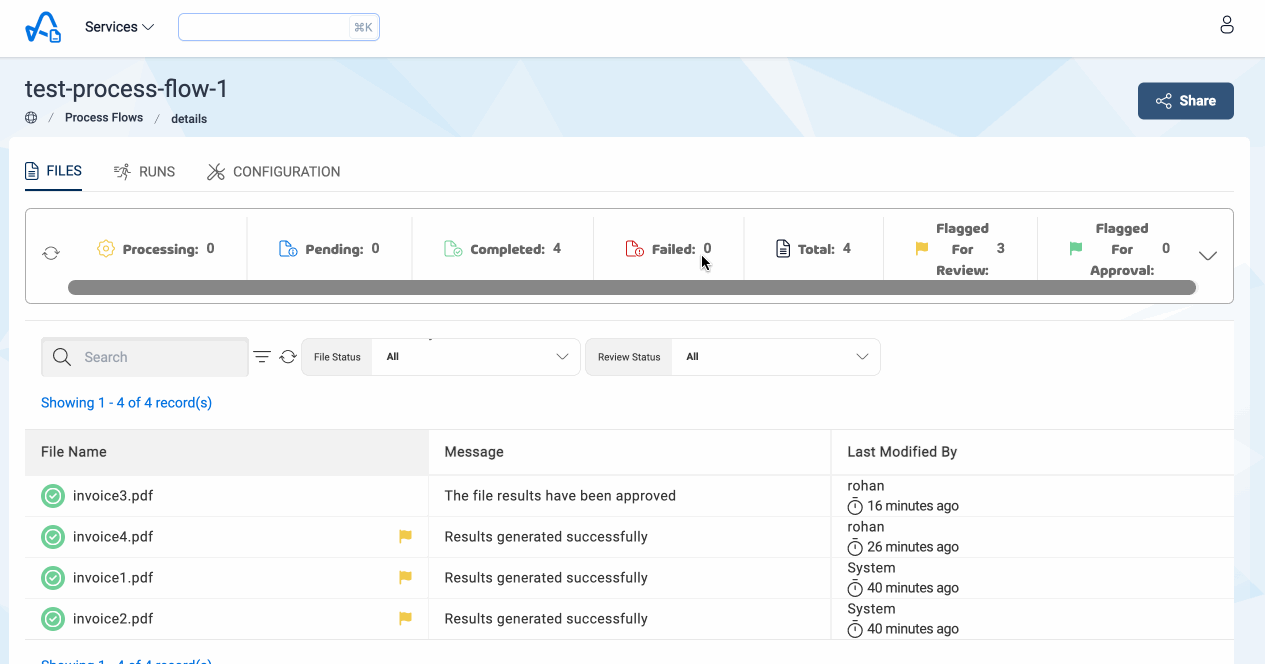
- Select the Process Flow and click on
FILEStab. Click on the accordion to expand more details. - Click on the
Sync Filesbutton and then onConfirmto start the file syncing process.
Below image shows how to sync back the files in the Document Store to Process Flow.
How to share a Process Flow?
Owners of the Process Flow can share it with other users in the IDP. There are two types of access control for Process Flows, Owner Access and Reviewer Access. Owners of the Process Flow can do any operation on those Process Flow(run, edit, modify custom script etc.) wheres as the reviewers can only view the Process Flows.
To share a Process Flow with other users in the IDP, follow these steps:
- Select the Process Flow that you want to share and click on
Sharebutton in the top right corner. - Click on the
+(Provide Access) button. - Select the username of the user to whom you want to share the Process Flow with and also select the access type(Owner or Reviewer) and click submit button.
How to delete a Process Flow?
Users can delete a Process Flow when there is no runs currently happening on that Process Flow. Follow below steps to delete a Process Flow:
- Select the Process Flow that you want to delete and go to
CONFIGURATIONtab. - Click on the delete icon in the Metadata section and click on the Delete Process Flow button to confirm the deletion.
Below image shows how to delete a Process Flow
Deleting the Process Flow will only delete all the Process Flow related metadata from IDP. The corresponding datasets that are created as part of Process Flow will still exists in Amorphic.